
Excertos do catálogo

PowerLine™ & Seychelle™ TREATMENT TABLE ASSEMBLY & OPERATION INSTRUCTIONS Seychelle™ with Flat Top and Shelf Seychelle™ with Backrest Top and Shelf PowerLine™ with Flat Top PowerLine™ with Backrest Top PowerLine™ with Flat Top and Shelf PowerLine™ with Backrest Top and Shelf
Abrir o catálogo na página 1
Treatment Table H-Brace and Shelf SUPPLIED PARTS: LEG HARDWARE TOOLS 1 - Large Allen Wrench 1 - Small Allen Wrench 1 - Open End Wrench STRETCHER BEAM 8 -Flat Washers 4 -Disc Washers (dull finish) 4 - Long Large Bolts 4 - Lock Nuts 1 - Wood Stretcher Beam 2 - Short Bolts 2 - Barrel Nuts SHELF (OPTIONAL) 8 - Velcro® Strips for Shelf Stretcher Beam Removable Shelf Assembly Instructions 1. Remove the table from the box and place it down on the floor with the top down. Remove all hardware and the stretcher beam. 2. Unfold the legs to a vertical position and remove any protective wrappings. (Fig....
Abrir o catálogo na página 2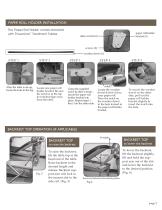
PAPER ROLL HOLDER INSTALLATION The Paper Roll Holder comes standard with PowerLine™ Treatment Tables. paper roll holder bracket (2) Supplied Parts screws (2) wooden dowel (1) notch After the table is set-up, locate the hole in the leg. rounded edge Locate one paper roll holder bracket. Be sure the notch is at the top & rounded edge away from the table. Using the supplied screw & allen wrench, secure the paper roll holder bracket into place. Repeat steps 1 thru 3 on the other side. notch Locate the wooden dowel & feed it thru your paper roll. Place the notch on the wooden dowel in the hole...
Abrir o catálogo na página 3
Treatment Table Optional Accessories & Table Care Attaching the Table Extender: 1. The table is equipped with two outlet holes at either end to allow the use of a Table Extender. Unfold the aluminum dowels of the extender and insert them into the outlet holes at either end of the table. (Fig. 8 & Fig. 9) CAUTION: DO NOT sit, lean or use the Extender or Paper Roll Holder in mounting or dismounting from the table. Fig. 8 Attaching & Using the QuickLock™ Face Rest: 1. Insert the ends of the Face Rest frame into the outlet holes at either end of the table. (Fig. 10) 2. Starting with the face...
Abrir o catálogo na página 4Todos os catálogos e folhetos técnicos da Oakworks
-
 PG Series & Ultrasound Series
40 Páginas
-
 Clinician Adjustable
8 Páginas
-
 Celesta® and Clodagh Gemini
28 Páginas
-
 Antigua
28 Páginas
-
 OAKWORKS
32 Páginas
-
 PORTAL LIGHT
4 Páginas
-
 New Performalift
7 Páginas
-
 Clodagh Trolley
1 Páginas
-
 libra
libra2 Páginas
-
 Masters
15 Páginas
-
 Spa Catalog
44 Páginas
-
 AURORA™
32 Páginas
-
 PROLUXE™
32 Páginas
-
 Symphony
1 Páginas
-
 EQUINOX
1 Páginas
-
 Trolley
8 Páginas
-
 Physical Therapy
32 Páginas
-
 Exam Tables
20 Páginas
-
 Powerline
2 Páginas
-
 Catalog:oak massage
24 Páginas

Catálogos arquivados
-
 100 Series Procedure Chair
20 Páginas
-
 Clodagh Libra
24 Páginas
-
 Portal Light Owner
4 Páginas
-
 100 Series Procedure Chair_2012
3 Páginas
-
 Powerline Treatment Table
4 Páginas
-
 Portal Pro 3 Owners
4 Páginas
-
 Mattes Chair Flyer
1 Páginas
-
 Portal Light Massage Chair Flyer
2 Páginas
-
 KeLa 30 inch Massage Table Package
2 Páginas
-
 One by OAKWORKS
2 Páginas
-
 Alliance Wood Massage
2 Páginas
-
 ProLuxe Convertible
20 Páginas
-
 Clodagh Leo
20 Páginas
-
 Celesta/Clodagh Gemini
24 Páginas
-
 Nova Portable Massage
2 Páginas
-
 Advanta
2 Páginas


