

- Products
- Catalogs
- News & Trends
- Exhibitions
WMF 800

WMF 800
The WMF 800 coffee machine is designed to offer professional coffee-making capabilities in a compact form. It features the WMF Touch Concept for easy operation, provides seven coffee specialties, and includes a 24-month premium guarantee.
The machine comprises control buttons, a removable drip tray, water tank, adjustable spout with milk foamer, coffee grounds container, beverage buttons, hot water spout, display, and bean hopper.
Instructions include unpacking, setting up on a stable surface, connecting the power cord, testing water hardness, preparing the water tank, and filling the bean hopper with fresh beans.
During start-up, users set language, time, date, water hardness, and water filter usage. The machine performs a coffee system rinse and a brewing test.
The WMF 800 prepares coffee beverages, milk, milk foam, and hot water. The All-in-One spout adjusts for different cup sizes, and the machine features an automatic rinse cycle.
Regular care includes warm-up rinses, milk system rinsing, cleaning programs, water filter replacement, and descaling. Manual cleaning of the milk system and brewing unit is necessary.
Users must follow safety instructions to avoid hazards such as electrocution and burns, ensuring correct use and adherence to warranty guidelines.
The manual provides technical specifications and information on optional accessories and spare parts.
The machine allows preparation of beverages like cappuccino, espresso, and latte macchiato. Users can adjust coffee strength and use a manual insert for different coffee types.
Milk is dispensed when the spout is in the top position, while milk foam is dispensed when the spout is not at the top.
Hot water can be dispensed for tea or other uses, with options for specific quantities or continuous flow.
The machine features simple control buttons and a lighting system for navigation. It requires a rinse cycle upon startup and shutdown.
Users can adjust cup size, beverage settings, and sequence of dispensing milk and coffee. Basic settings include language, time, date, water hardness, and brewing temperature.
Regular cleaning of the brewing unit and milk system is necessary. The document references specific pages for detailed cleaning instructions.
Users can set automatic switch-on and off times, adjust keypad beep, and brewing temperature.
Users can reset settings to factory defaults, adjust display contrast, and view beverage counters.
The grinding degree can be adjusted using a multitool, with changes evaluated after dispensing the second cup.
Regular care is crucial for optimal performance. The machine notifies users when rinsing, cleaning, or descaling is required.
Regular care program execution is essential, and failure to clean or descale can void warranty claims.
Descaling takes approximately 37 minutes and should not be interrupted. It involves using a descaling agent and thorough rinsing.
The milk system should be cleaned weekly, involving disassembly, soaking, and rinsing.
Key procedures include inserting the milk foamer, adjusting the spout, and cleaning components like the brewing unit and water tank.
Cleaning involves emptying and rinsing the coffee grounds container, water tank, and drip tray. Descaling is recommended to remove calcium deposits.
For optimal coffee quality, use thick porcelain espresso cups, pre-warm cups, and adjust the grinding degree based on coffee type.
The document outlines operating messages and error handling procedures, with solutions for common issues.
The machine can prepare various coffee specialties at the touch of a button, ensuring quality.
The document provides comprehensive guidance on the operation, maintenance, and troubleshooting of the coffee machine.
The WMF 800 operates with a power rating of 1.7-2.3 kW, has a daily capacity of 35 cups, and features a high-performance pump with 15 bar pressure.
Regular maintenance includes checking the milk hose, using the correct milk nozzle, and greasing O-rings.
Users should read the manual thoroughly to ensure safe operation and perform maintenance only by the WMF Service Center.
The WMF 800 comes with a two-year warranty, with service limited to Germany and Austria.
For transport, the machine should be emptied and packed in its original packaging, with disposal complying with the WEEE/EU directive.
The machine comes with accessories like a milk system cleaner and cleaning tools, with optional accessories available.
Catalog excerpts

Introduction and General Information Parts of the machine Control buttons: C button Care button P button, Confirm Plus button, Aroma button Minus button, Aroma button Removable drip tray with drip tray grid Water tank Height-adjustable AllinOne spout with integral milk foamer Coffee grounds container Beverage buttons Hot water spout Hot water button Manual insert Display Heated cup storage Bean hopper on/off-button Timer Milk hose Refrigerated milk tank (optional) Brewer lid
Open the catalog to page 2
The power of innovation, the quality that WMF is known for, and years of experience have made WMF professional coffee machines so successful. Despite its compact size, the WMF 800 has all the important components of professional WMF coffee machines – the basis for perfect coffee enjoyment. The WMF 800 has an appealing, clean design. Its simple operation concept is an indication of technical superiority. This is what makes the WMF 800 so remarkable: WMF Touch C • oncept: A simple touch is enough • Seven coffee specialities, warm milk, and water for tea • Just one spout for everything: WMF All-In-One...
Open the catalog to page 3
4 Introduction Introduction and General Information 2 Parts of the machine 2 Before you begin 6 User manual signs and symbols 6 Start-up program 8 Unpacking and setting up 8 Test the water hardness 8 Prepare the water tank 8 Insert the WMF water filter 8 Fill the water tank 9 Install the milk hose 10 Connect the milk hose to the milk 10 Fill the coffee bean hopper 11 Start-up program 12 Basic settings 12 Operation 16 Preparation of coffee beverages 16 Beverage button overview 16 Example: Prepare a cup of Cappuccino 17 Increase coffee strength for the next beverage 18 Coffee preparation using...
Open the catalog to page 4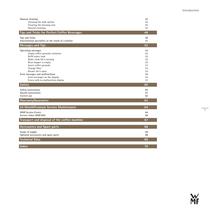
5 Introduction Manual cleaning 43 Cleaning the milk system 43 Cleaning the brewing unit 45 General cleaning 47 Tips and Tricks for Perfect Coffee Beverages 48 Tips and tricks 48 International specialties at the touch of a button 51 Messages and Tips 52 Operating messages 52 Empty coffee grounds container 52 Refill water tank 52 Water tank lid is missing 52 Bean hopper is empty 53 Insert coffee grounds 53 Change filter 53 Brewer lid is open 53 Error messages and malfunctions 55 Error messages on the display 55 Errors with no malfunction display 57 Safety 60 Safety instructions 60 Hazard instructions...
Open the catalog to page 5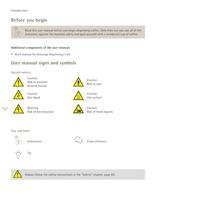
6 Introduction Before you begin Read this user manual before you begin dispensing coffee. Only then can you use all of the functions, operate the machine safely and spoil yourself with a wonderful cup of coffee. Additional components of the user manual: Brief manual f • or beverage dispensing / care User manual signs and symbols Hazard notices Caution Risk to machine General hazard Caution Risk to user Caution Hot liquid Caution Hot surface Warning Risk of electrocution Caution Risk of hand injuries Tips and hints Instruction Cross reference Tip Always follow the safety instructions in the “Safety”...
Open the catalog to page 6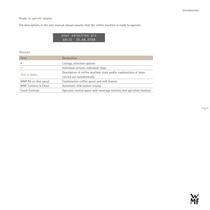
7 Introduction Ready to operate display The descriptions in the user manual always assume that the coffee machine is ready to operate. Glossary Term Declaration • Listings, selection options >> Individual actions, individual steps Text in italics Description of coffee machine state and/or explanations of steps carried out automatically WMF AllinOne spout Combination coffee spout and milk foamer WMF Connect & Clean Automatic milk system rinsing Touch Concept Operator control panel with beverage buttons and operation buttons your selection pls 08:15 25.08.2008
Open the catalog to page 7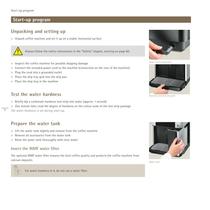
8 Start-up program Start-up program Unpacking and setting up >> Unpack coffee machine and set it up on a stable, horizontal surface Always follow the safety instructions in the “Safety” chapter, starting on page 60. >> Inspect the coffee machine for possible shipping damage >> Connect the included power cord to the machine (connection on the rear of the machine) >> Plug the cord into a grounded outlet >> Place the drip tray grid into the drip pan >> Place the drip tray in the machine Test the water hardness >> Briefly dip a carbonate hardness test strip into water (approx. 1 second) >> One minute...
Open the catalog to page 8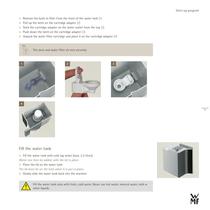
9 Start-up program Remove the built-in filter f >> rom the front of the water tank [1] >> Pull up the latch on the cartridge adapter [2] >> Stick the cartridge adapter on the water outlet from the top [3] >> Push down the latch on the cartridge adapter [3] >> Unpack the water filter cartridge and place it on the cartridge adapter [4] The sieve and water filter sit very securely. Fill the water tank >> Fill the water tank with cold tap water (max. 2.2 litres) Water can then be added, with the lid in place. >> Place the lid on the water tank The lid must be on the tank when it is put in place....
Open the catalog to page 9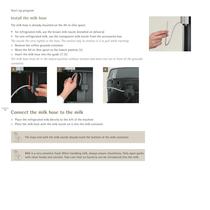
10 Start-up program Install the milk hose The milk hose is already mounted on the AllinOne spout. for refrigerated milk, use the brown milk nozzle ( • installed on delivery) • for non-refrigerated milk, use the transparent milk nozzle from the accessories box The nozzle fits very tightly in the hose. The easiest way to remove it is to pull while twisting. >> Remove the coffee grounds container >> Move the AllinOne spout to the lowest position [6] >> Insert the milk hose into the guide [7] [8] The milk hose must be in the lowest position without tension and must not run in front of the grounds...
Open the catalog to page 10
11 Start-up program Fill the coffee bean hopper Lift t >> he lid by the back side and remove it >> Fill with coffee beans (up to 250 g) >> Replace the lid Once roasted coffee beans have been unpacked, they lose their aromatic components within days. Therefore, only pour as many beans into the coffee bean hopper as you expect to use in the next few days; frequent topping off is better. Ensure that no foreign bodies land in the coffee bean hopper. Such foreign bodies can damage the grinders of the coffee mill. This damage is not covered under the warranty. Do not reach into the bean opening of...
Open the catalog to page 11All WMF catalogs and technical brochures
 KNOW-HOW / STYLE / ENJOYMENT
96 Pages
 DISH by WMF
96 Pages
 WMF Brochure Dining
44 Pages
 WMF Brochure Cooking
36 Pages
 WMF Brochure Preparing
32 Pages
 BESTECK flatware
56 Pages
 GESAMTPROGRAMM
268 Pages
 WMF 5000 S
2 Pages
 The new WMF 5000 S
9 Pages
 WMF 1500 S
2 Pages
 wmf main catalog
156 Pages
 Chafing Dish Induction
8 Pages
 WMF Trendcollection 2014 | 2015
29 Pages
 WMF combiNation
6 Pages
 Buffet combination
1 Page
 WMF Urban
13 Pages
 Complete Range 2013 I 2014
290 Pages
 WMF bistro!
13 Pages
 WMF Cafemat
11 Pages
 WMF combiNationF
6 Pages
 The World of WMF
110 Pages
 Chafing Dish CHANGE
2 Pages
 WMF Presto! features
2 Pages
 Auxiliary Units
8 Pages
 Cereal dispenser CHANGE
1 Page
 WMF Trendcollection 2012 | 2013
25 Pages
 WMF 1800 S
2 Pages
 WMF 1200 S
2 Pages
 WMF 2000S
2 Pages


Archived catalogs
 PRESTO
13 Pages
 BISTRO DUAL MILK
3 Pages
 WMF 1000 PRO
70 Pages
 Bistro
13 Pages
 Cafemat
11 Pages
 Prestolino
15 Pages