40083

40083
- Disconnect the transformer from the mains.
- Drain enough water to keep the spotlight dry.
- Remove the spotlight by unscrewing the recessed head screws.
- Access the AFM ring, glass pane, and silicone seal for bulb replacement.
- Reassemble and secure the spotlight back into the casing.
- Note: Spotlights over 35 watts should not be used in dry environments.
Catalog excerpts
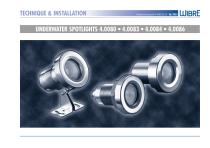
TECHNIQUE & INSTALLATION
Open the catalog to page 1
TECHNIQUE & INSTALLATION 2. General areas of application 2 1 la. Spotlight 4.0080 - construction 7 3. Mechanical installation of the spotlights 2 1 lb. Spotlight 4.0080 - installation of metal or plastic bowl 8 4. Assembly and maintenance instructions 3 11c. Spotlight 4.0080 - change of light bulb 8 5. Electrical connection to the spotlights 3 6. General replacement of light bulbs 3 12a. Spotlight 4.0083 - construction 9 7. Wear & tear parts to be regularly replaced 4 12b. Built-in casing 4.0084 - construction 10 8. Repair of defects to spotlights 4 12c. Built-in casing 4.0084 - installation...
Open the catalog to page 2
TECHNIQUE & INSTALLATION Dampness is to be avoided in spotlight casing. The seal and the flange are to be kept clean. Do not modify the spotlight or its casing on your own initiative. Use the materials and replacement parts we recommend. To avoid corrosion to the spotlight only tools made out of stainless steel may be used, such as drills and saws. Screws that get lost may only be replaced with V4A stainless steel ones. Please observe our instructions and stipulations. If you have any queries we shall be pleased to be of help to you. 5. Electrical connection to the spotlight Connecting up to...
Open the catalog to page 3
TECHNIQUE & INSTALLATION 7. Wear & tear parts to be regularly replaced The silicone casing seal should be replaced after every light bulb change. The connecting flex and the screwing seal are to be replaced every five years. Additional spare parts are available on request. 8. Repairing defects to spotlight If external damage is to be seen after unpacking the lights, which would seriously hinder integral parts of the light from functioning properly, then you should report this at once, if possible on the same day, to the shipment company and to insist on a written report being made by them on...
Open the catalog to page 4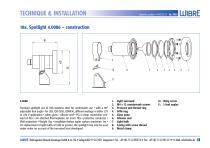
TECHNIQUE & INSTALLATION 4.0086 Fountain spotlight out of V4A stainless steel for underwater use • with a 90° adjustable foot angle • for LED, QR-CB51, QPAR16, different wattage in either 12V or 230 V application • safety glass • silicone seal • PG11-crimp connection screwed on flex • 3m attached thermoplastic 3x1.5mm2 flex • protective conductor • IP68 protection • Weight 1kg • installation below water surface maximum 3m • On replacement of light bulbs of 35W or greater, the spotlight may only be used under water on account of the increased heat developed. Light surround M4 x 12 countersunk...
Open the catalog to page 5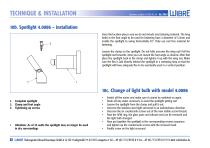
TECHNIQUE & INSTALLATION 10b. Spotlight 4.0086 – installation Since the location places vary we do not include any fastening material. The long holes in the foot angle to be used for fastening have a diameter of 5.5mm and enable the spotlight to swing horizontally 45°. Only use rust free material for fastening. Loosen the clamp on the spotlight. Do not fully unscrew the wing nut! Pull the spotlight out forwards. Now you can mount the foot angle as desired. After that place the spotlight back in the clamp and tighten it up with the wing nut. Make sure the flex is laid directly behind the spotlight...
Open the catalog to page 6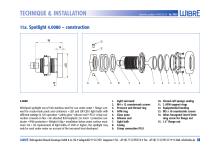
TECHNIQUE & INSTALLATION Whirlpool spotlight out of V4A stainless steel for use under water • flange sere- 3. wed for ready-made pools and containers • LED and QR-CB51 light bulbs with 4. different wattage in 12V operation • safety glass • silicone seal • PG11-crimp con- 5. nection screwed on flex • 3m attached thermoplastic 2x1.5mm2 • protective con- 6. ductor • IP68 protection • Weight 0.9kg • installation below water surface maxi- 7. mum 3m • On replacement of light bulbs of 35W or higher, the spotlight may 8. only be used under water on account of the increased heat developed. 9. Light surround...
Open the catalog to page 7
TECHNIQUE & INSTALLATION 11b. Spotlight 4.0080 – installation of metal or plastic bowl Cut a 50mm hole in the side of the pool wall. Remove the flange nut from the spotlight. Mount the spotlight with sealing in to the pool, or container, in the sequence indicated on the diagram. Now screw up the flange nut and tighten it with the adjusting screw. Finally connect the equipotential bonding. 11c. Change of light bulb with model 4.0080 • Complete spotlight Closed-cell sponge sealing Side of pool 2 AFM support rings 1.5” flange nut Equipotential bonding M5 x 10 countersink screws Inbus hexagonal insert...
Open the catalog to page 8
TECHNIQUE & INSTALLATION 4.0083 Whirlpool spotlight out of V4A stainless steel for underwater use • Mounted in connection with a 400.84 built-in casing in a concrete pool • for LED, QR-CB51, different wattage in 12V operation • safety glass • silicone seal • PG11-crimp connection screwed on flex • 3m attached thermoplastic 3x1.5mm2 flex • protective conductor • IP68 protection • Weight 0.8kg • maximum installation 3m below water surface • on replacement of light bulbs of 35W or greater, the spotlight may only be used under water on account of the increased heat developed. Light surround M4 x...
Open the catalog to page 9
TECHNIQUE & INSTALLATION 12b. Installation casing 4.0084 – construction 4.0084 Built-in casing out of V4A stainless steel • for whirlpool spotlight 4.0083 • suitable to be built into concrete pools and walls • stainless adaptor for wall thickness compensation • 1.5m flex protection tube and supports • supported with sealed PG11-crimp connection screwed on flex M6 x 30 countersink screws Adaptor ring PVC sealing Built-in casing Connection to equipotential bonding 6. Connection supports
Open the catalog to page 10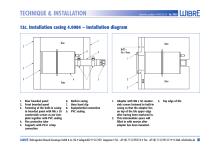
TECHNIQUE & INSTALLATION 12c. Installation casing 4.0084 – installation diagram 1. Rear boarded panel 2. Front boarded panel 3. Fastening of the built-in casing to boarded panel with M6 x 30 countersink screws as per template together with PVC sealing 4. Flex protective tube 5. Supports with PG11 crimp connection Built-in casing Hose band clip Equipotential connection PVC sealing Adaptor with M6 x 30 countersink screws fastened to built-in casing so that the adaptor lies on top of the tile upper edge after having been mortared in. 2. This intermediate space will filled in with mortar after adaptor...
Open the catalog to page 11All WIBRE Elektrogeräte Edmund Breuninger catalogs and technical brochures


Archived catalogs
 Outdoor and Underwater lighting
220 Pages
- Light fixture
- Industrial LED light
- Metal light fixture
- Commercial light fixture
- Contemporary light fixture
- Industrial LED spotlight
- Recessed light fixture
- Linear light fixture
- Metal spotlight
- Surface-mounted light fixture
- Commercial spotlight
- Round spotlight
- Outdoor light fixture
- Round light fixture
- Plastic light fixture
- Home light fixture
- Outdoor projector
- LED floodlight
- Surface mounted spotlight
- Commercial floodlight