- Catalogs
- Vitrum Design
- Home Master Remote Handset
Home Master Remote Handset

Home Master Remote Handset
The Home Master remote handset is a portable control unit for managing Z-Wave systems, including network creation, device association, and scenario creation. The front panel features function keys for operations like on/off and dimmer control, with LED indicators for status feedback. The rear panel contains programming keys for installation and maintenance tasks.
Programming Functions
Programming functions include resetting the handset to factory settings, adding or removing devices from the network, and creating associations between devices. The reset function clears all stored data, useful before setting up a new network. Inclusion and removal of devices require specific key presses and proximity to the device.
Associations
Devices can be associated with each other or with the remote handset to create control groups or scenarios. The process involves using the "Asc" key and proximity to the devices. Disassociation follows a similar process using the "Dis" key.
Warranty
Think Simple offers to replace or repair defective products, excluding batteries, under current legislation. The warranty is void in cases of misuse or tampering.
Compliance
The remote handset complies with European Telecommunications Equipment Directives. Think Simple reserves the right to modify products without notice.
Maintenance
Clean the product with a soft, dry cloth. Dispose of it at authorized recycling centers at the end of its life.
Compatibility
The product is Z-Wave compliant and compatible with certified Z-Wave products from other manufacturers.
Catalog excerpts

EN H O M E C O N T R O L Home Master Remote Handset INSTRUCTIONS FOR USE
Open the catalog to page 1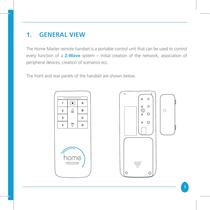
1. GENERAL VIEW The Home Master remote handset is a portable control unit that can be used to control every function of a Z-Wave system – initial creation of the network, association of peripheral devices, creation of scenarios ecc. The front and rear panels of the handset are shown below. 1 A 2 B 3 C 4 D 3
Open the catalog to page 3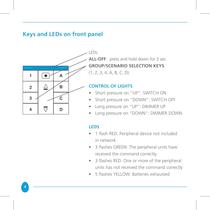
Keys and LEDs on front panel 1 A 2 B 3 C 4 D LEDs ALL-OFF: press and hold down for 2 sec GROUP/SCENARIO SELECTION KEYS (1, 2, 3, 4, A, B, C, D) CONTROL OF LIGHTS • Short pressure on “UP”: SWITCH ON • Short pressure on “DOWN”: SWITCH OFF • Long pressure on “UP”: DIMMER UP • Long pressure on “DOWN”: DIMMER DOWN LEDS • 1 flash RED: Peripheral device not included in network. • 3 flashes GREEN: The peripheral units have received the command correctly. • 3 flashes RED: One or more of the peripheral units has not received the command correctly • 5 flashes YELLOW: Batteries exhausted 4
Open the catalog to page 4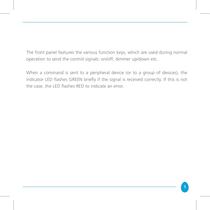
The front panel features the various function keys, which are used during normal operation to send the control signals: on/off, dimmer up/down etc. When a command is sent to a peripheral device (or to a group of devices), the indicator LED flashes GREEN briefly if the signal is received correctly. If this is not the case, the LED flashes RED to indicate an error. 5
Open the catalog to page 5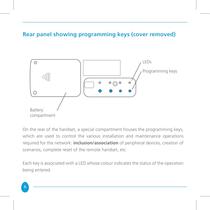
Rear panel showing programming keys (cover removed) LEDs Programming keys Battery compartment On the rear of the handset, a special compartment houses the programming keys, which are used to control the various installation and maintenance operations required for the network: inclusion/association of peripheral devices, creation of scenarios, complete reset of the remote handset, etc. Each key is associated with a LED whose colour indicates the status of the operation being entered. 6
Open the catalog to page 6
2. Programming Functions Programming functions are those used to map the network (inclusion/association of peripheral devices), to set up the desired associations or to reset the remote handset to its original factory settings. The programming functions are described in detail below. 7
Open the catalog to page 7
2.1 Resetting the Remote Handset The reset function restores the remote handset to the original factory settings. This cancels ALL the data stored in the remote handset’s memory, such as associations between the handset and the peripheral devices, the Z-Wave network in use, etc. This procedure is useful in a number of situations, especially before creating a new network: in this case, if the remote handset has previously been utilized with other Z-Wave networks, it is important to perform a total reset before creating a new network. This procedure is designed to prevent any possibility of malfunctions....
Open the catalog to page 8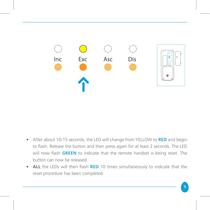
• After about 10-15 seconds, the LED will change from YELLOW to RED and begin to flash. Release the button and then press again for at least 2 seconds. The LED will now flash GREEN to indicate that the remote handset is being reset. The button can now be released. • ALL the LEDs will then flash RED 10 times simultaneously to indicate that the reset procedure has been completed. 9
Open the catalog to page 9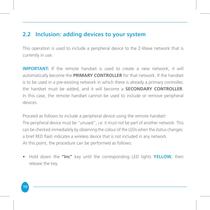
2.2 Inclusion: adding devices to your system This operation is used to include a peripheral device to the Z-Wave network that is currently in use. IMPORTANT: If the remote handset is used to create a new network, it will automatically become the PRIMARY CONTROLLER for that network. If the handset is to be used in a pre-existing network in which there is already a primary controller, the handset must be added, and it will become a SECONDARY CONTROLLER. In this case, the remote handset cannot be used to include or remove peripheral devices. Proceed as follows to include a peripheral device using...
Open the catalog to page 10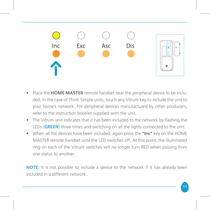
• Place the HOME MASTER remote handset near the peripheral device to be included; in the case of Think Simple units, touch any Vitrum key to include the unit to your home’s network. For peripheral devices manufactured by other producers, refer to the instruction booklet supplied with the unit. • The Vitrum unit indicates that it has been included to the network by flashing the LEDs (green) three times and switching on all the lights connected to the unit. • When all the devices have been included, again press the “Inc” key on the HOME MASTER remote handset until the LED switches off. At this...
Open the catalog to page 11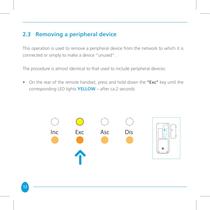
2.3 Removing a peripheral device This operation is used to remove a peripheral device from the network to which it is connected or simply to make a device “unused”. The procedure is almost identical to that used to include peripheral devices: • On the rear of the remote handset, press and hold down the “Exc” key until the corresponding LED lights YELLOW – after ca.2 seconds 12
Open the catalog to page 12
If using the handset with products from the Vitrum range, press and hold down either the leftmost button on the Vitrum multi-channel unit (Vitrum EU), or the topmost button on the left (Vitrum BS) or, for single-channel units, the central key. Hold the button down for at least 8 seconds. For products supplied by other manufacturers, refer to the instruction booklet supplied with the device. If the procedure is completed correctly, Vitrum blinks red tree times and the remote handset automatically exits “removal” mode. To exit manually, simply press and hold down the “Exc” button until the LED...
Open the catalog to page 13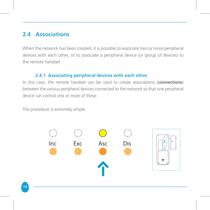
2.4 Associations When the network has been created, it is possible to associate two or more peripheral devices with each other, or to associate a peripheral device (or group of devices) to the remote handset. 2.4.1 Associating peripheral devices with each other In this case, the remote handset can be used to create associations (connections) between the various peripheral devices connected to the network so that one peripheral device can control one or more of these. The procedure is extremely simple: 14
Open the catalog to page 14All Vitrum Design catalogs and technical brochures
 Vitrum design
72 Pages
 Catalogue 2014
52 Pages
Archived catalogs
 Vitrum MAster On-Off Wireless
20 Pages
 Vitrum II DIN On-Off Wireless
11 Pages
 Vitrum Scene Control Panel
20 Pages
 Roller Blind
28 Pages
 Warnings
4 Pages
 Vitrum Dimmer Classic
24 Pages
 Vitrum Dimmer Wireless
32 Pages
 Vitrum Satellite Wireless
28 Pages
 Vitrum On-Off Classic
16 Pages
 Vitrum On-Off Wireless
24 Pages