WPC Installation (pdf generated on 6_29_2021)
1 /7Pages

WPC Installation (pdf generated on 6_29_2021)
1 /7Pages
Catalog excerpts
Installation RESILIENT INSTALLATION GUIDELINES FOR WPC PRODUCTS I. GENERAL INFORMATION These installation guidelines apply to the WPC products only. All instructions and recommendations should be followed for a satisfactory installation. Acclimation of material prior to installation is not required; however, the floor covering should be installed in a climate controlled environment with an ambient temperature range between 55°F - 85°F (13°C-29°C) or average temperature of 70°F (21.1°C). For installations involving 3 season scenarios, meaning, the dwelling or installed space is without climate control for extended periods during certain seasons of the year, the post installation temperature range allowed is an ambient room temperature between 32°F and 100°F (0°C- 37.7°C). This allowance is for floating floors only and does not apply to glue-down installations. Avoid exposure to direct sunlight for prolonged periods, doing so may result in discoloration. During peak sunlight hours, the use of drapes or blinds is recommended. Excess temperature due to direct sunlight can result in thermal expansion and UV fading. Install product after all other trades have completed work that could damage the flooring. If cabinets are to be installed on top of the flooring (including islands), that area of material must be fully adhered to the subfloor (including an additional 2’ beyond the cabinets and islands). To minimize shade variation, mix and install flooring from several cartons. Inspect all flooring for damage before installing. If you have any concerns about the product fit or finish, call Shaw Information Services at 1-800-441-7429. Claims will not be accepted for flooring that has been cut to size and/or installed. Use cementitious patching and leveling compounds that meet or exceed maximum moisture level and pH requirements. Use of gypsum-based patching and/or leveling compounds which contain Portland or high alumina cement and meet or exceed the compressive strength of 3,000 psi are acceptable. Installation Methods: Floating (on, above or below grade) / Glue Down (on, above or below grade) Required perimeter expansion spacing for Floating or Glue Down installation is as follows: For areas less than 2500 sq. ft. use 1/4" gap For areas larger than 2500 sq. ft. use 1/2" gap. WPC flooring is waterproof and reliably secures the flooring panels on all four sides. However, excessive moisture in the subfloor could promote mold, mildew, and other moisture related issues like the trapping of moisture emissions under the flooring, which may contribute to an unhealthy indoor environment. Additional layer of 6 mil poly film or equal vapor retarder with a perm rating of .1 or less may be used as an additional layer of protection. A second underlayment is allowed under any currently sold resilient product with attached underlayment in a residential application. If installed over a second underlayment, this underlayment cannot be greater than 3 mm thick. IIC (ASTM E49209) and STC (ASTM E90-09) lab testing on certain resilient products tested with and without a second layer of underlayment, to date, does not indicate that a second underlayment will provide additional acoustic benefit. Crumb rubber underlayments are not an acceptable option for use with resilient floor coverings due to performance issues resulting from chemical incompatibilities. II. SUBFLOOR INFORMATION All subfloors must be clean, flat, dry, and structurally sound. The correct preparation of the subfloor is a major part of a successful installation. Subfloor must be flat: 3/16" in 10' or 1/8" in 6'. www.COREtecFloors.com For reference purposes only if prin
Open the catalog to page 1
Installation A. WOOD SUBFLOORS Do not install material over wood subfloors that lay directly on concrete or over dimensional lumber or plywood used over concrete. Refer to ASTM F1482 for panel underlayment recommendations. 1. Do not apply sheet plastic over wood subfloors. 2. Basements and crawl spaces must be dry. Use of a 6 mil black polyethylene is required to cover 100% of the crawl space earth. Crawl space clearance from ground to underside of joist is to be no less than 18” and perimeter vent spacing should be equal to 1.5% of the total square footage of the crawl space area to provide...
Open the catalog to page 2
Installation The final responsibility for determining if the concrete is dry enough for installation of the flooring lies with the floor covering installer. NOTE: IT MAY NOT BE THE FLOOR COVERING INSTALLER'S RESPONSIBILITY TO CONDUCT THESE TESTS. IT IS, HOWEVER, THE FLOOR COVERING INSTALLER'S RESPONSIBILITY TO MAKE SURE THESE TESTS HAVE BEEN CONDUCTED, AND THAT THE RESULTS ARE ACCEPTABLE PRIOR TO INSTALLING THE FLOOR COVERING. WHEN MOISTURE TESTS ARE CONDUCTED, IT INDICATES THE CONDITIONS ONLY AT THE TIME OF THE TEST. LIGHTWEIGHT CONCRETE All recommendations and guarantees as to the suitability...
Open the catalog to page 3
Installation C. EXISTING FLOOR COVERINGS Flooring can be installed over most existing hard-surface floor coverings, provided that the existing floor surface is fully adhered, clean, flat, dry, structurally sound and free of deflection. • Existing sheet vinyl floors should not be heavily cushioned and not exceed more than one layer in thickness. Soft underlayment and soft substrates will compromise the product's locking ability as well as diminish its indentation resistance. • Installation is NOT allowed over any type of carpet. • Do NOT install over wood floors adhered to concrete. • This product...
Open the catalog to page 4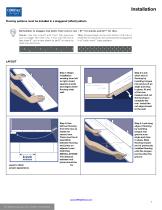
Installation Flooring patterns must be installed in a staggered (offset) pattern. Step 1: Begin installation working from left to right. Insert spacers at ends and edges where flooring meet wall. Step 2: Lock short end of flooring by inserting tongue into groove at an angle and drop in place. At end of the row, measure and cut the flooring to complete the row. Install the cut edge closest to the wall. Step 3: Use leftover flooring from first row as starter for second row. There must be at least 20cm between flooring end joints on adjacent rows. FOR TILE INSTALLATIONS: The distance between end...
Open the catalog to page 5All US FLOOR catalogs and technical brochures
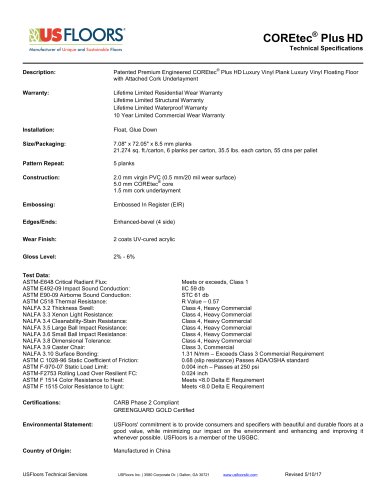 COREtec ® Plus HD
1 Page
 Ecofloors Natural Cork
7 Pages
 Bamboo with HDF Core
1 Page
 Bamboo with Endura AR™
1 Page
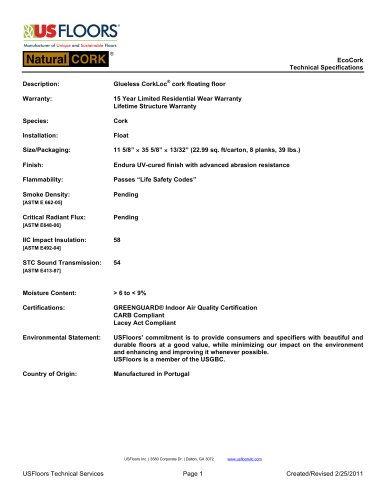 EcoCork specifications
1 Page
 Earth and classic
1 Page
 Almada
20 Pages
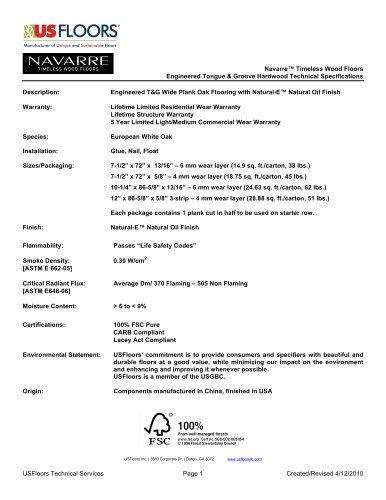 Navarre specifications
1 Page
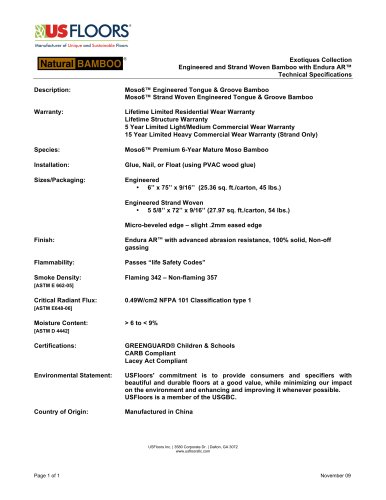 Exotiques
1 Page
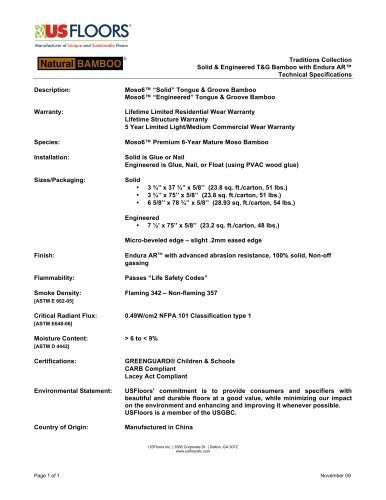 Traditions
1 Page
 Wall tile
1 Page
 Parquet tile
1 Page
 New Dimensions
1 Page
 Vinacork
2 Pages
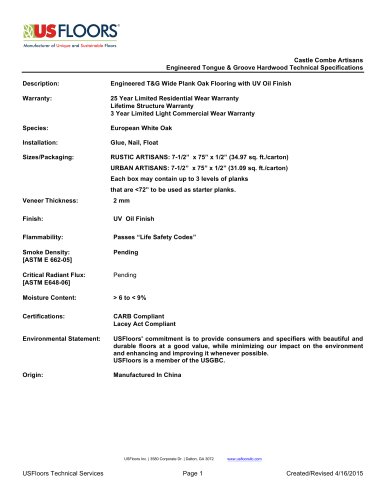
 Castle Comb
18 Pages
 Carriage House
2 Pages
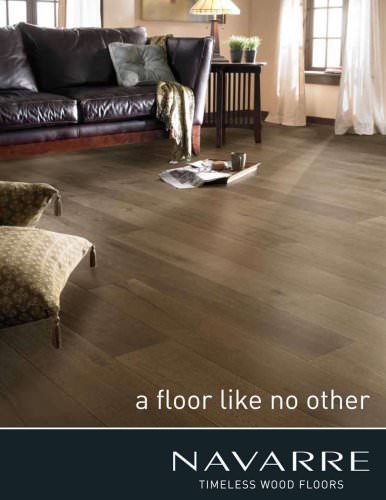 Navarre
8 Pages
 Natural Bamboo
7 Pages
 EcoCork
2 Pages
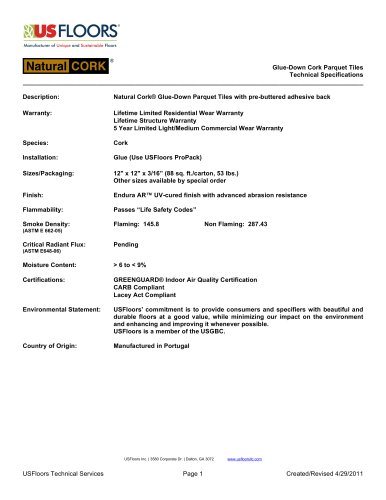
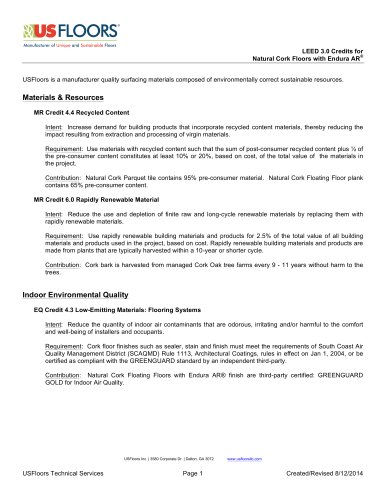
 NaturalCORK
7 Pages


- Industrial wood floor
- Glued wood floor
- Engineered parquet flooring
- Indoor flooring
- Tertiary flooring
- Oak parquet floor
- Floating parquet floor
- Strip parquet floor
- Vinyl floor covering
- Tile flooring
- Domestic use flooring
- Gray flooring
- Vinyl flooring
- Commercial flooring
- Commercial parquet floor
- Brown flooring
- Beige flooring
- Living room flooring
- Wood effect flooring