


- Products
- Catalogs
- News & Trends
- Exhibitions
Yokis Pro app quick guide

Yokis Pro app quick guide
To operate the "YOKIS PRO" system, an Android tablet (version 4.4 or higher) with an OTG port and a YOKEY - 5454491 with its USB Adapter - Micro USB are required. Optional accessories include the YOKISHUB – 5454495 for home control and scenario management via the YnO app.
Creating a YOKIS Pro company account is necessary for system protection and cloud backup. The setup is quick and requires an internet connection. After account creation, you can initiate your first system, which could be an individual or condominium project. Completing the system information form is crucial as it generates the System Report.
The interface involves three main steps: drawing the apartment layout and creating the Radio Bus, defining control points, and proposing scenarios to the customer. It allows duplication of systems and exporting system summaries in PDF format.
System preparation includes creating a layout of the apartment, defining rooms, and drawing them. You can add new levels such as outdoor areas and assign names and colors for easy identification.
Modules are placed on the layout in the "Modules" section, which can be done in the office to save time on-site. Dummy modules are used for initial placement, and their type and name must be defined.
Modules can be acquired automatically or manually. The automatic method involves searching for modules via the app, while the manual method requires connecting each module individually. Acquired modules are then placed on the layout.
Rooms are connected using modules, and the Radio Bus is created automatically or manually. The application optimizes the path for connecting rooms.
Control points are added and configured by selecting the type of control point and assigning functions to each button. Configurations include direct, centralized, and group controls.
The system can be transferred to the Yokis Hub or Cloud, and a PDF of the system can be printed. The YnO app provides access to the system, and maintenance can be performed as needed.
- Direct Controls: Allows programming sequences on a pushbutton for multiple modules with different final conditions. Example: "TV Night" scenario closes window shutters and sets living room dimmer to 35%. Requires Yokis Hub.
- Centralised Controls: Offers actions for all light or window shutter modules. Define actions for a pushbutton.
- Group Controls: Allows selection of a subset of modules for specific areas like kitchen or living room.
- Scenario Controls: Pushbutton reserved for launching scenarios. Scenarios are defined in "Situations".
- Define frequent situations like "Arriving home" or "TV and relax". Each situation requires a scenario and triggering events.
- Triggering events can be based on date/time, periodic schedules, sunrise/sunset, automatic module states, or transmitter events.
- Transfer configurations to Yokis Hub or Cloud for remote control.
- Provide customers with a PDF layout of module placements and configurations.
- Customers use the YnO app to access the system, requiring a Yokis account and connection to the home LAN.
- Customers can authorise installers for system maintenance by sharing "Keys" through the YnO app.
- Installers can make changes using the Yokis Pro app and update configurations to the Yokis Hub.
- Details on radio transmitters and receivers, including models and item numbers.
- Products are sold exclusively to professionals through wholesalers.
Catalog excerpts
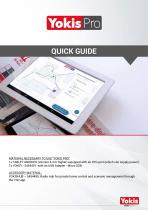
MATERIAL NECESSARY TO USE "YOKIS PRO": 1x TABLET ANDROID (Version 4.4 or higher) equipped with an OTG port (which can supply power) 1x YOKEY - 5454491: with its USB Adapter - Micro USB ACCESSORY MATERIAL: YOKISHUB - 5454495: Radio Hub for private home control and scenario management through the YnO app
Open the catalog to page 1
First connection and creation of the Company Account Creating the Company Account Creating your first system The Yokis Pro interface Preparation of the system The layout of the apartment Define the rooms Draw the rooms Define a new level The system's radio modules Place the modules on the layout Place the modules on the layout / Preparation on site Acquisition of YOKIS radio modules How to acquire the modules / the Yokis Hub automatically How to acquire the modules / the Yokis Hub manually Place the acquired modules on the layout Creation of the Radio Bus Connections between rooms Automatic creation...
Open the catalog to page 2
Configuration of the control points Add new control points to the system The different types of configuration for a transmitter channel Direct controls Centralised controls Group controls Scenario controls Transfer to remote controls Situations Transfer of the system to the customer Transfer the system to the Yokis Hub Transfer the system to the Yokis Cloud Print the PDF of the system Access the system with the YnO app Maintenance of the customer's system Overview of the Yokis Pro and YnO apps Compatible and optimised products for Yokis Pro
Open the catalog to page 3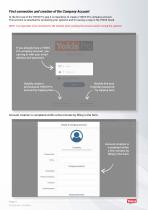
First connection and creation of the Company Account At the first use of the YOKIS Pro app it is imperative to create a YOKIS Pro company account. This account is essential for protecting your systems and for saving a copy in the YOKIS Cloud. NOTE: It is important to be connected to the Internet when creating the account and/or saving the systems. If you already have a YOKIS Pro company account, you can log in with your email address and password Quickly find your forgotten password by tapping here Quickly create a professional YOKIS Pro account by tapping here Account creation is completed within...
Open the catalog to page 4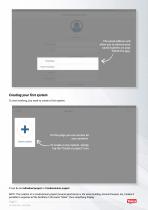
The email address will allow you to retrieve your saved systems on your YOKIS Pro app. Creating your first system To start working, you need to create a first system. On this page you can access all your systems. To create a new system, simply tap the "Create a project" icon It can be an Individual project or Condominium project. NOTE: The creation of a condominium project (several apartments in the same building, terraced houses, etc.) makes it possible to organise all the facilities in the same "folder", thus simplifying display. Page 5 DS1054-040 - LBT20452
Open the catalog to page 5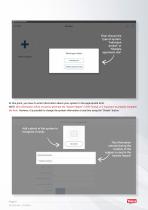
Then choose the type of system: "Individual project" or "Multiple apartment site" At this point, you have to enter information about your system in the appropriate form. NOTE: this information will be re-used to generate the "System Report" in PDF format. It is important to properly complete the form. However, it is possible to change the system information at any time using the “Details" button. Add a photo of the system to recognise it easily The information entered during the creation of the system is used in the System Report!
Open the catalog to page 6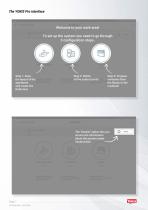
Step 2: Define all the control points Step 3: Propose scenarios from the library to the customer Step 1: Draw the layout of the apartment and create the Radio Bus The "Details" option lets you access the information about the system under construction
Open the catalog to page 7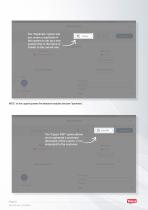
The "Duplicate" option lets you create a duplicate of the system to set up a new system that is the same or similar to the current one NOTE: In the copied system the detected modules become "dummies". The "Export PDF" option allows you to generate a summary document of the system, to be presented to the customer
Open the catalog to page 8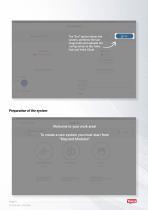
The "End" option closes the system, performs the last range tests and uploads the configuration to the Yokis Hub and Yokis Cloud Welcome to your work area! To create a new system you must start from "Map and Modules"
Open the catalog to page 9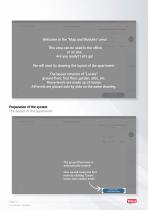
Welcome to the "Map and Modules" area! This area can be used in the office or on site. Are you ready? Let's go! We will start by drawing the layout of the apartment. The layout consists of "Levels": ground floor, first floor, garden, attic, etc. These levels are made up of rooms. All levels are placed side by side on the same drawing. Preparation of the system The layout of the apartment The ground floor level is automatically created. Now we will create the first room by clicking "Create rooms and outdoor areas".
Open the catalog to page 10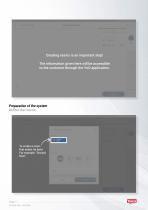
Creating rooms is an important step! The information given here will be accessible to the customer through the YnO application. Preparation of the system Define the rooms To create a room, first select its level. For example: "Ground floor"
Open the catalog to page 11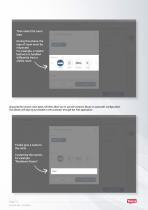
Then select the room type. During this phase, the type of room must be respected. For example, a master bedroom is handled differently from a child's room. Choosing the correct room types will then allow you to use the scenario library in automatic configuration. This library will also be accessible to the customer through the YnO application. Finally give a name to the room. Customise the names, for example: "Matthew's Room".
Open the catalog to page 12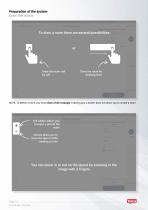
Draw the room cell Draw the room by by cell drawing lines NOTE: To define a room, you must draw a full rectangle. Drawing just a border does not allow you to create a room. The rubber allows you to erase a part of the room Arrows allow you to move the layout while creating a room
Open the catalog to page 13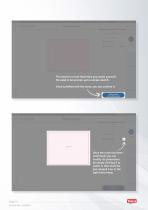
The layout is a tool that helps you orient yourself. No need to be precise, just a simple sketch. Once satisfied with the room, you can confirm it. Once the room has been confirmed, you can modify its parameters by simply clicking it to select it, then click the pen-shaped icon in the right-hand menu.
Open the catalog to page 14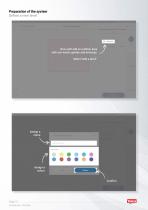
Preparation of the system Define a new level Now we'll add an outdoor area with two levels: garden and driveway. Select "Add a level". Assign a colour Confirm
Open the catalog to page 15All Urmet catalogs and technical brochures
 1722/858
2 Pages
 THERMAL SOLUTIONS
2 Pages
 GENERAL CATALOGUE 2020
308 Pages
 Google home
4 Pages
 SinthesiS2
20 Pages
 Digital Video door phone Systems
40 Pages
 Alpha
Alpha4 Pages
 Alpha, modular entry panel
20 Pages
 Yokis Yno app brochure
16 Pages
 Yokis Smart home catalogue
76 Pages
 CallMe brochure - consumer
2 Pages
 General catalogue
196 Pages
 SINTHESI S2
20 Pages


Archived catalogs
 Cctv catalogue
80 Pages
 SINTHESI STEEL
24 Pages
- Door intercom
- Surface-mounted detector
- Security camera
- White detector
- Commercial detector
- Ventilation controller
- Wall-mounted ventilation controller
- Surface-mounted security camera
- Metal door intercom
- IP security camera
- Infrared detector
- Video intercom
- Industrial motion detector
- White door intercom
- Dome security camera
- Wall-mounted detector
- Door intercom with screen
- Outdoor detector
- Interior digital door viewer
- IP door intercom