Direct Cooling Type TCDD
1 /12Pages

Direct Cooling Type TCDD
1 /12Pages
Catalog excerpts
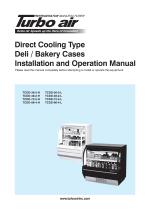
Turbo Air Speeds up the Pace of Innovation Direct Cooling Type Deli / Bakery Cases Installation and Operation Manual Please read this manual completely before attempting to install or operate this equipment.
Open the catalog to page 1
Damage inspection Power switch Light switch Temperature control Condenser coil
Open the catalog to page 2
INTRODUCTION This owner’s manual has important information. Please read the entire manual before installing your new Turbo Air Open Display Merchandiser. For specific questions not answered on this manual, please call: CUSTOMER SERVICE DEPARTMENT TURBO AIR 4184 E. Conant St. Long Beach, CA 90808 1-800-381-7770 Please write down the model and serial number of your merchandiser for future references: MODEL NUMBER SERIAL NUMBER WARNING Keep this manual in a safe place for your reference. Failure to read this manual in its entirety can result in misuse of the equipment, which may cause personal injury...
Open the catalog to page 3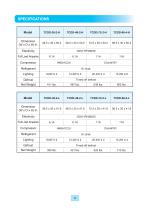
Electricity Full Load Amperes Refrigerant Lighting Electricity Full Load Amperes Refrigerant Lighting
Open the catalog to page 4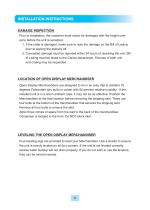
INSTALLATION INSTRUCTIONS DAMAGE INSPECTION Prior to installation, the customer must check for damages with the freight company before the unit is accepted. 1. If the crate is damaged, make sure to note the damage on the Bill of Lading prior to signing the delivery off. 2. Concealed damage must be reported within 24 hours of receiving the unit. Bill of Lading must be faxed to the Claims department. Pictures of both unit and crating may be requested. LOCATION OF OPEN DISPLAY MERCHANDISER Open Display Merchandisers are designed to be in an area that is ambient 75 degrees Fahrenheit (dry bulb) or...
Open the catalog to page 5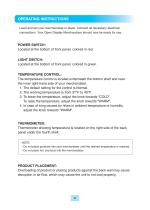
OPERATING INSTRUCTIONS Level and set your merchandiser in place. Connect all necessary electrical connections. Your Open Display Merchandiser should now be ready for use. POWER SWITCH: Located at the bottom of front panel, colored in red. LIGHT SWITCH: Located at the bottom of front panel, colored in green. TEMPERATURE CONTROL: The temperature control is located underneath the bottom shelf and near the inner right-hand side of your merchandiser. 1. The default setting for the control is Normal. 2. The working temperature is from 37℉ to 40℉. 3. To lower the temperature, adjust the knob towards...
Open the catalog to page 6
MAINTENANCE & CLEANING Always turn off your unit (both power and lights) when cleaning. Remove all products and allow your unit to reach room temperature. Do not allow electrical components to get wet. CLEAN YOUR OPEN DISPLAY MERCHANDISER THOROUGHLY BEFORE FIRST USAGE. a. Do not clean with harsh detergents. Use mild soap. b. Remove all products. c. Remove shelves and bottom trays. d. Clean interior with warm water and mild detergent. e. Wipe with damp cloth. Do not leave soap residue. CLEANING THE CONDENSER COIL Condenser coil is located at bottom behind panel. 1. Disconnect the electrical power...
Open the catalog to page 7
TROUBLESHOOTING For any problems with your unit, please refer to the following check list. If you are still experiencing problems or have questions, please call the Customer Service line at 1-800-381-7770. Ⅰ. MERCHANDISER NOT FUNCTIONING a. Check to see that the breaker hasn’t tripped. b. Check that enough power is BEING supplied to the unit. c. Check that the power switch is on. Ⅱ. MERCHANDISER IS WARM a. Check the condenser to see if it is clean. b. Check that the inner airflow is not being blocked by products. Ⅲ. LIGHTS ARE NOT WORKING a. Check that light switch is on. b. Check that the lights...
Open the catalog to page 8
WIRING DIAGRAM Lamp Lamp Lamp Lamp Lamp switch Temperature controller NEON LAMP Power switch NEON LAMP Magnetic contactor
Open the catalog to page 9
MANUFACTURING COMPANY TWO YEAR WARRANTY Turbo Air warrants to the original purchaser of every new Turbo Air refrigerated unit, the cabinet and all parts thereof, to befree from defects in material or workmanship, under normal use and service, for a period of two (2) year from the date of original installation or 27 months after shipment date from Turbo Air , whichever occurs first. Any parts covered by this warranty that are examined and determined by Turbo Air to have been defective within two (2) year of original installation or twenty seven (27) months after shipment date from manufacturer,...
Open the catalog to page 10
What is NOT covered by this warranty Turbo Airʼs sole obligation under this warranty is limited to either repair or replacement of parts, subject to the additional limitations below. This warranty neither assumes nor authorizes any person to assume obligations other than expressly covered by this warranty. 1. WARRANTY IS NOT TRANSFERABLE. This warranty is not assignable and applies only in favor of the original purchaser/user to whom delivered. ANY SUCH ASSIGNMENT OR TRANSFER SHALL VOID THE WARRANTIES HEREIN MADE AND SHALL VOID ALL WARRANTIES, EXPRESS OR IMPLIED, INCLUDING ANY WARRANTY OF MERCHANTABILITY...
Open the catalog to page 11
Warranty Claims... All claims for parts or labor must be made directly thorough Turbo Air. All claims should include: model number of the unit, the serial number of the cabinet, proof of purchase, date of installation, and all pertinent information supporting the alleged defect. In case of compressor replacement under warranty, either compressor or compressor tag must be returned to Turbo Air along with above listed information. Failure to comply with warranty policies will result in voiding claims. Two Year Parts & Labor Warranty... Turbo Air warrants all new refrigerated components, the cabinet...
Open the catalog to page 12All Turbo Air catalogs and technical brochures
 TPR-93SD-D6-N
2 Pages
 TPR-67SD-D2-N
2 Pages
 M3R24-2-N M3R24-2-N-L
2 Pages
 PRO-77F-N
2 Pages
 PUR-48-D2R-N PUR-48-D2L-N
2 Pages
 PUR-48-D4-N
2 Pages
 PUR-60-D2R(L)-N
2 Pages
 MUR-20SG-N6
2 Pages
 MUR-34S-N6
2 Pages
 2017 A/C Catalog
1 Page
 2017 Texaking Catalog
29 Pages
 TST-28SD-D2-N
2 Pages
 TST-72SD-30-N-GL
2 Pages
 VALUE CATALOG 2018
56 Pages
 CATALOG 2018
218 Pages
 TWF-28SD-N
2 Pages
 TMKC-34S
2 Pages
 TMKC-49S
2 Pages
 TMKC-58S
2 Pages
 TMKC-34D
2 Pages
 TMKC-49D
2 Pages
 TMKC-58D
2 Pages
 Glass Door Freezers TGF
13 Pages
 Underbar Equipment TBD
13 Pages
 Underbar Equipment TBB
11 Pages
 CRT-77-1R CRT-77-2R
12 Pages
 TGM-35SD
2 Pages
 TGM-15SD
2 Pages
 JUR-60-G
2 Pages
 JBT-36
2 Pages
 JST-48
2 Pages
 MST-28
2 Pages
 TST-72SD
2 Pages
 TPR-67SD-D2
2 Pages
 TPR-44SD
2 Pages
 JRF-45
2 Pages
 M3F24-2
2 Pages
 M3R72-6
2 Pages
 PRO-77-6R
2 Pages
 PRO-26R
2 Pages
 MSR-23G-1
2 Pages
 MSF-49NM
2 Pages
 MSR-23NM
2 Pages
 TSF-35SD
2 Pages
 TSR-23SD*
2 Pages
 JRF-19
2 Pages
 SAKURA-50
2 Pages
 TPR-67SD-D4
2 Pages
 TSR-35SD
2 Pages
 JBT-60
2 Pages
 TWR-48SD-D2
2 Pages

- Refrigerated display case
- Shop refrigerated display case
- Industrial refrigerator
- Standalone refrigerator
- Industrial freezer
- Metal refrigerator
- Upright refrigerator
- Stainless steel refrigerator
- Commercial refrigerator
- Professional freezer
- Ice cream refrigerated display case
- Eco-friendly refrigerator
- Industrial upright freezer
- Metal freezer
- Industrial prep table
- Commercial prep table
- Stainless steel prep table
- Undercounter refrigerator
- Stainless steel freezer
- Energy-saving freezer