INSTALLATION MANUAL
1 /17Pages

INSTALLATION MANUAL
1 /17Pages
Catalog excerpts

Flush sidings INSTALLATION MANUAL TRESPA.COM
Open the catalog to page 1
TRESPA ® PURA NFC ® FLUSH SIDINGS | 3
Open the catalog to page 3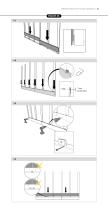
TRESPA® PURA NFC® FLUSH SIDINGS | 5
Open the catalog to page 5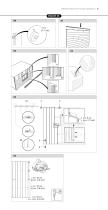
TRESPA ® PURA NFC ® FLUSH SIDINGS | 7
Open the catalog to page 7
INSTALLATION MANUAL FOR THE PROFESSIONAL INSTALLER Dear customer, Congratulations on your purchase of this Trespa Pura NFC® product. These instructions contain all the necessary information in order to quickly achieve a professional result. This Trespa Pura NFC® constitutes part of the Trespa Pura NFC® Flush siding System. These instructions describe how you can use the Trespa Pura NFC® Flush siding System. The other components which constitute part of the Trespa Pura NFC® Flush siding System must be purchased seperately. There is a summary of the components in Chapter 1. The information in these...
Open the catalog to page 8
TRESPA® PURA NFC® FLUSH SIDINGS | 9 Important terms in these instructions used in an overview 9 Get results in four simple steps - Horizontal installation 10 1 Ensure the correct supplies. 10 2 Make a facade drawing. 13 3 Ensure the correct basic construction. 13 4 Carry out the installation instructions. 13 Finishing around a window What should I look for when I place Trespa Pura NFC® Flush siding around a window? 16 Vertical Installation What should I look for when I place Trespa Pura NFC® Flush siding vertically? 16 IMPORTANT TERMS IN THESE INSTRUCTIONS USED IN AN OVERVIEW SEE IMAGE 1 | lOverview...
Open the catalog to page 9
GET RESULTS IN FOUR SIMPLE STEPS YOU CAN EQUIP YOUR FACADE TRESPA WITH PURA NFC® FLUSH SIDING IN FOUR EASY STEPS: 1 Ensure the correct supplies. 2 Make a facade drawing. 3 Ensure the correct basic construction. 4 Carry out the installation instructions. Trespa Pura NFC® Flush siding System Components
Open the catalog to page 10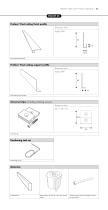
TRESPA ® PURA NFC ® FLUSH SIDINGS | 11 Proface® Flush siding finish profile Dimensions (mm) Length 3000 10,5 Flush siding finish profile Proface® Flush siding support profile Dimensions (mm) Length 3000 10 Flush siding support profile Universal clips (including matching screws) Dimensions (mm) 33.5 x 30 x 7.6 EPDM rubber. At least the width of the vertical battens Flat head nails to fix the mounting bar and fix the flush s
Open the catalog to page 11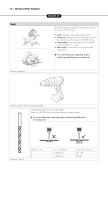
Tools The following general guidelines apply when sawing Trespa Pura NFC® Sidings: • Tooth: Alternate tooth or trapezoid flat tooth. • Positioning: Always position the entering tooth at the decorative side of the Trespa Pura NFC® Siding. • Cutting edges: Any sharp edges can be removed using sandpaper or a router. • Rake angle: A rake angle of 45º gives the best performance. current information regarding Trespa’s For machining guidelines see www.trespa.info. Cordless screwdriver / drill with torque limiting coupling Carbide-tipped HSS drill, top angle 60-80º. Trespa Pura NFC® Sidings should...
Open the catalog to page 12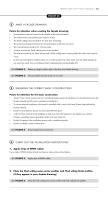
TRESPA ® PURA NFC ® FLUSH SIDINGS | 13 2 MAKE A FAÇADE DRAWING Points for attention when creating the façade drawing: • Intermediate joints are located in the middle of the vertical battens. The width of the intermediate joint must be 8 mm. The Flush sidings must overlap by 6.5 mm after mounting. The maximum distance between the vertical battens is 600 mm on center. The vertical battens must be 95-110 mm wide. At outer corners use Flush siding outer-corner profiles. The distance between the Flush sidings and a Flush siding outer-corner profile (the end joint) must be 5 mm. Is there an interruption...
Open the catalog to page 13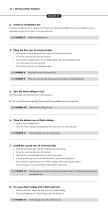
3. Install an installation bar Install an installation bar at a distance of 35 mm from the starting height. You use the installation bar as attachment points for the first row of universal clips. SEE FIGURE 7 4. Place the first row of universal clips • Place the first row of universal clips with the installation head down. • Screw the universal clips into the top hole. • Do you plan to equip the first row of Flush sidings with an intermediate joint? If so, then place two universal clips. • Do not place the clip on a finishing profile. SEE FIGURE 8 | Place the first row of universal clips | Place...
Open the catalog to page 14
9. Place the second row of Flush sidings • When placing a row of Flush sidings always check that an intermediate joint is supported on both sides by its own universal clip. • Check that the intermediate joint is at least 8 mm wide. • Fix every Flush siding with a flat head nail. When placing a row of Flush sidings check the support of the intermediate joint 10. Install the other row of Flush sidings Install the other row of Flush sidings from below to above. SEE FIGURE 15 | lInstall the other row of Flush sidings from below to above 11. Place the last row of Flush sidings Finish with universal...
Open the catalog to page 15
FINISHING AROUND A WINDOW WHAT SHOULD I LOOK FOR WHEN I PLACE TRESPA PURA NFC ® FLUSH SIDING AROUND A WINDOW? • Support the Flush siding directly above the window with a Flush siding support profile (A). Finish the side of the window with a Flush siding finish profile (B1) or a Flush siding outer-corner profile (B2). Finish the underside of the window with a weather moulding (C). SEE FIGURE 22 | Finishing around a window FINISHING AROUND A DORMER WHAT SHOULD IK LOOK FOR WHEN I PLACE TRESPA PURA NFC ® SIDINGS AROUND A DORMER? • Fix the bottom flush siding with a fast fixing screw. SEE FIGURE 23...
Open the catalog to page 16
TRESPA INTERNATIONAL B.V. P.O. Box 110, 6000 AC Weert Wetering 20, 6002 SM Weert The Netherlands www.trespa.com CUSTOMER SERVICE DESK EMEA EXPORT Tel: +31 (0) 495 458 839 [email protected] TRESPA UK LTD. 35 Calthorpe Road Edgbaston Birmingham, B15 1TS United Kingdom Tel: 0808-2340268 [email protected] VERSION 3.0 ■ BROCHURE CODE U1093 ■ DATE 10-2017
Open the catalog to page 17All TRESPA catalogs and technical brochures
 PURA® NFC
13 Pages
 PURA® NFC LASTING AESTHETICS
24 Pages
 144007_BROCHURE_Meteon_Lumen_UK
11 Pages
 NATURE AT ITS BEST
11 Pages
 NUANCES MAKE THE DIFFERENCE
11 Pages
 CREATE MEMORABLE FAÇADES
11 Pages
 COLOUR CARD
8 Pages
 TIMELESS BEAUTY
32 Pages
 MATERIALIZING SUSTAINABILITY
11 Pages
 SCHOOLS OF TOMORROW
8 Pages
 TRESPA® METEON® | EXTERIOR
2 Pages
 TRESPA
26 Pages
 TRESPA® TOPLAB®
8 Pages
 Trespa® METEON
2 Pages
 Trespa® Meteon® exterior
12 Pages
 Trespa Longevity
2 Pages
 Inspiring the world 50 Years
122 Pages
 INSPIRING THE WORLD
133 Pages


Archived catalogs
 TRESPA® METEON® | EXTÉRIEUR
12 Pages
 EXTERIOR PANELS
14 Pages
 laboratory
10 Pages
 Interior
40 Pages
 Interior Panels
12 Pages

- Decorative panel
- Rainscreen cladding
- Commercial decorative panel
- Wall-mounted decorative panel
- Panel rainscreen cladding
- Cover decorative panel
- Textured decorative panel
- Smooth rainscreen cladding
- Decorative cassetta
- High-resistance decorative panel
- Interior panel
- Gray cassetta
- Custom decorative panel
- Sustainable rainscreen cladding
- Commercial panel
- Building decorative panel
- Wood decorative panel
- Cover panel
- Metal look cladding
- Smooth decorative panel