PDFM361AB
1 /12Pages

PDFM361AB
1 /12Pages
Catalog excerpts
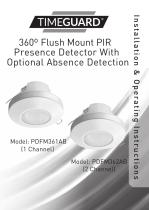
Model: PDFM361AB (1 Channel) Model: PDFM362AB (2 Channel) Installation & Operating Instructions 360º Flush Mount PIR Presence Detector With Optional Absence Detection
Open the catalog to page 1
1. General Information These instructions should be read carefully and retained for further reference and maintenance. Note: Timeguard reserve the right to alter these instructions at any time. Up to date instructions will always be available for download at www.timeguard.com 2. Safety • Before installation or maintenance, ensure the mains supply to the PIR is switched off and the circuit supply fuses are removed or the circuit breaker turned off. • It is recommended that a qualified electrician is consulted or used for the installation of this PIR and install in accordance with the current IEE...
Open the catalog to page 2
30sec - 30min 60 Minutes with optional remote control IR10AB • (LUX) level adjustment: • Manual Override: • Load 1 for Lighting: Voltage free contacts: Max 5A for 230V AC or 30V DC (resistive) 73W Motor Note: Only PDFM362AB supports 2 channel. Presence / Absence Note: Absence mode can only be triggered via using the IR10AB remote control. (Sold Separately). A push switch is required for absence mode to work on the PIR. Conforms to the latest directiives • Construction: Polycarbonate • Dimensions (H x W x D): 105mm x 105mm x 67mm 23.5mm • PIR Ceiling Projection: If a 2 channal surface PIR is required,...
Open the catalog to page 3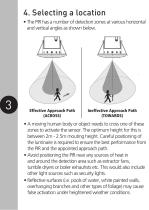
4. Selecting a location • The PIR has a number of detection zones at various horizontal and vertical angles as shown below. Effective Approach Path (ACROSS) Ineffective Approach Path (TOWARDS) • A moving human body or object needs to cross one of these zones to activate the sensor. The optimum height for this is between 2m - 2.5m mouting height. Careful positioning of the luminaire is required to ensure the best performance from the PIR and the appointed approach path. • Avoid positioning the PIR near any sources of heat in and around the detection area such as extractor fans, tumble dryers or...
Open the catalog to page 4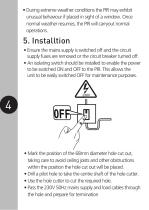
• During extreme weather conditions the PIR may exhibit unusual behaviour if placed in sight of a window. Once normal weather resumes, the PIR will carryout normal operations. 5. Installtion • Ensure the mains supply is switched off and the circuit supply fuses are removed or the circuit breaker turned off. • An isolating switch should be installed to enable the power to be switched ON and OFF to the PIR. This allows the unit to be easily switched OFF for maintenance purposes. • Mark the position of the 68mm diameter hole cut out, taking care to avoid ceiling joists and other obstructions within...
Open the catalog to page 5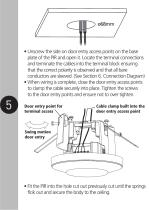
• Unscrew the side on door entry access points on the base plate of the PIR and open it. Locate the terminal connections and terminate the cables into the terminal block ensuring that the correct polarity is observed and that all bare conductors are sleeved. (See Section 6. Connection Diagram) • When wiring is complete, close the door entry access points to clamp the cable securely into place. Tighten the screws to the door entry points and ensure not to over tighten. Door entry point for terminal access Cable clamp built into the door entry access point Swing motion door entry • Fit the PIR...
Open the catalog to page 6
PDFM362AB Channel 2 Load Volt Free Input C2 C1 Push Button Push Button PDFM361AB: Wiring Configuration 230V AC 50Hz Mains Supply Live (Brown or Red) to L Neutral (Blue or Black to N Load Switched Live (Brown or Red) to Neutral (Blue or Black to N PDFM362AB: Wiring Configuration Supply (Mains + Volt Free) Channel 1: 230V AC 50Hz Only Live (Brown or Red) to L Neutral (Blue or Black to N Channel 2: Volt Free Input to C1 (5-230V AC 50Hz or 5-30V DC 5A MAX) or 73W Motor Load Switched Live Channel 1 (Brown or Red) to Switched Live Channel 2 Volt Free Output to C2 (Terminal C2 will refelct the supply...
Open the catalog to page 7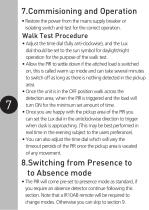
7.Commisioning and Operation • Restore the power from the mains supply breaker or isolating switch and test for the correct operation. Walk Test Procedure • Adjust the time dial (fully anti-clockwise), and the Lux dial should be set to the sun symbol for daylight/night operation for the purpose of the walk test. • Allow the PIR to settle down if the attched load is switched on, this is called warm up mode and can take several minutes to switch off as long as there is nothing detected in the pickup area. • Once the unit is in the OFF position walk across the detection area, when the PIR is triggered...
Open the catalog to page 8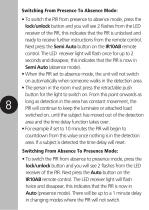
Switching From Presence To Absence Mode: • To switch the PIR from presence to absence mode, press the lock/unlock button and you will see 2 flashes from the LED receiver of the PIR, this indicates that the PIR is unlocked and ready to receive further instructions from the remote control. Next press the Semi Auto button on the IR10AB remote control. The LED receiver light will flash once for up to 2 seconds and dissapear, this indicates that the PIR is now in Semi Auto (absence mode). • When the PIR set to absence mode, the unit will not switch on automatically when someone walks in the detection...
Open the catalog to page 9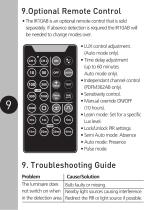
9.Optional Remote Control • The IR10AB is an optional remote control that is sold separately. If absence detection is required the IR10AB will be needed to change modes over. • LUX control adjustment. (Auto mode only). • Time delay adjustment (up to 60 minutes Auto mode only). • Independant channel control (PDFM362AB only). • Sensitiveity control. • Manual override ON/OFF (10 hours). • Learn mode: Set for a specific Lux level. • Lock/Unlock PIR settings. • Semi Auto mode: Absence • Auto mode: Presence • Pulse mode 9. Troubleshooting Guide Problem The luminaire does not switch on when in the detection...
Open the catalog to page 10
Heat sources as described in section 4. Reflective surfaces described in section 4. Moving pedestrians, cars or animals in the area. Check the detection area. Nearby electromagnetic disturbance from a neighbouring circuit (CCTV interference). Luminaire remains switched on Luminaire switches on during daylight hours False activation. (Luminaire switches on for no apparent reason) Continuous false activation resetting the delay time when an object is detected. Shadow casting over the PIR sensor Clouds creating a dark presence. Enure the luminaire recievces adequate daylight from all angles (not...
Open the catalog to page 11All Theben AG catalogs and technical brochures
 LEDPROCAM
12 Pages
 LED LIGHTING SOLUTION
11 Pages
 New Faces
7 Pages
 Heating Programmer
5 Pages
 LED Lighting Solutions
9 Pages
Archived catalogs
 2015 PRODUCT CATALOGUE
53 Pages
 2014 Product catalogue
100 Pages
- Outdoor projector
- Recessed switch
- Square switch
- Door intercom
- Industrial thermostat
- Push-button switch
- Adjustable floodlight
- White thermostat
- Security camera
- Programmable thermostat
- Heating thermostat
- Digital thermostat
- Wall-mounted thermostat
- Surface-mounted security camera
- Room thermostat
- IP security camera
- White door intercom
- Public space floodlight
- Rectangular switch