LEDPROCAM
1 /12Pages

LEDPROCAM
1 /12Pages
Catalog excerpts
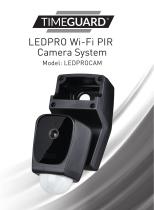
LEDPRO Wi-Fi PIR Camera System Model: LEDPROCAM
Open the catalog to page 1
1. General Information These instructions should be read carefully and retained for further reference and maintenance. Note: Timeguard reserve the right to alter these instructions at any time. Up to date instructions will always be available for download at www.timeguard.com 2. Safety • Before installation or maintenance, ensure the mains supply to this system is switched off and the circuit supply fuses are removed or the circuit breaker turned off. • It is recommended that a qualified electrician is consulted or used for the installation of this luminaire and install in accordance with the...
Open the catalog to page 2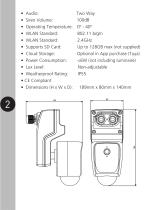
• Audio: • Siren Volume: • Operating Temperature: • WLAN Standard: • WLAN Standard: • Supports SD Card: • Cloud Storage: • Power Consumption: • Lux Level: • Weatherproof Rating: • CE Compliant • Dimensions (H x W x D): Two Way 100dB 0º - 40º 802.11 b/g/n 2.4GHz Up to 128GB max (not supplied) Optional in App purchase (Tuya) <6W (not including luminaire) Non-adjustable IP5
Open the catalog to page 3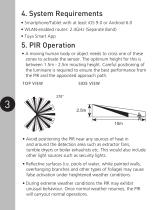
4. System Requirements • Smartphone/Tablet with at least iOS 9.0 or Android 6.0 • WLAN-enabled router: 2.4GHz (Separate Band) • Tuya Smart App 5. PIR Operation • A moving human body or object needs to cross one of these zones to activate the sensor. The optimum height for this is between 1.5m - 2.5m mouting height. Careful positioning of the luminaire is required to ensure the best performance from the PIR and the appointed approach path. SIDE V IEW • Avoid positioning the PIR near any sources of heat in and around the detection area such as extractor fans, tumble dryers or boiler exhauhsts etc....
Open the catalog to page 4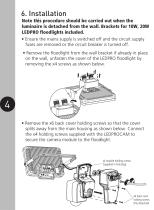
Note this procedure should be carried out when the luminaire is detached from the wall. Brackets for 10W, 20W LEDPRO floodlights included. • Ensure the mains supply is switched off and the circuit supply fuses are removed or the circuit breaker is turned off. • Remove the floodlight from the wall bracket if already in place on the wall, unfasten the cover of the LEDPRO floodlight by removing the x4 screws as shown below. 4 • Remove the x6 back cover holding screws so that the cover splits away from the main housing as shown below. Connect the x4 holding screws supplied with the LEDPROCAM to secure...
Open the catalog to page 5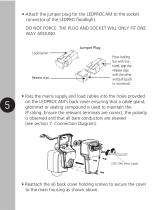
• Attach the jumper plug for the LEDPROCAM to the socket connector of the LEDPRO floodlight. DO NOT FORCE. THE PLUG AND SOCKET WILL ONLY FIT ONE WAY AROUND. Jumper Plug Locking bar bar with one with the other to reconnect). • Pass the mains supply and load cables into the holes provided on the LEDPROCAM’s back cover ensuring that a cable gland, grommet or sealing compound is used to maintain the IP rating. Ensure the relevant terminals are correct, the polarity is observed and that all bare conductors are sleeved (see section 7. Connection Diagram). • Reattach the x6 back cover holding screws...
Open the catalog to page 6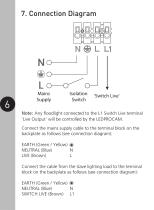
Mains Supply Isolation Switch 'Switch Live' Note: Any floodlight connected to the L1 Switch Live terminal 'Live Output' will be controlled by the LEDPROCAM. Connect the mains supply cable to the terminal block on the backplate as follows (see connection diagram): EARTH (Green / Yellow) NEUTRAL (Blue) N LIVE (Brown) L Connect the cable from the slave lighting load to the terminal block on the backplate as follows (see connection diagram): EARTH (Green / Yellow) NEUTRAL (Blue) N SWITCH LIVE (Brown) L1
Open the catalog to page 7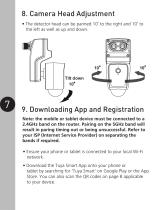
8. Camera Head Adjustment • The detector head can be panned 10˚ to the right and 10˚ to the left as well as up and down. 9. Downloading App and Registration Note: the mobile or tablet device must be connected to a 2.4GHz band on the router. Pairing on the 5GHz band will result in paring timing out or being unsuccessful. Refer to your ISP (Internet Service Provider) on separating the bands if required. • Ensure your phone or tablet is connected to your local Wi-Fi network. • Download the Tuya Smart App onto your phone or tablet by searching for ’Tuya Smart’ on Google Play or the App Store. You...
Open the catalog to page 8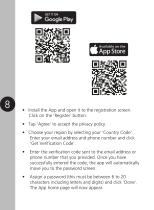
• Install the App and open it to the registration screen. Click on the ’Register’ button. • Tap ‘Agree’ to accept the privacy policy. • Choose your region by selecting your ‘Country Code’. Enter your email address and phone number and click ‘Get Verification Code’. • Enter the verification code sent to the email address or phone number that you provided. Once you have successfully entered the code, the app will automatically move you to the password screen. Assign a password (this must be between 6 to 20 characters including letters and digits) and click ‘Done’. The App
Open the catalog to page 9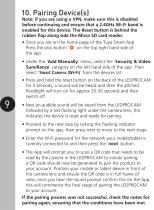
Note: if you are using a VPN, make sure this is disabled before continuing and ensure that a 2.4GHz Wi-Fi band is enabled for this device. The Reset button is behind the rubber flap along side the Mirco SD card reader. • Once you are on the home page of the Tuya Smart App Press the plus button ‘ ’ on the top right hand side of the app. • Under the ‘Add Manually’ menu, select the ‘Security & Video Sureillance’ catagory on the left hand side of the app. Then select ‘Smart Camera (Wi-Fi)’ from the devices list. • Press and hold the reset button on the back of the LEDPROCAM for 5 seconds, a sound...
Open the catalog to page 10
11. Smart Home Assistant For Smart Home Assistant services such as Google Home or Amazon Alexa, follow the on-board instructions on the TuyaSmart App. This can be found under the ‘Me’ section on the home page of the App. Note: The Smart Home Assistant services supported by the TuyaSmart App may change as it is a 3rd party App Service. Any services that may be removed are the responsibility of TuyaSmart developers and not Timeguard. In the unlikely event of this product becoming faulty due to defective material or manufacture, within 3 years of the date of purchase, please return it to your supplier...
Open the catalog to page 11All Theben AG catalogs and technical brochures
 PDFM361AB
12 Pages
 LED LIGHTING SOLUTION
11 Pages
 New Faces
7 Pages
 Heating Programmer
5 Pages
 LED Lighting Solutions
9 Pages
Archived catalogs
 2015 PRODUCT CATALOGUE
53 Pages
 2014 Product catalogue
100 Pages
- Outdoor projector
- Recessed switch
- Square switch
- Door intercom
- Industrial thermostat
- Push-button switch
- Adjustable floodlight
- White thermostat
- Security camera
- Programmable thermostat
- Heating thermostat
- Digital thermostat
- Wall-mounted thermostat
- Surface-mounted security camera
- Room thermostat
- IP security camera
- White door intercom
- Public space floodlight
- Rectangular switch