
- Catalogs
- TEKA KUPPERSBUSCH
- Steam Ovens

Steam Ovens

Steam Ovens
Before using the oven, remove all packaging and operate it at 200ºC for one hour to eliminate residues. Ensure proper ventilation during this process.
The packaging is recyclable. Follow local disposal regulations.
Repairs should be conducted by authorized personnel only. Keep children away during use, do not store flammable materials inside, and use provided trays and racks. Avoid covering the oven bottom with foil.
The oven includes functions like Conventional, Grill, MaxiGrill, and Turbo. Keep the door closed when using grill functions.
Set the desired temperature and function. Use the electronic programming clock for timed cooking; the oven will switch off automatically when the time elapses.
Provide temperature ranges and cooking times for various dishes, recommending preheating for optimal results.
Disconnect the appliance before cleaning. Use non-abrasive materials and avoid steam cleaning. Some models feature a catalytic self-cleaning system.
Ensure proper installation within kitchen units. Refer to technical specifications for energy efficiency and consumption details.
- Clean catalytic panels with a sponge and water, then dry and reassemble. Heat the oven at 200ºC for one hour. Avoid commercial cleaners.
- Remove supports and panels by easing out supports, undoing bolts, and removing screws. Reassemble in reverse order.
- Clean the exterior and accessories with warm soapy water. Avoid metallic scouring pads.
- Remove the oven door by turning clips and pulling it free from hinges. Reassemble in reverse order.
- Clean the large interior glass door by removing, cleaning, and reinserting it into the door grooves.
- To change the oven bulb, disconnect power and replace with a bulb resistant to 300ºC.
- If the oven does not work, check electrical connections, fuses, and settings. For light issues, change the bulb. If smoke is emitted, clean the oven and reduce grease usage.
- If cooking results are unsatisfactory, refer to cooking tables.
- The oven complies with European safety and electromagnetic compatibility directives. Installation requires a minimum depth of 580 mm and specific electrical connections.
- Ensure the electrical installation supports the oven's power requirements and has adequate earthing. Use an omnipolar switch for disconnection during emergencies or maintenance.
- Unpack the oven carefully and ensure a niche in the kitchen unit as per specified dimensions. Install the oven without trapping cables and secure it with screws. Maintain a 2 mm gap between the oven and neighboring units.
Catalog excerpts
29 ENGLISH Index Before Using your Oven for the First Time Page 29 Ecological Packaging 29 Important Safety Instructions 30 Coocking Tables 31 Cleaning and Maintenance 35 Trouble Shooting 39 Technical Information 40 Installation 40 Figures oven Fitting 68 Before Using your Oven for the First Time Carefully read this Instruction Manual to achieve the best results from your oven. Due to the manufacturing process there may be residues of grease and other substances. To eliminate these, proceed as follows: • Remove all the packaging material, including the protective plastic, if included. • Select...
Open the catalog to page 2
30 Electrical Safety • Any repairs must be carried out by an authorised Service Agent, using original spare parts. Repairs carried out by other people, may cause damage or malfunction to the equipment and endanger your safety. • Disconnect your oven if it breaks down. Safety for Children • Do not allow children to approach the oven while it is in use, as high temperatures can be reached. • During the catalytic self-cleaning process, which is carried out at a high temperature, the outer surfaces may become hotter than normal and children should be kept away from the oven. • Most models have a...
Open the catalog to page 3
7 ENGLISH Control Panel Models EB1000E / EB3000E 1 Electronic timer (depending on the model). 2 Heating indicator light. Indicates that the heat is going to the food and it goes out when the set temperature is reached. 3 Cooker indicator light. It indicates that one or more of electric hotplates are on. 4 Function selector. 5 Temperature selector. 6 Control knobs for the hob. Models EH1000E / EH3000E Models EB4000E / EB6000E Models EH4000E / EH6000E 2 4 5 2 3 4 5 6 6 6 6 1 2 4 1 2 3 4 5 6 6 6 6 5
Open the catalog to page 4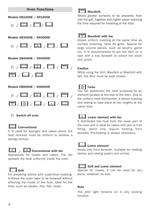
8 Models EB1000E / EH1000E / / / Models EB3000E / EH3000E / / / / Models EB4000E / EH4000E / / / / / / / Models EB6000E / EH6000E / / / / / / / / / Switch off oven Conventional It is used for sponges and cakes where the heat received must be uniform to achieve a spongy texture. / Conventional with fan Appropriate for roasts and cakes. The fan spreads the heat uniformly inside the oven. Grill For preparing dishes with superficial roasting. It allows the outer layer to be browned without affecting the inside of the food. Ideal for flat food, such as steaks, ribs, fish, toast. MaxiGrill Allows greater...
Open the catalog to page 5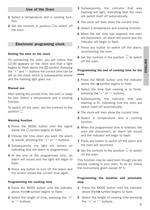
9 ENGLISH Use of the Oven 1 Select a temperature and a cooking function. 2 Set the controls in position to switch off the oven. 3 Subsequently, the indicator that was flashing will light, indicating that the oven will switch itself off automatically. 4 The clock will then show the current time. 5 Select a temperature and cooking function. 6 When the set time has elapsed, the oven will disconnect, an alarm will sound and the indicator will begin to flash. 7 Press any button to switch off the alarm, reconnecting the oven. 8 Set the controls in the position to switch off the oven. Programming the...
Open the catalog to page 6
10 3 Subsequently, the indicator that was flashing will remain lit. 4 Press the mode button until the indicator above the symbol begins to flash. 5 Select the time that cooking should finish pressing the “+” or “-“ buttons. 6 Subsequently, the indicator that was flashing will remain lit. 7 Select a function and cooking temperature. 8 The oven will remain disconnected with the indicators above the and symbols lit. Your oven is programmed. 9 When the time to begin cooking is reached, the oven will switch itself on and will continue cooking during the programmed time. 10 When the programmed finishing...
Open the catalog to page 7
Unser Beitrag zum Umweltschutz: wir verwenden umweltfreundliches Papier. Our contribution to enviromental protection: we use recycled paper. Cod.: 3172118/83172118/ABB00 DATENBLATT/ BROCHURE Hersteller Manufacturer ASTROH ASTROH ASTROH ASTROH Modell Model EB 1000E EH 1000E EB 3000E EH 3000E EB 4000E EH 4000E EB 6000E EH 6000E Energieeffizienzklasse auf einer Skala von A (niedriger Verbrauch) bis G (hoher Verbrauch). Beheizung. Konventionelle Beheizung. Umluft / Heißluft. Energy efficiency class on a scale of A (more efficient) to G (less efficient). Heating function. Conventional. Forced air...
Open the catalog to page 8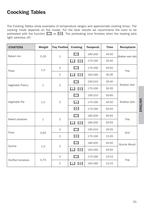
31 ENGLISH Coocking Tables The Cooking Tables show examples of temperature ranges and approximate cooking times. The cooking mode depends on the model. For the best results we recommend the oven to be preheated with the function or . The preheating time finishes when the heating pilot light switches off. Baked rice Shallow oven dish Pasty Vegetable Pie Tray Shallow dish Baked potatoes Tray Pizza Quiche Quiche Mould Grid Vegetable Pastry Shallow dish 1,5 1 1,5 1 1,5 3 0,35 1 2 2 3 180-200 170-190 190-210 190-210 180-200 190-210 180-200 45-50 170-190 35-40 45-50 160-180 30-35 35-40 170-190 30-35...
Open the catalog to page 9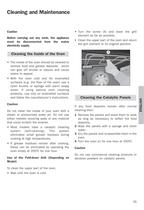
35 ENGLISH Cleaning and Maintenance Caution Before carrying out any work, the appliance must be disconnected from the mains electricity supply. • The inside of the oven should be cleaned to remove food and grease deposits, which can give off smoke or odours and cause stains to appear. • With the oven cold and for enamelled surfaces (e.g. the floor of the oven) use a nylon brushe or sponge with warm soapy water. If using special oven cleaning products, use only on enamelled surfaces and follow the manufacturer’s instructions. Caution Do not clean the inside of your oven with a steam or pressurised...
Open the catalog to page 13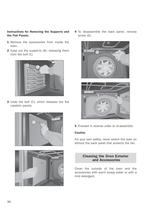
36 C Instructions for Removing the Supports and the Flat Panels. 1 Remove the accessories from inside the oven. 2 Ease out the supports (B), releasing them from the bolt (C) 3 Undo the bolt (C), which releases the flat catalytic panels. 4 To disassemble the back panel, remove screw (D). 5 Proceed in reverse order to re-assemble. Caution For your own safety, never switch the oven on without the back panel that protects the fan. Clean the outside of the oven and the accessories with warm soapy water or with a mild detergent. Cleaning the Oven Exterior and Accessories B C D
Open the catalog to page 14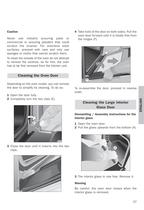
37 ENGLISH Caution Never use metallic scouring pads or commercial or scouring powders that could scratch the enamel. For stainless steel surfaces, proceed with care and only use sponges or cloths that cannot scratch them. To clean the outside of the oven do not attempt to remove the controls, as for this, the oven has to be first removed from the kitchen unit. . Depending on the oven model, you can remove the door to simplify its cleaning. To do so: 1 Open the door fully. 2 Completely turn the two clips (E). 3 Close the door until it inserts into the two clips. Cleaning the Oven Door 4 Take hold...
Open the catalog to page 15All TEKA KUPPERSBUSCH catalogs and technical brochures
 Katalog 2013
244 Pages
 The kitchen of the 21st century
26 Pages
Archived catalogs
 Ovens
Ovens20 Pages
 Coffee Machine
35 Pages
- Industrial tap
- Mixer faucet
- Indoor mixer tap
- Metal mixer tap
- 1-hole single-handle faucet
- Countertop single-handle mixer tap
- Electric oven
- Extractor hood
- Range hood with built-in lighting
- Industrial hob
- Industrial sink
- Industrial coffee machine
- Kitchen mixer tap
- Contemporary kitchen sink
- Wall-mounted cooker hood
- Hob with front controls
- Swivel spout mixer tap
- Built-in hob
- Convection oven