SU-R1A / Network Audio Control Player
1 /240Pages
SU-R1A / Network Audio Control Player
1 /240Pages
Catalog excerpts
Operating Instructions Network Audio Control Player Mode d’emploi Préamplificateur lecteur réseau Network Audio Control Player Reproductor Audio en Red con Pre-amplificador Netwerk Audio Speler
Open the catalog to page 1
Music is borderless and timeless, touching people’s hearts across cultures and generations. Each day the discovery of a truly emotive experience from an unencountered sound awaits. Let us
Open the catalog to page 3
Thank you for purchasing this product. Please read these instructions carefully before using this product, and save this manual for future use. For the United Kingdom and Ireland customers Customer Communications Centre • For customers within Ireland: 01 447 5229 • Monday-Friday 9:00 am - 5:00 pm, (Excluding public holidays). • For further support on your product, please visit our website: www.technics.com/uk/ This unit offers the following features: Technics has minimised the length of the signal path by enclosing the network audio player and input selector, which handle very weak signals, into...
Open the catalog to page 4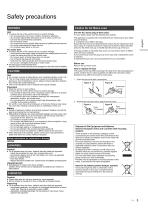
Safety precautions Unit ≥ To reduce the risk of fire, electric shock or product damage, – Do not expose this unit to rain, moisture, dripping or splashing. – Do not place objects filled with liquids, such as vases, on this unit. – Use only the recommended accessories. – Do not remove covers. – Do not repair this unit by yourself. Refer servicing to qualified service personnel. – Do not let metal objects fall inside this unit. – Do not place heavy items on this unit. ≥ To reduce the risk of fire, electric shock or product damage, – Ensure that the power supply voltage corresponds to the voltage...
Open the catalog to page 5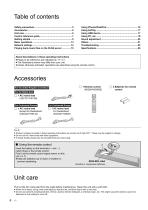
About descriptions in these operating instructions ≥ Pages to be referred to are indicated as “@ ±±”. ≥ The illustrations shown may differ from your unit. ≥ Unless otherwise indicated, operations are described using the remote control. Accessories ∏ 1 Remote control (N2QAYA000095) ∏ 2 Batteries for remote control ∏ 1 AC mains lead Except for Switzerland (K2CQ2YY00132) ∏ 1 AC mains lead For Switzerland (K2CS2YY00001) ≥ Product numbers provided in these operating instructions are correct as of April 2017. These may be subject to change. ≥ Do not use AC mains lead with other equipment. ≥ In Saudi...
Open the catalog to page 6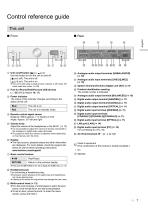
Control reference guide This unit ∫ Rear 1 Unit on/off button [ ] Use this button to turn the unit on and off. [ ] (off): The unit is off. [ ] (on): The unit is on. ≥ The unit is still using a small amount of power in off mode. Off mode uses less power. (> 26) : Analogue audio output terminals [UNBALANCED] (> 10) ; Analogue audio input terminals [LINE1]/[LINE2] (> 10) < System terminal [Technics Digital Link OUT] (> 9) 2 Port for iPhone/iPad/iPod and USB devices ( DC 5 V 2.1 A) (> 16, 17) = Product identification marking The model number is indicated. 3 Power indicator The colour of the indicator...
Open the catalog to page 7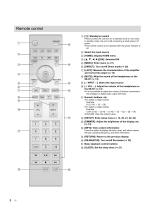
Press to switch the unit from on to standby mode or vice versa. In standby mode, the unit is still consuming a small amount of power. • The remote control do not operate when the power indicator is off. @ Select the input source © [HOME]: Display HOME menu @ [3, 4, 2,1]/[OK]: Selection/OK © [MENU]: Enter menu (^ 21) © [DIRECT]: Turn on/off Direct mode (^ 20) 7 [LAPC]: Measure the characteristics of the amplifier and correct its output (^ 12) © [MUTE]: Mute the sound of the headphones or the SE-R1 (^ 13) @ [> INPUT <]: Select the input source © [+ VOL —]: Adjust the volume of the headphones or...
Open the catalog to page 8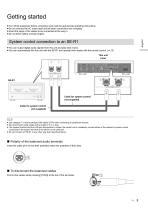
Getting started ≥ Turn off all equipment before connection and read the appropriate operating instructions. ≥ Do not connect the AC mains lead until all other connections are complete. ≥ Insert the plugs of the cables to be connected all the way in. ≥ Do not bend cables at sharp angles. System control connection to an SE-R1 ≥ You can output digital audio signals from this unit and play back music. ≥ You can automatically link this unit with the SE-R1 and operate them easily with the remote control. (> 23) This unit (rear) Cable for system control (not supplied) Cable for system control (not supplied)...
Open the catalog to page 9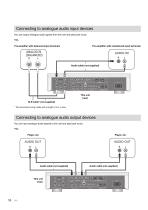
Connecting to analogue audio input devices You can output analogue audio signals from this unit and play back music. e.g., Pre-amplifier with balanced input terminals Pre-amplifier with unbalanced input terminals Audio cable (not supplied) This unit (rear) XLR cable* (not supplied) * We recommend using cables with a length of 3 m or less. Connecting to analogue audio output devices You can input analogue audio signals to this unit and play back music. e.g., Player, etc. Audio cable (not supplied) This unit (
Open the catalog to page 10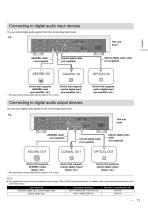
You can output digital audio signals from this unit and play back music. Optical digital audio cable (not supplied) Device that supports Device that supports AES/EBU input coaxial digital input We recommend using cables with a length of 3 m or less. You can input digital audio signals to this unit and play back music. Device that supports optical digital input (pre-amplifier, etc.) — Coaxial digital cable (not supplied) Optical digital audio — cable Device that supports coaxial digital output (player, etc.) Device that supports optical digital output (player, etc.) Device that supports AES/EBU...
Open the catalog to page 11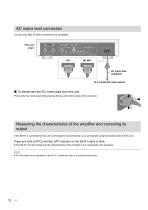
AC mains lead connection Connect only after all other connections are completed. This unit (rear) AC mains lead (supplied) To a household mains socket ∫ To disconnect the AC mains lead from this unit Pull out the AC mains lead while pressing the top and bottom sides of the connector. Measuring the characteristics of the amplifier and correcting its output If the SE-R1 is connected to this unit via the system control function, you can operate using the remote control of this unit. Press and hold [LAPC] until the LAPC indicator on the SE-R1 starts to blink. ≥ The SE-R1 will start measuring the...
Open the catalog to page 12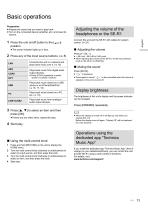
• Prepare the music that you want to play back. • Turn on the connected device (amplifier, etc.) and lower its volume. • The power indicator lights up in blue. Connect this unit and the SE-R1 with cables for system control. (^ 23) • When adjusting the volume of the SE-R1, set the input selector knob on the SE-R1 to [DIGITAL]. Press [MUTE]. • Press again to cancel. “ £] x ” is also cancelled when the volume is adjusted or the unit is turned off. The brightness of this unit's display and the power indicator can be changed. Press [DIMMER] repeatedly. 3 Press [3, 4] to select an item and then press...
Open the catalog to page 13All Technics catalogs and technical brochures
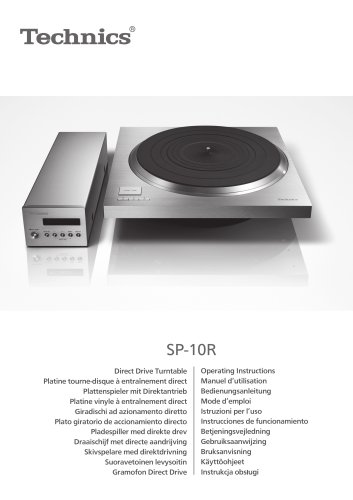 SP-10R / Direct Drive Turntable
272 Pages
 SB-R1 / Speaker System
128 Pages
 SE-R1 / Stereo Power Amplifier
36 Pages
Archived catalogs
 Hi-Fi Audio 2014/15
32 Pages
 SP-10R / Direct Drive Turntable
136 Pages
 SB-R1 / Speaker System
128 Pages
 SU-R1 / Network Audio Control Player
240 Pages
 SE-R1 / Stereo Power Amplifier
116 Pages

- Indoor home theater
- Home speaker
- Black home theater
- Rectangular home theater
- White stereo speaker
- Multimedia speaker
- Round speaker
- Wooden audio system
- Audio amplifier
- Built-in audio system
- Built-in speaker
- Wooden speaker
- Commercial speaker
- Bluetooth speaker
- Tower audio system
- Tower speaker
- Wireless speaker
- Living room speaker
- Turntable