


SE-R1 / Stereo Power Amplifier
SE-R1 / Stereo Power Amplifier
This document serves as the owner's manual for the SE-R1 Stereo Power Amplifier, detailing its features, safety precautions, setup, and operation instructions.
The SE-R1 is a full-digital amplifier equipped with a high-precision jitter reduction circuit and PWM conversion circuit to minimize distortion and noise. It includes LAPC (Load Adaptive Phase Calibration) for adaptive speaker impedance processing and a GaN-FET Driver for efficient, high-speed switching.
For optimal performance, it is recommended to pair the amplifier with Technics devices such as the SU-R1 Network Audio Control Player and the SB-R1 Speaker System.
Key safety instructions include keeping the unit away from water, ensuring proper ventilation, and using only specified accessories to prevent fire, electric shock, or product damage.
Instructions are provided for connecting the amplifier to speakers using single or bi-wiring connections, as well as system control connections to an SU-R1 and analog audio output device connections.
The manual includes a control reference guide explaining the functions of various buttons and indicators on the amplifier, such as the power button, power indicator, and input selector knob.
A troubleshooting section addresses common issues, and detailed specifications of the amplifier are provided, including power supply, power consumption, and dimensions.
Details of the limited warranty for the U.S.A. and Canada are included, covering repair, replacement, or refund options for defects, with exclusions for normal wear and tear and misuse.
This manual is essential for the proper setup and safe operation of the SE-R1 Stereo Power Amplifier, ensuring users can fully utilize its advanced features.
Catalog excerpts
Owner’s Manual Stereo Power Amplifier
Open the catalog to page 1
Music is borderless and timeless, touching people’s hearts across cultures and generations. Each day the discovery of a truly emotive experience from an unencountered sound awaits. Let us take you on your journey to rediscover music. Sans frontières, la musique est aussi intemporelle, touchant le coeur des gens en traversant les cultures et les générations. Tous les jours, nous attendons la révélation d'une expérience émotionnelle authentique à partir d'un son venu de nulle part. Permettez-nous d
Open the catalog to page 3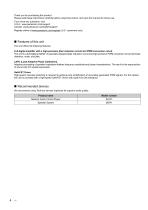
Thank you for purchasing this product. Please read these instructions carefully before using this product, and save this manual for future use. If you have any questions, visit: U.S.A.: www.panasonic.com/support Canada: www.panasonic.ca/english/support Register online at www.panasonic.com/register (U.S. customers only) ∫ Features of this unit This unit offers the following features: Full-digital amplifier with a high-precision jitter reduction circuit and PWM conversion circuit This unit is a full-digital amplifier. Its specially-designed jitter reduction circuit and high-precision PWM conversion...
Open the catalog to page 4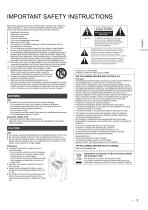
IMPORTANT SAFETY INSTRUCTIONS WARNING Unit ≥ To reduce the risk of fire, electric shock or product damage, – Do not expose this unit to rain, moisture, dripping or splashing. – Do not place objects filled with liquids, such as vases, on this unit. – Use only the recommended accessories. – Do not remove covers. – Do not repair this unit by yourself. Refer servicing to qualified service personnel. – Do not place heavy items on this unit. AC power supply cord ≥ The power plug is the disconnecting device. Install this unit so that the power plug can be unplugged from the socket outlet immediately....
Open the catalog to page 5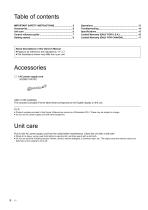
About descriptions in this Owner’s Manual ≥ Pages to be referred to are indicated as “@ ±±”. ≥ The illustrations shown may differ from your unit. Accessories ∏ 1 AC power supply cord (K2CB2YY00107) (ONLY FOR CANADA) The enclosed Canadian French label sheet corresponds to the English display on the unit. ≥ Product numbers provided in this Owner’s Manual are correct as of December 2014. These may be subject to change. ≥ Do not use AC power supply cord with other equipment. Unit care Pull out the AC power supply cord from the outlet before maintenance. Clean this unit with a soft cloth. ≥ When dirt...
Open the catalog to page 6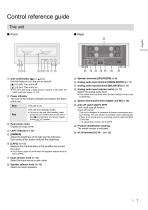
The unit is in standby mode. • To turn on this unit from standby mode, Red press the unit on/off button on this unit to the [MOFF] position, and press it again to the [m(i)/l] position. © Unit on/off button a(!)/l] Use this button to turn the unit on and off. • The unit is still using a small amount of power in off mode. Off mode uses less power. © 15) @ Power indicator The color of the indicator changes according to the status of this unit. @ Peak power meter Display the output level. © [DIMMER] Adjust the brightness of the light and the indicators. Each press of this button switches the brightness....
Open the catalog to page 7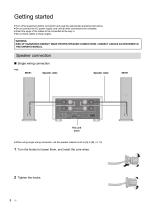
Getting started ≥ Turn off all equipment before connection and read the appropriate operating instructions. ≥ Do not connect the AC power supply cord until all other connections are complete. ≥ Insert the plugs of the cables to be connected all the way in. ≥ Do not bend cables at sharp angles. WARNING: RISK OF HAZARDOUS ENERGY! MAKE PROPER SPEAKER CONNECTIONS. CONNECT CABLES AS DESCRIBED IN THIS OWNER'S MANUAL. Speaker connection ∫ Single wiring connection e.g., SB-R1 Speaker cable Speaker cable This unit (rear) ≥ When using single wiring connection, set the speaker selector knob to [A] or [B]....
Open the catalog to page 8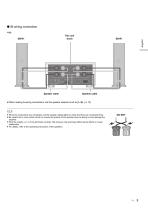
∫ Bi-wiring connection e.g., This unit (rear) Speaker cable Speaker cable ≥ When making bi-wiring connections, set the speaker selector knob to [A+B]. (> 13) ≥ When the connections are completed, pull the speaker cables lightly to check that they are connected firmly. ≥ Be careful not to cross (short-circuit) or reverse the polarity of the speaker wires as doing so may damage the amplifier. ≥ Wire the polarity (r/s) of the terminals correctly. Not doing so may adversely affect stereo effects or cause malfunction. ≥ For details, refer to the
Open the catalog to page 9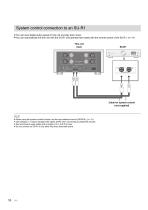
System control connection to an SU-R1 ≥ You can input digital audio signals to this unit and play back music. ≥ You can automatically link this unit with the SU-R1 and operate them easily with the remote control of the SU-R1. (> 14) This unit (rear) Cable for system control (not supplied) ≥ When using the system control function, set the input selector knob to [DIGITAL]. (> 13) ≥ Use category 7 or above straight LAN cables (STP) when connecting to peripheral devices. ≥ We recommend using cables with a length of 3 m (9.9 ft) or less. ≥ Do not connect an
Open the catalog to page 10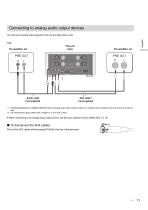
Connecting to analog audio output devices English You can input analog audio signals to this unit and play back music. e.g., This unit (rear) Audio cable (not supplied) *1 Select [BALANCED] or [UNBALANCED]. Set the analog audio input selector switch to a position that corresponds to the device you want to play. *2 We recommend using cables with a length of 3 m (9.9 ft) or less. ≥ When connecting to an analog audio output device, set the input selector knob to [ANALOG]. (> 13) ∫ To disconnect the XLR cables Pull out the XLR cables while pressing [PU
Open the catalog to page 11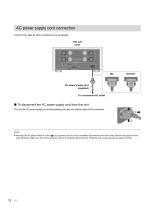
AC power supply cord connection Connect only after all other connections are completed. This unit (rear) AC power supply cord (supplied) To a household AC outlet ∫ To disconnect the AC power supply cord from this unit Pull out the AC power supply cord while pressing the top and bottom sides of the connector. ≥ Although the AC power switch is in the [ ] position, the unit is not completely disconnected from the mains. Remove the plug from the main electrical outlet if you will not be using the unit for an extended period of time. Place
Open the catalog to page 12All Technics catalogs and technical brochures
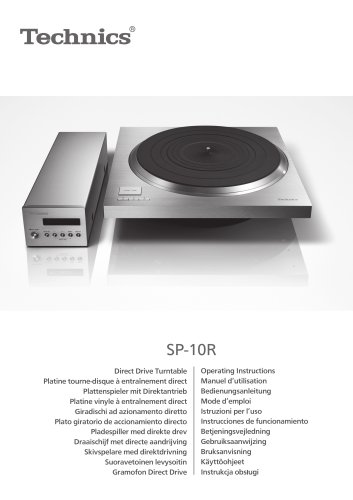 SP-10R / Direct Drive Turntable
272 Pages
 SB-R1 / Speaker System
128 Pages
Archived catalogs
 Hi-Fi Audio 2014/15
32 Pages
 SP-10R / Direct Drive Turntable
136 Pages
 SB-R1 / Speaker System
128 Pages
 SU-R1 / Network Audio Control Player
240 Pages
 SE-R1 / Stereo Power Amplifier
116 Pages

- Interior speaker
- Home speaker
- Black home theater
- Rectangular home theater
- White stereo speaker
- Multimedia speaker
- Round speaker
- Wooden audio system
- Audio amplifier
- Built-in audio system
- Wooden speaker
- Built-in speaker
- Commercial speaker
- Bluetooth speaker
- Tower audio system
- Tower speaker
- Wireless speaker
- Living room speaker
- Turntable