
- Catalogs
- TECE Italia
- TECEprofil

TECEprofil

TECEprofil
TECEprofil is a versatile pre-wall system designed for efficient bathroom construction, suitable for both new builds and renovations. It offers flexibility, cost-effectiveness, and design freedom, allowing for creative bathroom solutions.
System Description
The system consists of a supporting frame, universal modules, and cladding. It is adaptable to various building situations, including sloping ceilings and wall recesses. The system is stable and easy to install without special tools.
Fields of Application
TECEprofil can be used for pre-wall assembly, free-standing installation walls, partition walls, and duct claddings. It supports various shelf heights and is suitable for both residential and commercial applications.
Economic Efficiency
Compared to traditional brick-wall construction, TECEprofil offers a 20% cost reduction. It simplifies the construction process by reducing the need for coordination between different trades, thus increasing efficiency and reducing dirt load.
System Installation Instructions
Installation requires adherence to specific guidelines for struts and fixings. Standard supporting frame height is 1,150 mm, with recommendations for comfort seat height at 450 mm. The system supports various wall types, including solid walls, drywall stud walls, and floor-to-ceiling installations.
Building and Cladding
The supporting frame is built using profile pipes secured with double joints and angle brackets. Cladding is done with plasterboard, ensuring proper marking and filling of joints to maintain structural integrity.
Filling and Finishing
Filling of plasterboard panels is categorized into four quality levels, with level 1 being the standard. TECEprofil filling compound is used for its high adhesion and crack-free hardening properties.
Conclusion
TECEprofil offers a comprehensive solution for sanitary installations, providing economic and practical advantages over traditional methods. Its adaptability and ease of installation make it a preferred choice for modern construction projects.
Specifications and Applications
The document outlines the use of bonding agents for fixing various boards to masonry in interior areas, emphasizing the need for priming absorbent substrates. It also details the use of gypsum adhesive for non-load bearing partition wall panels.
Substrate Preparation
Substrates must be clean, solid, and offer maximum grip. Pre-treatment with primers is necessary for smooth surfaces.
Mixing Instructions
Mix the powder with water in a 1:2.25 ratio, stirring vigorously to form a smooth paste. Allow the mixture to rest before stirring again.
Processing and Post-treatment
Apply the compound evenly and work within 30 minutes. Post-treatment is generally unnecessary unless specific paints are applied.
Cladding for Wet Areas
TECEprofil panel plates are recommended for high moisture areas. These are cement-bound boards reinforced with fibreglass, suitable for public showers and pools.
Storage Guidelines
Store panel plates flat to prevent distortion. They can be stored outdoors but should be covered to prevent soiling.
Construction Site Conditions
Installation should occur in humidity below 80% and temperatures above 5°C. Panels must be dry before handling.
Cutting and Cladding
Boards can be cut with a circular saw. Cladding should be installed with smooth faces forward, and joints must be offset by at least 200 mm.
Fixing and Joint Technique
Boards are secured with screws, and joints are glued with Fermacell adhesive. The adhesive must fill the joint completely.
Moisture Stress Class A Procedures
Sealing systems must be applied to cladding plates in high moisture areas, following specific steps for bonding and sealing.
Pre-wall Heights and Depths
Details on possible pre-wall heights and depths with TECEprofil supporting frames are provided, including standard and special wall configurations.
Moisture Protection
TECEprofil is suitable for damp rooms but not wet rooms. Proper sealing is required at penetrations and edges.
Console Loads
Guidelines for light, medium, and heavy console loads are provided, with specific fixing requirements.
TECEprofil Universal Module
The universal module is versatile for various dry-wall constructions, offering easy installation and multiple upgrade options.
Installation Instructions
Instructions for installing the universal module in different wall types, including pre-wall and free-standing configurations, are detailed.
Specifications and Components
The TECEprofil universal module is designed for flexible installation in various wall structures. It features adjustable module height and depth, with a universal fastener allowing a range of 150-240 mm. The module can be installed in single or corner assemblies, with specific fasteners for each configuration.
Installation Procedures
1. Single Module Installation: The module can be adjusted to suit tile patterns with a height range of 1160-1300 mm using the height-adjustable fastener.
2. Corner Assembly: Modules can be attached at a 45° angle to a structural wall using a corner fastener, allowing for compact installations with a base area of 0.14 m².
3. Metal and Wooden Stud Walls: The module can be installed in C-profile metal stud walls or wooden stud walls, with specific fasteners and screws provided for each type.
4. Floor Attachment: Module feet are secured to the floor with screws and wall plugs, ensuring stability.
Odour Extraction System
The toilet module includes a DN 70 outlet for odour extraction, compatible with various fans. The system ensures effective odour removal without affecting flush performance. Installation requires watertight connections to prevent water ingress into the ventilation pipe.
Applications in Different Building Types
1. Apartment Buildings: The module can connect to room fans for odour extraction, ensuring low air velocity and effective moisture management.
2. Detached Houses: The system can be connected to an external wall fan, minimizing temperature drops and heating costs.
Compatibility and Limitations
Odour extraction is not compatible with certain toilet ceramics due to design constraints. A list of incompatible models is provided.
Bathtub Installation
The TECEprofil system supports bathtub installations with adjustable feet and profile struts. Specific calculations are required for profile lengths, considering bathtub dimensions and material thickness.
Shower Toilet Solutions
TECE offers modules for shower toilets with concealed connections, accommodating various water and electricity supply positions. Compatibility should be verified before installation.
Important Notes
1. Ensure compliance with local standards and installation instructions.
2. Use vertical struts for toilet ceramics with reduced supporting surfaces to prevent structural collapse.
3. For acrylic bathtubs, additional support may be necessary for thin edges.
Installation Set for Shower Toilet Module
This document outlines the installation process for a shower toilet module, specifically focusing on the fine installation set required for connecting a shower toilet to a universal module. The set includes a replacement reinforced hose with a T-piece and a long inlet hose, with variations depending on the installation height of the module. Key steps include sawing off round plugs for flush and waste pipes, connecting water and electricity, and ensuring reinforced hoses do not interfere with the lever mechanism.
Mounting the Fine Installation Set
1. Dismantle the splash guard and actuation unit.
2. Close the corner valve and replace the reinforced hose.
3. Connect the replacement hose using the provided adapter if necessary.
4. Ensure the union nut is removed before pushing the hose through.
5. Attach the safety pin and connect the hose to the T-piece.
Compatible Shower Toilets
The document lists compatible shower toilets, including models from Geberit, Duravit, V&B, TOTO, and Vitra.
TECEone Shower Toilet Pre-Fitting
The TECEone operates without power, requiring only cold and hot water connections. An upgrade set ensures accurate positioning of these connections.
TOTO Neorest Shower Toilet Module
This module is designed for the TOTO Neorest shower toilet, including all necessary components for installation. An upgrade set is available for attaching TOTO Washlet models.
Toilet Module with Hygiene Flushing Function
The TECE hygiene flush maintains potable water quality by draining stagnant water. It includes a hygiene flush unit, shut-off valves, and flush hoses. Installation and operation require qualified personnel, and the system can be controlled via the TECE Smartflow app or a building management system (BMS).
Operation and Maintenance
The hygiene flush can be programmed for interval or weekday flushing. Maintenance includes annual servicing and testing of valves. The system can be upgraded and connected to a BMS for enhanced control and reporting.
Cleaning Procedures
To clean the filters or flow regulator of the hygiene flush unit, remove the filters using pliers and clean them under running water. If the flow regulator is dirty, remove it with needle-nose pliers and clean it similarly.
Toilet Module for Baby/Children's Standing Toilet
This module is designed for floor-standing baby/children's toilets, featuring lower seat heights and connection dimensions. It allows for adjustments in flush volume and can be installed in various wall types. It is not compatible with wall-hung toilets.
Barrier-Free Construction with TECEprofil
For public buildings, barrier-free toilet facilities must adhere to local standards. The TECEprofil system supports the installation of safety support arms and extended toilets, requiring specific fastening plates and modular fasteners. The Geronto module is designed for barrier-free systems, meeting DIN 18 040-1 standards, and allows for flexible installation options.
Sound Insulation and Fire Protection
TECEprofil pre-wall elements are designed to meet sound insulation requirements, with attention to product properties and planning tasks. Compliance with local fire protection laws and standards is mandatory during installation.
Catalog excerpts
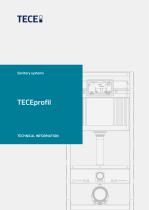
Sanitary systems TECHNICAL INFORMATION
Open the catalog to page 1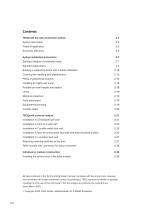
TECEprofil dry-wall construction system 2-4 Standard heights of installation walls 2-7 Building a supporting frame with module installation 2-12 Covering the cladding with plasterboard 2-13 Filling of plasterboard panels 2-15 Cladding for highly wet areas 2-16 Possible pre-wall heights and depths 2-18 TECEprofil universal module 2-21 Installation in a TECEprofil pre-wall 2-21 Installation in front of a solid wall 2-22 Installation in C-profile metal stud wall 2-25 Installation in floor-to-ceiling metal stud wall with flush-mounted profiles 2-26 Installation in a wooden stud wall 2-27 Attaching...
Open the catalog to page 2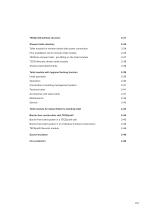
TECEprofil bathtub structure Shower toilet solutions 2-34 Toilet module for shower toilets with power connection 2-34 Fine installation set for shower toilet module 2-34 TECEone shower toilet - pre-fitting on the toilet module 2-37 TOTO Neorest shower toilet module 2-38 Shower toilet attachments 2-38 Toilet module with hygiene flushing function 2-39 Connection to building management system 2-41 Accessories and spare parts 2-41 Toilet module for baby/children's standing toilet 2-43 Barrier-free construction with TECEprofil 2-44 Barrier-free toilet system in a TECEprofil wall 2-45 Barrier-free...
Open the catalog to page 3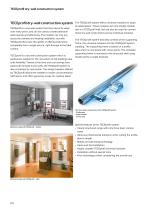
TECEprofil dry-wall construction system TECEprofil dry-wall construction system TECEprofil is a pre-wall system that has proven its value over many years, and can be used to create bathroom walls quickly and effectively. The installer not only produces the sanitary and heating installation, but with TECEprofil they have the option of offering bathrooms completely from a single source, right through to the tiled surface. TECEprofil is a dry-wall construction system which is particularly suitable for the renovation of old buildings due to its flexibility. Thanks to the time and cost savings compared...
Open the catalog to page 4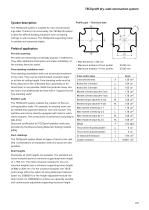
System description The TECEprofil system is suitable for new and old buildings alike. Thanks to its universality, the TECEprofil system is ideal for difficult building situations such as sloping ceilings or wall recesses. The TECEprofil supporting frame is variable and extremely stable. Fields of application Pre-wall assembly Pre-walls are becoming increasingly popular in bathrooms. They offer additional shelf space and make installation of the sanitary items far easier. Free-standing installation wall Free-standing installation walls can be erected anywhere in the room. They can be implemented...
Open the catalog to page 5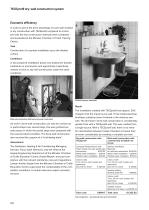
Economic efficiency In order to prove the price advantage of a pre-wall realised in dry construction with TECEprofil compared to a brick pre-wall, the two construction methods were compared and evaluated at the Munster Chamber of Trade Training Centre. Task Construction of a sanitary installation up to the tileable surface. Conditions In two prepared installation boxes, two tradesmen (master tradesman or journeyman and apprentice) respectively worked in brick or dry-wall construction under the same conditions. Brick-wall construction (left) versus dry-wall construction As work in brick-wall construction...
Open the catalog to page 6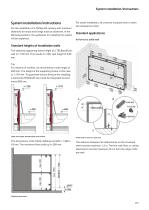
System installation/instructions System installation/instructions For the installation of a TECEprofil sanitary wall, minimum distances for struts and fixings must be observed. In the following sections, the guidelines for installing the system will be explained. For easier installation, all universal modules have a meter line stamped on them. Standard applications In front of a solid wall Standard heights of installation walls The standard supporting frame height of a TECEprofil prewall is 1,150 mm. This results in a WC seat height of 430 mm. Tip: For reasons of comfort, we recommend a seat...
Open the catalog to page 7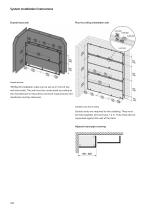
System installation/instructions Drywall stud wall Floor-to-ceiling installation wall Drywall stud wall TECEprofil installation walls can be set up in front of drywall stud walls. The wall must be constructed according to the manufacturer's instructions and local requirements and standards must be observed. Installation wall, floor-to-ceiling Double struts are required for the cladding. They must be fixed together at least every 1.2 m. They shall also be supported against the wall at the back. Adjacent duct/pipe covering
Open the catalog to page 8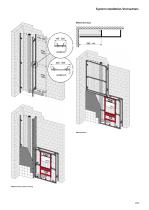
System installation/instructions Attached duct Attached duct Adjacent duct, pipe covering
Open the catalog to page 9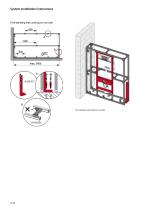
System installation/instructions Free-standing wall, leaning on one side Free-standing wall, leaning on one side
Open the catalog to page 10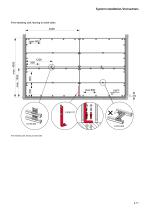
System installation/instructions Free-standing wall, leaning on both sides Free-standing wall, leaning on both sides
Open the catalog to page 11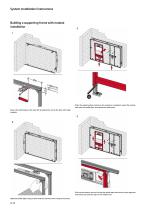
System installation/instructions Building a supporting frame with module installation Place the angle bracket centred on the module or crossbeam, place the module feet onto the profile pipe, and release the foot brake Secure the profile pipe to the wall with double joints, and to the floor with angle brackets Pull out the module, secure it to the top profile pipe with corner joints, apply the foot brake and close the clip on the module foot Align the profile pipes using a spirit level and connect them using corner joints.
Open the catalog to page 12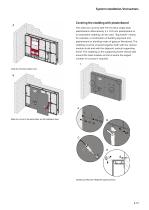
System installation/instructions Covering the cladding with plasterboard The walls are covered with 18 mm-thick single-layer plasterboard. Alternatively, 2 x 12.5 mm plasterboard or an equivalent cladding can be used. “Equivalent” means, for example, a combination of building plywood and plasterboard or planking made of gypsum fibreboard. The cladding must be screwed together both with the vertical module struts and with the adjacent, vertical supporting frame. The cladding on the supporting frame should start around the toilet module as that is where the largest number of cut-outs is required....
Open the catalog to page 13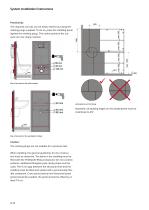
System installation/instructions Practical tip: The required cut-outs can be easily marked out using the marking plugs supplied. To do so, press the cladding panel against the marking plugs. The centre points of the cutouts are now clearly marked. Size of cut-outs for the toilet module Joint patterns on the facing Important: all abutting edges on the plasterboard must be chamfered to 45°. Size of cut-outs for the washstand module Caution: The marking plugs are not suitable for a pressure test. When cladding, the general guidelines for dry construction must be observed. The joints in the cladding...
Open the catalog to page 14All TECE Italia catalogs and technical brochures
 SYSTEM CONSTRUCTION, TECE BRAND
40 Pages
 TECEbox
16 Pages
 FLUSH PLATES
8 Pages


Archived catalogs
 Brochure TECElux
28 Pages
 TECE: Company & Production
40 Pages


