
Catalog excerpts

• RidgeMaster Plus & HipMaster • Cowl Vent • Rafter Roll Ventilator • Dry Verge • Abutment Ventilator © Boral, all rights reserved. The copying of any part of this document is strictly forbidden unless permission to do so is granted by Boral or one of its group of companies.
Open the catalog to page 2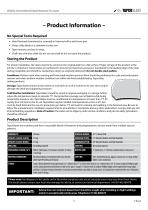
WWW.TAPCOROOFINGPRODUCTS.COM sV^TAPCOSIATI - Product Information -No Special Tools Required • Hand fastened (hammered or screwed) or fastened with a nail/screw gun. • Sharp utility blade or a standard circular saw. • Tape measure, pry bar, tin snips. • Chalk line with blue chalk (do not use red chalk as this can stain the product). Storing the Product For proper installation, the slates need to be stored on the original pallet on a flat surface. Proper storage of the product at the job site is important. Classic slates are cambered to ensure that maximum pressure is transferred to the...
Open the catalog to page 3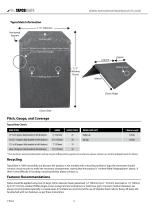
vV^TAPCOSIATI WWW.TAPCOROOFINGPRODUCTS.COM Horizontal Spacers Centre Line Cut at 12" (305mm) for %-Slate use in Eaves/Starter Course Exposure Gauge Nailing Area Classic Slate TapcoSlate Classic * The minimum recommended pitch and lap may be influenced by special circumstances, please contact our technical department for advice. Recycling TapcoSlate is 100% recyclable, but because the product is not marked with a recycling symbol or logo the contractor should contact a local recycler to make the necessary arrangements, stating that the product is "mineral-filled Polypropylene" plastic. If...
Open the catalog to page 4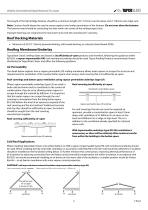
WWW.TAPCOROOFINGPRODUCTS.COM The length of the Hip & Ridge fastener should be a minimum length of 2" (51mm) over the slates and 3" (76mm) over ridge vent. Note: Caution should always be used to ensure against over/under penetration of the fastener. Do not over-drive the fastener. The fastener head should be contacting the slate within the centre of the nailing target circle. Improper fastening can compromise the roof system and voids the manufacturers' warranty. Roof Decking Materials • Minimum of 23/32" (18mm) plywood decking, solid wood decking, or oriented strand board (OSB). Roofing...
Open the catalog to page 5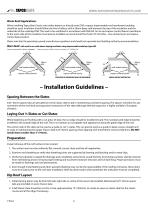
WWW.TAPCOROOFINGPRODUCTS.COM Warm Roof Applications When installing TapcoSlate Classic onto either battens or directly onto OSB a vapour impermeable roof membrane/underlay should be used. Insulation should follow the line of rafters, with a 50mm deep void between the top of the insulation and the underside of the underlay/OSB. This void to be ventilated in accordance with BS5250. An air and vapour control barrier membrane to the warm side of the insulation must also be installed, we recommend the Protect VC Foil Ultra – low emissivity air and vapour control layer product. Please note that...
Open the catalog to page 6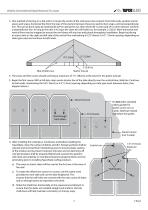
WWW.TAPCOROOFINGPRODUCTS.COM 3. One method of starting on a hip roof is to locate the centre of the roof area to be covered. From both ends, position starter pieces and snap a horizontal line from the tops of the starters between these two points. Next snap a vertical perpendicular line. This can be done easily by marking 3ft (0.91m) along the eve, then where 4ft (1.22m) and 5ft (1.52m) intersect will form a perpendicular line. As long as the ratio 3:4:5 stays the same this will hold true, for example, 21:28:35. More horizontal and vertical lines may be snapped to ensure the roof slates...
Open the catalog to page 7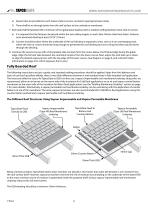
WWW.TAPCOROOFINGPRODUCTS.COM e) Spacer tabs are provided on each Classic slate to ensure consistent spacing between slates. f ) There shall be no through-joints from the roof surface to the underlay or membrane. 7. Each slate shall be fastened with a minimum of two galvanised, stainless steel or outdoor roofing fasteners (clout nails or screws). a) It is required that the fasteners be placed within the two nailing targets on each slate. Flatten slate then fasten. Fastener must penetrate decking at least 23/32" (18mm). b) Caution should be taken where the underside of the roof decking is...
Open the catalog to page 8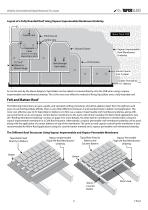
WWW.TAPCOROOFINGPRODUCTS.COM Layout of a Fully Boarded Roof Using Vapour Impermeable Membrane/Underlay Centre Line Third Course Centre Line Exposure Lines Second Course Vapour Impermeable Roof Membrane/ Underlay First Course Nail through both slates Starter Course (Cut ¾-slate) Gutter Oversail by 1½" (38mm) As can be seen by the above diagram, TapcoSlates can be nailed or screwed directly onto the OSB when using a vapour impermeable roof membrane/underlay. This is the most cost-effective method of fixing TapcoSlate onto a fully-boarded roof. Felt and Batten Roof The following instructions...
Open the catalog to page 9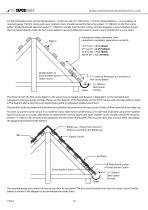
WWW.TAPCOROOFINGPRODUCTS.COM For felt and batten roofs, start by fixing battens – minimum size of 2" (50mm) by 1" (25mm) treated battens – over underlay to required gauge. The first course and eaves (starter) course should oversail the fascia by at least 1½" (38mm), so the first course batten should be placed approximately 7½" (190mm) centrally from the start of the roof (see diagram). A second batten should then be placed directly under the first course batten to accommodate the eaves or starter course (made from a cut ¾-slate). Subsequent batten placement, from centreline to centreline,...
Open the catalog to page 10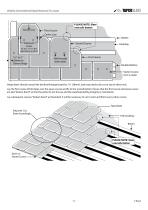
Centre Line PLEASE NOTE: Slate oversails batten Third Course Centre Line Batten Exposure Lines Second Course First Course Nail through both slates Double Battens Starter Course (Cut ¾-slate) Verge slates should oversail the brickwork/barge board by 1½" (38mm), and may need to be cut to size at either end. Lay the first course of full slates over the eaves course and fix to the second batten. Ensure that the first course and eaves course are laid "broken bond" so that the joints do not line up and the weatherproofing integrity is maintained. Lay subsequent courses "broken bond" as...
Open the catalog to page 11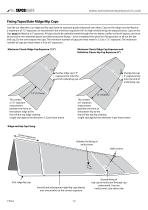
Fixing TapcoSlate Ridge/Hip Caps Just like our slate tiles, our ridge and hip caps have an exposure guide embossed onto them. Caps on the ridge must be fitted at a maximum of 7.5" exposure, we recommend the minimum exposure of 6" for high-wind/driving rain exposed areas. Caps on the hips must be fitted at a 6" exposure. All caps should be nailed/screwed through the one below, similar to the tile layout, and must be secured in the indicated spaces provided using two fixings – once completed this gives four fixing points on all but the last end cap. Do not over-expose the caps. The minimum...
Open the catalog to page 12All Tapco Roofing Products catalogs and technical brochures
-
Dry verge fixing guide
1 Pages
-
Tapcoroofing Brochure
8 Pages
-
Self-Build Homes Fact Sheet
2 Pages
-
Re-Roof Your Home Fact Sheet
2 Pages
-
Outdoor Living Fact Sheet
2 Pages
-
Modular Homes Fact Sheet
2 Pages
-
Conservatory Roof Fact Sheet
2 Pages
-
40-year Warranty
2 Pages
-
ISO 9001 Certificate
2 Pages
-
Tapco Chemical Compatibility
1 Pages
-
Tapco Cowl Vent Fixing Guide
1 Pages
-
Tapco Abutment Ventilator
1 Pages
-
Wunderlay
2 Pages
-
VP300
2 Pages


