
- Catalogs
- Tapco Roofing Products
- Tapco Inline Vent Fixing Guide


Tapco Inline Vent Fixing Guide

Tapco Inline Vent Fixing Guide
- For 20° to 25° Pitch Roof: Use a 6" exposure marking on TapcoSlate. Follow the guide for cutting TapcoSlate pieces and ensure proper alignment and nailing as per the non-nailable area guide.
- For 25° to 27.5° Pitch Roof: Use a 6.5" exposure marking. Adjust batten spacing to 165mm and follow similar procedures as above, with specific measurements for lead flashing and slate cuts.
- For 27.5° to 30° Pitch Roof: Use a 7" exposure marking. Batten spacing should be 178mm. Follow the guide for slate positioning and nailing.
- For 30° to 90° Pitch Roof: Use a 7.5" exposure marking. Batten spacing should be 191mm. Ensure proper alignment and secure slates using the standard nailing areas.
Catalog excerpts
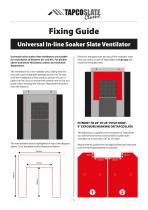
Fixing Guide Universal In-line Soaker Slate Ventilator Universal inline soaker slate ventilators are suitable for roof pitches of between 20° and 90°. For pitches above and below this please contact our technical department. Place this template over the top of the ventilator each time you add a course of TapcoSlates and do not nail inside the template area. The ventilator has a non-nailable area, nailing into this area will cause irreparable damage to the unit. To help with the installation of this product, a piece of card or paper can be cut to sit around the central vent to use as a guide when securing the relevant TapcoSlates around it onto the battens. FITMENT TO 20° TO 25° PITCH ROOF: 6" EXPOSURE MARKING ON TAPCOSLATE The following is a guide to the cut pieces of TapcoSlate you will need to fit the universal inline soaker slate ventilator to a roof with a 20° to 25° pitch. The non-nailable area is highlighted in red in the diagram above. Cut a template to the dimensions below: Measurements quoted here are approximate and may need to be trimmed appropriately on worksite.
Open the catalog to page 1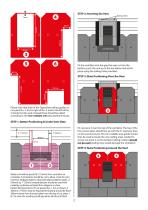
STEP 2: Inserting the Vent Nailing holes Lead Flashing Fit the ventilator into the gap that was cut into the battens, push the unit up to the top batten and nail in place using the nailing holes provided. STEP 3: Slate Positioning Over the Vent Please note that both of the TapcoSlate nailing guides on cut piece No. 3, to the right of No. 4, and to the left of No. 5 should not be used. Instead these should be nailed according to the non-nailable area discussed previously. STEP 1: Batten Positioning & Under Vent Slate Fit cut piece 3 over the top of the ventilator. The top of the first course slates...
Open the catalog to page 2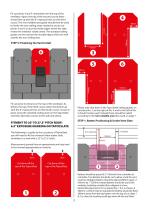
Fit cut pieces 4 and 5 centralised over the top of the ventilator. Again, the top of the second course slates should line up with the 6" exposure lines on this third course. The non-nailable area guide should then be used to locate the new nailing areas needed to secure cut pieces 4 and 5 on just the inside edges where the slate meets the ventilator raised centre. The standard nailing guides can be used on the outside edges which are well outside the non-nailing area. STEP 5: Finalising the Vent Install 165mm Fit cut piece 6 central over the top of the ventilator. As before, the top of the third...
Open the catalog to page 3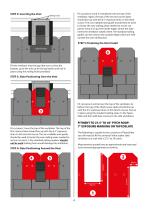
STEP 2: Inserting the Vent Fit cut pieces 4 and 5 centralised over the top of the ventilator. Again, the top of the second course slates should line up with the 6.5" exposure lines on this third course. The non-nailable area guide should then be used to locate the new nailing areas needed to secure cut pieces 4 and 5 on just the inside edges where the slate meets the ventilator raised centre. The standard nailing guides can be used on the outside edges which are well outside the non-nailing area. Nailing holes STEP 5: Finalising the Vent Install Lead Flashing Fit the ventilator into the gap that...
Open the catalog to page 4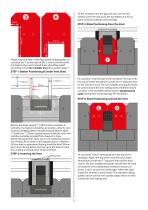
Fit the ventilator into the gap that was cut into the battens, push the unit up to the top batten and nail in place using the nailing holes provided. STEP 3: Slate Positioning Over the Vent Please note that both of the TapcoSlate nailing guides on cut piece No. 1, to the right of No. 2, and to the left of No. 3 should not be used. Instead these should be nailed according to the non-nailable area discussed on page 1. STEP 1: Batten Positioning & Under Vent Slate Fit cut piece 1 over the top of the ventilator. The top of the first course slates should line up with the 7" exposure lines on this second...
Open the catalog to page 5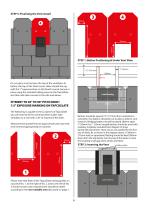
STEP 5: Finalising the Vent Install STEP 1: Batten Positioning & Under Vent Slate 2" (50mm) Lead Flashing FITMENT TO 30° TO 90° PITCH ROOF: 7.5" EXPOSURE MARKING ON TAPCOSLATE The following is a guide to the cut pieces of TapcoSlate you will need to fit the universal inline soaker slate ventilator to a roof with a 30° to maximum 90° pitch. Battens should be spaced 7.5" (191mm) from centreline to centreline. Two battens should be cut to allow a hole for vent insertion. Bridging battens should be placed 260mm apart. 2" (50mm) by 1" (25mm) treated battens should be used with underlay (underlay excluded...
Open the catalog to page 6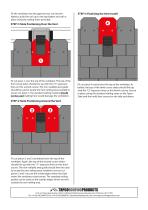
STEP 5: Finalising the Vent Install Fit the ventilator into the gap that was cut into the battens, push the unit up to the top batten and nail in place using the nailing holes provided. STEP 3: Slate Positioning Over the Vent 6" 6.5" 7" 7.5" Fit cut piece 1 over the top of the ventilator. The top of the first course slates should line up with the 7.5" exposure lines on this second course. The non-nailable area guide should be used to locate the new nailing areas needed to secure cut piece 1, the standard nailing markers should not be used (nailing here would damage the ventilator). Fit cut piece...
Open the catalog to page 7All Tapco Roofing Products catalogs and technical brochures
 TapscoSlate Fixing Guide
26 Pages
 Dry verge fixing guide
1 Page
 Tapcoroofing Brochure
8 Pages
 Self-Build Homes Fact Sheet
2 Pages
 Re-Roof Your Home Fact Sheet
2 Pages
 Outdoor Living Fact Sheet
2 Pages
 Modular Homes Fact Sheet
2 Pages
 Conservatory Roof Fact Sheet
2 Pages
 40-year Warranty
2 Pages
 ISO 9001 Certificate
2 Pages
 Wunderlay
2 Pages
 VP300
VP3002 Pages


- Roof tile
- Profile
- Edge profile
- Black roof tile
- Sustainable roofing
- Drain connector
- Industrial roof vent
- Waterproof roofing
- Slate look roof tile
- Roof ridge tile
- Easy to install roofing sheet
- Colored roofing sheet
- Industrial closer
- Roof profile
- Traditional look roof tile
- Slate look roofing
- Lightweight roofing
- Ventilated covering element
- End roof tile