
- Catalogs
- Tapco Roofing Products
- Tapco Cowl Vent Fixing Guide


Tapco Cowl Vent Fixing Guide

Tapco Cowl Vent Fixing Guide
This guide provides instructions for installing the Universal Cowl Soaker Slate Ventilator, suitable for roof pitches between 15° and 60°. For other pitches, contact the technical department.
Installation Procedure
- Preparation: Lay slates to the desired position of the ventilator. Cut the slate below the ventilator to avoid protrusion past the slate batten. Create a 280mm wide gap in the batten at the slate's head.
- Positioning: Ensure the ventilator is not directly above a rafter and that the batten cantilever is not excessive. Cut the underlay with two diagonal cuts, fold back to ensure a free airpath, and fit an underlay protector.
- Ventilator Placement: Position the ventilator centrally on the slates below and level with adjacent slates. Secure it with nails.
- Slate Cutting: Cut two “L” shaped slates to fit on either side of the ventilator, ensuring they abut the cowl upstand neatly. Fix each slate piece twice to the battens.
- Continuation: Lay the next course of slates, cutting the slate directly above the cowl to allow a minimum 20mm clearance to the rear of the cowl.
- Inspection: Check the junction and security of the ventilating unit and adjacent slating before proceeding with further courses.
Visual Aids
Shaded areas in diagrams indicate where tiles need to be cut. Ensure a 280mm gap between cut battens and maintain a 20mm clearance around the cowl.
Catalog excerpts
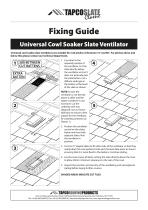
Universal Cowl Soaker Slate Ventilator Universal cowl soaker slate ventilators are suitable for roof pitches of between 15° and 60°. For pitches above and below this please contact our technical department. 1. Lay slates to the required position of the ventilator. Cut the slate directly below the ventilator so that it does not protrude past the slate batten. Cut a 280mm wide gap in the batten at the head of the slate as shown. NOTE: Ensure the ventilator is not directly above a rafter and the batten cantilever is not excessive. Cut the underlay with two diagonal cuts as shown, fold back to ensure a free airpath for the ventilator, fit underlay protector (as Sketch 1). 2. Position the ventilator central on the slates below and level with adjacent slates. Nail the ventilator in position. 3. Cut two "L"shaped slates to fit either side of the ventilator so that they neatly abut the cowl upstand. Hole each formed slate piece as shown ensuring that it is twice fixed to the battens. Continue slating. 4. Lay the next course of slates cutting the slate directly above the cowl to allow 20mm minimum clearance to the rear of the cowl. 5. Inspect the junction and security of the ventilating unit and adjacent slating before laying further courses. SHADED AREAS INDICATE CUT TILES V^ TAPCO I00FING PRODUCTS Unit 32, Tokenspire Business Park, Hull Road, Woodmansey, Beverley, East Yorkshire, HU17 0TB Tel: +44 (0)1482 880478 | Fax: +44 (0)1482 880678 | [email protected] | www.tapcoroofingproducts.com
Open the catalog to page 1All Tapco Roofing Products catalogs and technical brochures
 TapscoSlate Fixing Guide
26 Pages
 Dry verge fixing guide
1 Page
 Tapcoroofing Brochure
8 Pages
 Self-Build Homes Fact Sheet
2 Pages
 Re-Roof Your Home Fact Sheet
2 Pages
 Outdoor Living Fact Sheet
2 Pages
 Modular Homes Fact Sheet
2 Pages
 Conservatory Roof Fact Sheet
2 Pages
 40-year Warranty
2 Pages
 ISO 9001 Certificate
2 Pages
 Wunderlay
2 Pages
 VP300
VP3002 Pages


- Roof tile
- Profile
- Roofing
- Edge profile
- Black roof tile
- Sustainable roofing
- Drain connector
- Industrial roof vent
- Waterproof roofing
- Slate look roof tile
- Roof ridge tile
- Easy to install roofing sheet
- Colored roofing sheet
- Industrial closer
- Roof profile
- Traditional look roof tile
- Slate look roofing
- Lightweight roofing
- Ventilated covering element
- End roof tile