Catalog excerpts

Fixing Guide RidgeMaster Plus and HipMaster installed 12" (305mm) beyond the slot opening. For best appearance install RidgeMaster Plus along the entire length of the ridge and HipMaster along the entire length of the hip. 5. Install TapcoSlate Ridge Cap pieces over RidgeMaster Plus and HipMaster, nailing in the designated nail target areas. Use 3" (76mm) long roofing nails. 6. RidgeMaster Plus and HipMaster have an overlap and an underlap end that interlock when laid end-to-end in proper orientation. This unites the 4 foot (1.22m) sections into a single structural integrated, weather tight system. Always install RidgeMaster Plus and HipMaster with overlap end on outside terminal end of ridge. You should also complete your ridge vent with factory end on the opposite terminal end of the ridge. RidgeMaster Plus and HipMaster will provide 12.228 square inches (7889mm²) of NFVA per linear foot. The RidgeMaster Plus ridge ventilator system and HipMaster hip ventilator system are suitable for roof pitches of between 14° and 45°. We recommend RidgeMaster Plus 11" (279mm) to meet your ridge ventilation requirements and HipMaster 11" for your hip ventilation requirements. Make sure to follow the steps below when installing TapcoSlate and RidgeMaster Plus/HipMaster: 1. Cut a 1" (25mm) opening in the ridge of the roof, end all cuts 12" (305mm) from outside walls, chimneys, ridge corners or hip joints. 2. Install slates up to the opening. 3. Fold felt over last course of slates or install metal J channel to prevent the infiltration of fine powder snow between keyways. 4. Install RidgeMaster Plus and HipMaster using 3" (76mm) roofing nails. RidgeMaster Plus should be Underlap Ends Supported Nail Bosses (For nailing vent to roof sheathing) HipMaster® (With patented triple baffle system engineered to keep blowing rain and snow from entering hip.) Slotted Ends Blowing Snow & Bug Barrier (Must be left in) Baffles Structural Ribs Overlap Ends (Always start with Overlap end on outside terminal end of roof ) Nailing Guide To use for nail alignment when installing cap shingles Nailing Guide To use for nail alignment when installing cap shingles Slotted Inte
Open the catalog to page 1
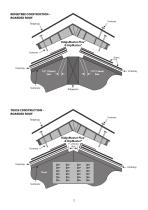
RIDGETREE CONSTRUCTION – BOARDED ROOF Fastener RidgeMaster Plus® & HipMaster® Fastener Slates TRUSS CONSTRUCTION – BOARDED ROOF Fastener RidgeMaster Plus® & HipMaster® 1" (25mm) Slot Underlay Underlay Truss
Open the catalog to page 2
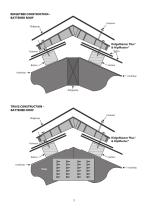
RIDGETREE CONSTRUCTION – BATTENED ROOF Fastener Ridgecap RidgeMaster Plus® & HipMaster® Slates Underlay Underlay TRUSS CONSTRUCTION – BATTENED ROOF Fastener Ridgecap RidgeMaster Plus® & HipMaster® Underlay Underlay
Open the catalog to page 3
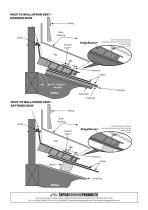
ROOF TO WALL/APRON VENT – BOARDED ROOF Siding Base Flashing Sealant Tape** Centre additional nail along nail guide located on vent. Drive one nail between all nail bosses Fastener Slates Substrate Underlay ROOF TO WALL/APRON VENT – BATTENED ROOF Siding Base Flashing Sealant Tape** Centre additional nail along nail guide located on vent. Drive one nail between all nail bosses Fastener Slates Batten Unit 32, Tokenspire Business Park, Hull Road, Woodmansey, Beverley, East Yorkshire, HU17 0TB Tel: +44 (0)1482 880478 | Fax: +44 (0)1482 880678 | international@tapcoint.com | www.tapcoroofingproduct
Open the catalog to page 4All Tapco Roofing Products catalogs and technical brochures
-
TapscoSlate Fixing Guide
26 Pages
-
Dry verge fixing guide
1 Pages
-
Tapcoroofing Brochure
8 Pages
-
Self-Build Homes Fact Sheet
2 Pages
-
Re-Roof Your Home Fact Sheet
2 Pages
-
Outdoor Living Fact Sheet
2 Pages
-
Modular Homes Fact Sheet
2 Pages
-
Conservatory Roof Fact Sheet
2 Pages
-
40-year Warranty
2 Pages
-
ISO 9001 Certificate
2 Pages
-
Tapco Chemical Compatibility
1 Pages
-
Tapco Cowl Vent Fixing Guide
1 Pages
-
Tapco Abutment Ventilator
1 Pages
-
Wunderlay
2 Pages
-
VP300
2 Pages


