Echo Chandelier
1 /6Pages

Echo Chandelier
1 /6Pages
Catalog excerpts
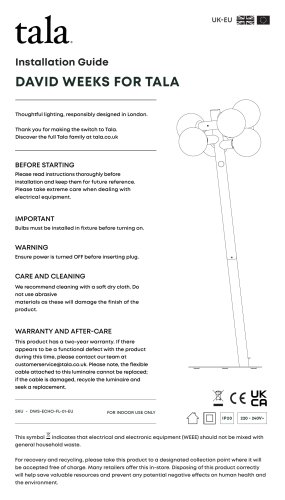
Installation Guide DAVID WEEKS FOR TALA Thoughtful lighting, responsibly designed in London. Thank you for making the switch to Tala. Discover the full Tala family at tala.co.uk BEFORE STARTING We advise the fitting of this ceiling rose and pendant to be performed by a qualified electrician. Please read through these instructions before commencing work, and keep them for future reference. Please take extreme care when carrying out these instructions. IMPORTANT This light fitting must be connected to the supply earth. If your lighting circuit does not have an earth, ask a qualified electrician to provide an earth facility. This light fitting is suitable for indoor use only. This fitting operates on 240V mains voltage. WARNING Always switch off electricity supply at the mains during installation and maintenance. We recommend that the fuse is withdrawn or the circuit breaker is switched off whilst work is in progress. Do not just turn off at the wall switch. All fittings must be installed in accordance with current Building Regulations and IEE Wiring Regulations. RECOMMENDED EQUIPMENT - Small flat head screwdriver - Wire strippers - Insulation tape Further equipment may be required for fixing to your ceiling. Please visit our website to see our recommended dimmers.
Open the catalog to page 1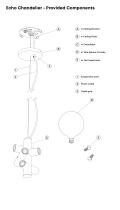
(A x1 Ceiling Bracket (A xl Ceiling Plate (C xl Chandelier (D x7 Tala Sphere IV bulbs (E x2 Flat head bolts (A Suspension cord (2 Power cable (3 Cable grip
Open the catalog to page 2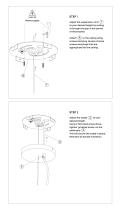
Adjust the suspension cord 1 to your desired height by pulling it through the grip in the centre of the bracket. Attach A to the ceiling using screws and plug. Always choose screws and plugs that are appropriate for the ceiling. STEP 2 Adjust the Cable 2 to your desired length. Using a flat head screw driver, tighten ‘grub/set screw’ on the cable grip 3 . This will secure the cable in place. Maintain all double insulation.
Open the catalog to page 3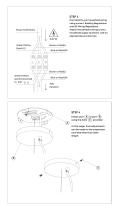
STEP 3 First identify your household wiring using current Building Regulations and IEE Wiring Regulations. Attach the pendant wiring to your household supply as shown. Use an appropriate junction box. House hold Mains Brown or Red(L) Blue or Black(N) Green/Yellow (earth) Attached to Part A Blue or Black(N) Tala Pendant Fasten part A to part B using the bolts E provided. At this stage, final adjustments can be made to the suspension cord and electrical cable length.
Open the catalog to page 4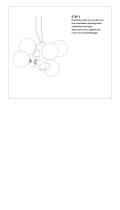
STEP 5 Carefully insert your bulbs into the chandelier rotating each clockwise until tight. Take care not to tighten too much to avoid breakage.
Open the catalog to page 5
CARE AND CLEANING We recommend cleaning with a soft dry cloth. Do not use abrasive materials as these will damage the finish of the product. WARRANTY AND AFTER-CARE This product has a two-year warranty. If there appears to be a functional defect with the product during this time, please contact our team at [email protected]. Please note, the flexible cable attached to this luminaire cannot be replaced; if the cable is damaged, recycle the luminaire and seek a replacement. This symbol indicates that electrical and electronic equipment (WEEE) should not be mixed with general household...
Open the catalog to page 6All Tala catalogs and technical brochures
 Echo Floor Lamp
4 Pages
 Globe E27 LED Bulb
1 Page
 Plug-In Pendant in Brass
1 Page

Archived catalogs
 TALA Catalog 2018
31 Pages