- Catalogs
- STÖCKL PARKETT
- BHARD MODERN
BHARD MODERN
1 /14Pages

BHARD MODERN
1 /14Pages
Catalog excerpts

modern Installation instructions Herringbone It’s wood. It’s hard. It’s nature
Open the catalog to page 1
Installation & maintenance instructions B:hard modern herringbone For optimum advice, fulfillment of all inspection obligations and professional installation, please contact an installation specialist. The specifications of the currently valid standards, the general rules of technology and the guidelines on the manufacturer's data sheets and instructions apply to the installation and subsequent use. In order to obtain a warranty and the best installation results, the following installation and regulations must be observed without fail. It is extremely important to read and understand this information...
Open the catalog to page 2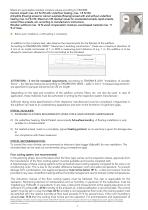
Maximum permissible residual moisture values according to ÖNORM: Cement screed: max. 2.0 % CM with underfloor heating, max. 1.8 % CM. Anhydrite (flowing) screed or calcium sulphate (flowing) screed with and without underfloor heating max. 0.3 % CM. Maximum CM residual values for accelerated screeds, rapid screeds, cement flow screeds, etc. according to manufacturer's instructions. Wooden subfloors max. 12 % wood compensation moisture, wood-based materials max. 11 % of mass. Before each installation, a CM-reading is mandatory! In addition to the moisture test, also observe the requirements for...
Open the catalog to page 3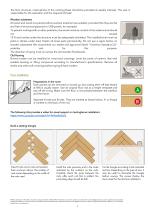
the floor structure, interruptions of the cooling phase should be provided at weekly intervals. The user is responsible for the operation and the required climate! Wooden substrates All wood and wood-mix panels without surface treatment are suitable, provided that they are flat and free of structures (plywood or OSB panels, for example). To prevent mold growth or other problems, the wood moisture content of the substructure should not exceed 12 % and cavities under the structure must be adequately ventilated. The installed level must not yield or vibrate under load. Fasten all loose parts permanently....
Open the catalog to page 4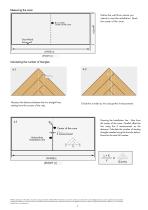
Define the wall from where you intend to start the installation. Mark the center of the room. Center of the room WIDTH Starter wall Calculating the number of triangles Measure the distance between the two straight lines, starting from the corners of the rods. Divide this number by two and get the X measurement. 4:3 Center of the room X measurement Drawing the installation line - Start from the center of the room. Parallel offset the line using the X measurement as the distance. Calculate the number of starting triangles needed using the formula below. Round to the next full number. Installation...
Open the catalog to page 5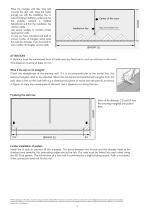
Center of the room Allign with installation line! Installation line ATTENTION! A distance must be maintained from all walls and any fixed parts, such as columns in the room. This distance must be at least 14 mm. What if the wall is not straight? Check the straightness of the starting wall. If it is not perpendicular to the center line, the starting triangles need to be adjusted. Move the connected and positioned triangles from the wall, draw a line on the rods with e.g a drawing tool (piece of wood with the pencil), as shown in figure, to copy any unevenness of the wall. Use a jigsaw to cut along...
Open the catalog to page 6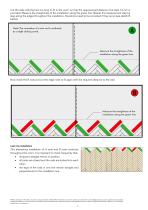
Cut the side rods that are too long to fit in the room, so that the required wall distance of at least 14 mm is provided. Measure the straightness of the installation along the green line. Repeat this measurement step by step along the edges throughout the installation. Deviations need to be corrected if they occur (see sketch B below). Now install the B rods and cut the edge rods to fit again with the required distance to the wall. Last row installation This alternating installation of A rods and B rods continues throughout the room. It is important to check frequently that: all spacer wedges...
Open the catalog to page 7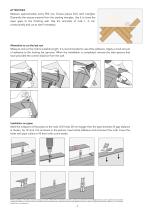
Measure approximately every fifth row. Excess pieces from start triangles: Dismantle the excess material from the starting triangles. Use it to close the open gaps to the finishing wall. Use the remnants of rods 1, 2, etc. consecutively and cut to size if necessary. Alternative to cut the last row Measure and cut the rods to suitable length. It is recommended to use white adhesive. Apply a small amount of adhesive to the locking bar (groove). When the installation is completed, remove the side spacers that have provided the correct distance from the wall. Installation on pipes Mark the midpoint...
Open the catalog to page 8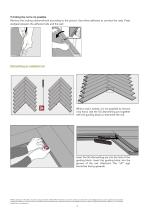
If clicking the rod is not possible Remove the locking element/hook according to the picture. Use white adhesive to connect the rods. Press wedges between the adhered rods and the wall. When a rod is locked, it is not possible to remove it by hand. Use the 5G dismantling pin together with the guiding block to dismantle the rod. Insert the 5G dismantling pin into the hole of the guiding block. Insert the guiding block into the groove of the rod. Attention! The "UP" sign should be facing upwards. With the publication of this edition, all previous versions lose their validity! With this information,...
Open the catalog to page 9
Push forward the 5G dismantling pin. The 5G dismantling pin pushes back the flexible tongue and releases the rod for dismantling. Now it is easy to lift the rod by its long side. Full surface bonding The temperature of the subfloor during installation must be at least 15° C, max. 28° C, and the relative humidity 45 – 65 %. For full surface bonding, neither a PE-foil nor an insulating carpet pad is required. Mark the area to be glued on the first three rows using a chalk line to apply the glue after the elements have been reassembled. Proceed only after the initial rows are firmly fixed. Never...
Open the catalog to page 10
Once a year, it is advisable to remove the resulting layers with Parquet Care Remover and then use the care products to give the floor a new shine. Always observe application instructions! Initial care of oiled wooden surfaces Remove coarse dirt with a mop, hair broom or vacuum cleaner, fine dust with lukewarm water. Stöckl Parkett recommends initial oiling with maintenance oil after installation to achieve an even better surface. This reduces the absorption of mop water over the edges of the parquet significantly. Then the entire surface is polished with a single-disc machine by the installer....
Open the catalog to page 11All STÖCKL PARKETT catalogs and technical brochures
 EPICO 190 trend
1 Page
 BHARD INSTALLATION
10 Pages
 2-PARQUET INSTALLATION
9 Pages
 ECODUR
9 Pages
 B:HARD
6 Pages
- Industrial wood floor
- Glued wood floor
- Engineered parquet flooring
- Oak parquet floor
- Strip parquet floor
- Oiled parquet floor
- Home parquet floor
- Living room wood floor
- Commercial parquet floor
- PEFC certified parquet floor
- Varnished parquet floor
- Matte parquet floor
- Chevron parquet flooring
- Sustainable parquet floor
- Wide plank parquet flooring
- Boat deck parquet floor
- Kitchen parquet floor
- American walnut parquet floor
- Ash parquet floor
- Beech parquet floor