- Catalogs
- STÖCKL PARKETT
- 2-PARQUET INSTALLATION
2-PARQUET INSTALLATION
1 /9Pages
2-PARQUET INSTALLATION
1 /9Pages
Catalog excerpts

Installation instructions 2-layer-engineered-parquet www.stoeckl.com
Open the catalog to page 1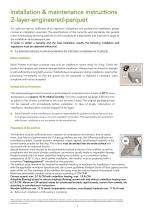
Installation & maintenance instructions 2-layer-engineered-parquet For optimum advice, fulfillment of all inspection obligations and professional installation, please contact an installation specialist. The specifications of the currently valid standards, the general rules of technology and the guidelines on the manufacturer's data sheets and instructions apply to the installation and subsequent use. In order to obtain a warranty and the best installation results, the following installation and regulations must be observed without fail. It is extremely important to read and understand this information...
Open the catalog to page 2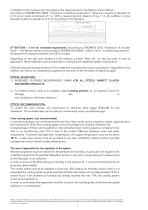
In addition to the moisture test, also observe the requirements for the flatness of the subfloor. According to ÖNORM DIN 18202 "Tolerances in building construction", these are a maximum deviation of 4 mm at an inside micrometer of 1 m. With a measuring point distance of e.g. 1 m, the subfloor is to be allowed a maximum allowance of 4 mm according to the standard. Measuring point distance Inside micrometer ATTENTION! – 3 mm for increased requirements. According to ÖNORM B 2218 "Installation of wooden floors" – the flatness tolerances according to ÖNORM DIN 18202 – table 3, line 4 "increased requirements"...
Open the catalog to page 3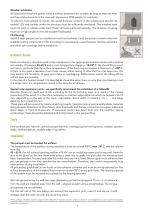
Wooden substrates All wood and wood-mix panels without surface treatment are suitable, as long as they are even and free of structures (as is the case with plywood or OSB-panels, for example). To prevent mold growth or similar, the wood moisture content of the substructure should not exceed 12% and cavities under the structure must be sufficiently ventilated. The installed level must not yield or vibrate under load. Fasten all loose parts permanently. The direction of laying must run at right angles to the old wooden floorboards. Old flooring Stöckl 2-layer parquet can be installed on most hard...
Open the catalog to page 4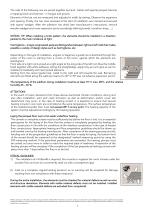
The rods of the following row are joined together by hand - better with special parquet hammer or tapping block and hammer - in tongue and groove. Elements of the last row are measured and adjusted in width by sawing. Observe the expansion joint spacing. Finally, the two rows recessed at the start of installation are inserted and secured with spacer wedges. After the adhesive has dried (see manufacturer's instructions), remove wooden wedges and cover expansion joints accordingly (skirting boards, transition strips, ...) STÖCKL TIP: When installing a brick pattern, the elements should be installed...
Open the catalog to page 5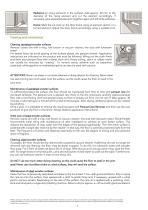
Radiators (or rising elements in the surface): Add approx. 20 mm to the diameter of the rising element and cut the element accordingly. If necessary, glue separated elements together again with D3 white adhesive. Doors: Mark the cut mark on the door frame using an element section or a turned element. Adjust the door frame accordingly using a suitable tool. Cleaning and maintenance Cleaning varnished wooden surfaces Remove coarse dirt with a mop, hair broom or vacuum cleaner, fine dust with lukewarm water! For sealed floors (to avoid graying of the surface) please use parquet cleaner. Application...
Open the catalog to page 6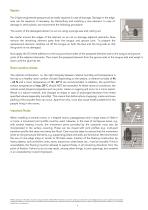
Repairs The 2-layer-engineered-parquet can be easily repaired in case of damage. Damage in the edge area can be repaired, if necessary, by dismantling and inserting a new element. In case of damage in other places, we recommend the following procedure: The center of the damaged element is cut out using a plunge saw and cutting rail. Be careful around the edges of the element so as not to damage adjacent elements. Now remove the remaining element parts from the tongue and groove joint. To prepare the replacement element, carefully cut off the tongue on both the face and the long side so that the...
Open the catalog to page 7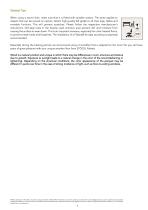
General Tips When using a swivel chair, make sure that it is fitted with suitable castors. The same applies to objects that can be moved on castors. Attach high-quality felt glides to all chair legs, tables and movable furniture. This will prevent scratches. Please follow the respective manufacturer's instructions. Dirt-stop mats in the heavily used entrance area prevent dirt and moisture from causing the surface to wear down. This is an important measure, especially for color-treated floors, to prevent tread marks and footprints. The installation of a Fidbox® for data recording is expressly...
Open the catalog to page 8
www.stoeckl.com With the publication of this edition, all previous versions lose their validity! With this information, we want to advise you to the best of our knowledge based on our tests, experience and standards applied. The conditions on site are not known to STÖCKL and must be checked by a specialist and the structure adapted if necessary. Valid for all pages. Stöckl GmbH I Heide 25 | 3331 Kematen an der Ybbs I www.stoeckl.com
Open the catalog to page 9All STÖCKL PARKETT catalogs and technical brochures
 EPICO 190 trend
1 Page
 BHARD INSTALLATION
10 Pages
 BHARD MODERN
14 Pages
 ECODUR
9 Pages
 B:HARD
6 Pages
- Industrial wood floor
- Glued wood floor
- Engineered parquet flooring
- Oak parquet floor
- Strip parquet floor
- Oiled parquet floor
- Home parquet floor
- Living room wood floor
- Commercial parquet floor
- PEFC certified parquet floor
- Varnished parquet floor
- Matte parquet floor
- Chevron parquet flooring
- Sustainable parquet floor
- Wide plank parquet flooring
- Boat deck parquet floor
- Kitchen parquet floor
- American walnut parquet floor
- Ash parquet floor
- Beech parquet floor