evohome Wireless Radiator Zoning Kit
1 /24Pages

evohome Wireless Radiator Zoning Kit
1 /24Pages
Catalog excerpts

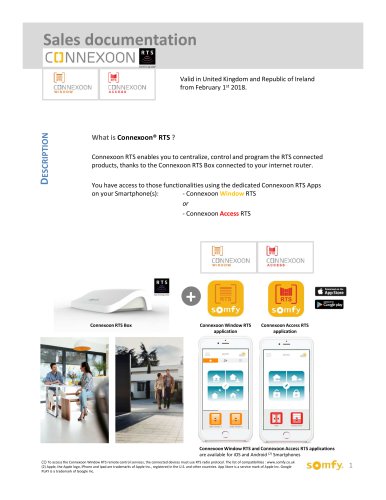
evohome Wireless Radiator Zoning Kit Installation & User Guide
Open the catalog to page 1
Getting the most from your evohome system
Open the catalog to page 2
Installation & User Guide Getting the most from your evohome system Thanks for choosing an evohome Wireless Radiator Zoning Kit. By adding Wireless Radiator Zoning Kits to your evohome system you are creating smart zones which means more comfort, more control and savings of up to 40% on heating your home*. Energy savings by smart zoning Heating the whole house as one zone is like turning all your lights on from one switch. With an evohome Connected Pack and a Wireless Radiator Zoning Kit on each radiator you can divide your home into separate areas based on your lifestyle, so you only need to...
Open the catalog to page 3
Getting the most from your evohome system
Open the catalog to page 4
Installation & User Guide 3 Follow these instructions to learn more about smart zoning and set up your Radiator Controllers. Before you start Make sure you have an evohome Wireless Heating Controller installed and a Radiator Zoning Kit for each radiator in your home. Icon Key Radiator Controller overview 4 Set up your Radiator Controller 5 Using your Radiator Controller 13 Technical & Safety information 19
Open the catalog to page 5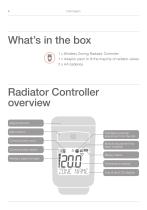
What’s in the box 1 x Wireless Zoning Radiator Controller 1 x Adaptor pack to fit the majority of radiator valves 2 x AA batteries Radiator Controller overview Adjustment dial Menu button Communication error Communication status Indicates a manual adjustment from the dial Manual adjustment has been disabled Battery status Wireless signal strength Temperature display Line of text LCD display
Open the catalog to page 6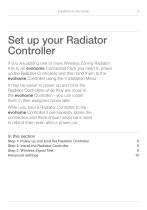
Installation & User Guide Set up your Radiator Controller If you are adding one or more Wireless Zoning Radiator Kits to an evohome Connected Pack you need to power up the Radiator Controllers and then bind them to the evohome Controller using the ‘Installation Menu’. It may be easier to power up and bind the Radiator Controllers while they are close to the evohome Controller - you can install them in their assigned zones later. When you bind a Radiator Controller to the evohome Controller it permanently stores the connection and there should never be a need to rebind them even after a power...
Open the catalog to page 7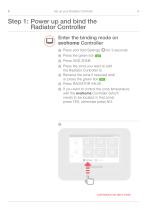
Set up your Radiator Controller Step 1: Power up and bind the Radiator Controller Enter the binding mode on evohome Controller Press and hold Settings for 3 seconds Press the green tick 3 Press ADD ZONE 4 Press the zone you want to add the Radiator Controller to 5 Rename the zone if required and/ or press the green tick 6 Press RADIATOR VALVE 7 If you want to control the zone temperature with the evohome Controller (which needs to be located in that zone) press YES, otherwise press NO. 1 2 Monday 27 April Quick Actions Living room Dining room
Open the catalog to page 8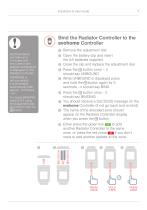
Installation & User Guide 7 Installation & User Guide 7 ! Synchronisation can take up to 4 minutes until the current room setpoint temperature is displayed on the Radiator Controller. If BINDING is not successful, it is terminated automatically after approx. 10 minutes. - or -To cancel BINDING, select EXIT using the adjustment dial and confirm with the HD button. Bind the Radiator Controller to the evohome Controller ^ Remove the adjustment dial 3 Open the battery clip and insert the AA batteries supplied 3 Close the clip and replace the adjustment dial 3 Press the g button once - it should say...
Open the catalog to page 9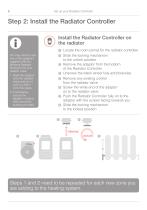
8 Set up your Radiator Controller e You may need to use one of the adaptors supplied with the Wireless Radiator Zoning Kit for your radiator valve: 1. Slide the adaptor onto the radiator valve and turn it until you feel it click into place. 2. If necessary, secure the adaptor in place with one of the screws provided. Install the Radiator Controller on the radiator ^ Locate the room (zone) for the radiator controller Slide the locking mechanism to the unlock position 3 Remove the adaptor from the bottom of the Radiator Controller ^ Unscrew the black wheel fully anticlockwise 3 Remove any existing...
Open the catalog to page 10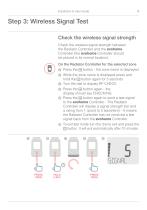
Installation & User Guide 9 Check the wireless signal strength Check the wireless signal strength between the Radiator Controller and the evohome Controller (the evohome Controller should be placed in its normal location). On the Radiator Controller for the selected zone Press the g button - the zone name is displayed While the zone name is displayed press and hold the g button again for 5 seconds Turn the dial to display RF CHECK Press the g button again - the display should say CHECKING Press the g button again to send a test signal to the evohome Controller - The Radiator Controller will display...
Open the catalog to page 11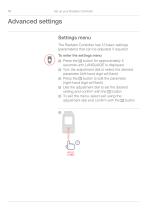
10 Set up your Radiator Controller Settings menu The Radiator Controller has 12 basic settings (parameters) that can be adjusted if required. To enter the settings menu Press the (H button for approximately 5 seconds until LANGUAGE is displayed Turn the adjustment dial to select the desired parameter (left-hand digit will flash). Press the (H button to edit the parameter (right-hand digit will flash) Use the adjustment dial to set the desired setting and confirm with the m button To exit the menu, select exit using the adjustment dial and confirm with the (U button
Open the catalog to page 12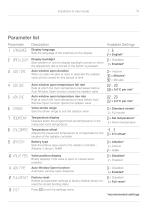
Installation & User Guide Parameter list Parameter
Open the catalog to page 13
Set up your Radiator Controller
Open the catalog to page 14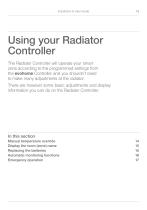
Installation & User Guide 13 Using your Radiator Controller The Radiator Controller will operate your smart zone according to the programmed settings from the evohome Controller and you shouldn’t need to make many adjustments at the radiator. There are however some basic adjustments and display information you can do on the Radiator Controller. Manual temperature override 14 Display the room (zone) name 15 Automatic monitoring functions 16
Open the catalog to page 15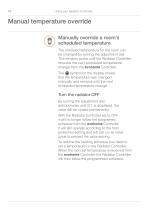
14 Using your Radiator Controller Manually override a room’s scheduled temperature The sheduled temperature for the room can be changed by turning the adjustment dial. This remains active until the Radiator Controller receives the next scheduled temperature change from the evohome Controller. The # symbol on the display shows that the temperature was changed manually and remains until the next scheduled temperature change. Turn the radiator OFF By turning the adjustment dial anticlockwise until OFF is displayed, the valve will be closed permanently. With the Radiator Controller set to OFF it...
Open the catalog to page 16All SOMFY catalogs and technical brochures
 Situo io II
2 Pages
 Keygo 4 RTS
2 Pages
 TaHoma® switch
12 Pages
Archived catalogs
 HOME ALARM PRODUCT SHEET
15 Pages
 Situo io II
2 Pages
 evohome-User-Guide
20 Pages
 DEXXO PRO 800 - 1000 RTS
13 Pages
 ROLLIXO RTS
4 Pages
 Irismo Wirefree User Manual
116 Pages
 GDK 700
68 Pages
 Lighting Indoor RTS
28 Pages
 INDOOR PLUG PRODUCT SHEET
2 Pages
 Somfy Protect Camera + TaHoma
12 Pages
 Smart Home Brochure
12 Pages
 lightingoutdoor_rts
2 Pages
 Motorized blinds by somfy
8 Pages
 Dexxo Pro
8 Pages
 Sonesse 50
2 Pages
 Sunea Screen io
2 Pages
 LS 40
LS 402 Pages
 Sonesse 40 RTS 447 MHz
2 Pages
 Sonesse 40 RTS
2 Pages
 Sonesse 30
2 Pages
 Screen Up
2 Pages
 Screen Job 40
2 Pages
 LT 50
LT 502 Pages
 J4 WT
J4 WT2 Pages
 LV25 / LW25
2 Pages
 J4 HTM
2 Pages
 LT 28
LT 282 Pages
 J4 2TN
2 Pages
 J4 io
J4 io2 Pages
 J4 1TN
2 Pages
 J4 RTS
2 Pages
 Irismo
2 Pages
 Glydea
2 Pages
 Altus 50 RTS
2 Pages
 SOMFY CATALOG
25 Pages
 Awnings That Think Brochure
2 Pages
 Sunis Flyer
2 Pages
 Sonesse Range Brochure
8 Pages
 animeo IP Brochure
16 Pages
 WireFree Range Brochure
7 Pages
 ZRTSI Flyer
2 Pages
 TaHomA Brochure
28 Pages
 rts_brochure_2012
28 Pages
 enjoy_lifes_simple_pleasures
8 Pages
 2011_rts_pocket_guide_low
93 Pages
 WireFreeSolar Pack
2 Pages
 Awnings That Think
2 Pages
 DEXXO PRO
8 Pages
 Patios - The Somfy way
8 Pages
 Motorised blinds by Somfy
6 Pages


- Contemporary switch
- Recessed switch
- Industrial socket
- Square switch
- Contemporary socket
- Industrial plug socket
- Door intercom
- Push-button switch
- Surface-mounted detector
- Wall-mounted socket
- Recessed socket
- Security camera
- White detector
- White switch
- Ventilation controller
- White socket
- Wall-mounted ventilation controller
- Gate automation
- Surface-mounted security camera