FIRE PIT INSTALLATION and USER MANUAL
1 /15Pages

FIRE PIT INSTALLATION and USER MANUAL
1 /15Pages
Catalog excerpts
Contemporary design, formed in concrete. INSTALLER: Leave this manual with the appliance CONSUMER: Retain this manual for future reference
Open the catalog to page 1
SOLUS DECOR FIRE PIT INSTALLATION AND USER MANUALFor Outdoor Use Only. Read Installation and User Manual before use. This fi re pit is tested for compliance to the standards: ANSI Z2 1.97 - 2004/CSA 2.41 - 201 4 Outdoor Decorative Gas Appliance and CSA 2.17 - 201 7 Gas-Fired Appliances for Use at High Altitudes. Made in Canada by Solus Decor Inc. - 1 09 Braid St., Building C, New Westminster, BC, V3L 5H4 Canada - T: (604) 255-2472 - E: [email protected] Gas Type: NG (Natural Gas) LP (Liquid Propane) Electric if applicable: 24V/1 10VAC, 1.5A, 60 Hz Gas Pressure: NG - Inlet pressure: 7.0 inwc;...
Open the catalog to page 2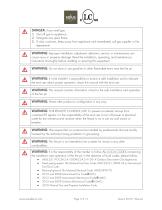
diately call gas supplier or fire 2) Extinguish any open flame 3) If odor continues, keep away from appliance and imme department WARNING: We require that our products be installed by professionals that are locally licensed by the authority having jurisdiction in gas piping. WARNING: This fi re pit is not intended to be a starter for wood or any other combustibles. WARNING: It is the responsibility of the installer to follow ALL LOCAL CODES concerning the installation and operation of the fire pit. In the absence of local codes, please follow: • ANSI Z2 1.97/CSA 2.4 1 -2004/CSA 2.4 1 -2014 Outdoor...
Open the catalog to page 3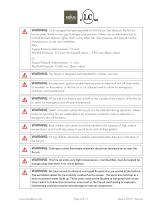
WARNING: Only use gas/fuel type specified for this fire pit. See label on the fire pit burner plate. Verify correct gas/fuel type and pressure. Never use an alternative fuel to include bio-fuel, ethanol, lighter fluid or any other fuel. Gas pressure and type should be checked prior to use and installation. NG: Supply Pressure: Inlet pressure: 7.0 inwc Manifold Pressure: 3.5 inwc (Honeywell valve) / 5.80 inwc (Baso valve) LP: Supply Pressure: Inlet pressure: 1 1 inwc Manifold Pressure: 1 0.80 inwc (Baso valve) WARNING: Both children and adults should be alerted to the hazards of high surface temperatures...
Open the catalog to page 4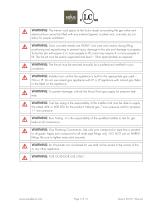
WARNING: The interior void space of the Solus vessel surrounding the gas valve and electrical box cannot be filled with any material (gravel, crushed rock, concrete, etc.) to allow for proper ventilation. WARNING: FOR OUTDOOR USE ONLY www.solusdecor.com
Open the catalog to page 5
TABLE of CONTENTS: 1) Location of Installation 2) Fire Pit Installation 3) Placement of Lava Rocks and Refractory Stones 4) Parts List 5) Fire Pit Operation 6) Maintenance 7) LP Gas Conversion 8) Troubleshooting 1. LOCATION OF INSTALLATION The Solus fire pit vessel must be placed on a stable surface. Select a location with good drainage that allows easy access for installation and maintenance of the fire pit. Pick a location that allows sufficient horizontal room to enjoy the fire pit while allowing a safe distance from the heat and flame (see “Safe Fire pit Clearance”) The weight of the burner...
Open the catalog to page 6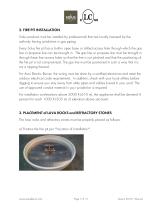
2. FIRE PIT INSTALLATION Solus products must be installed by professionals that are locally licensed by the authority having jurisdiction in gas piping. Every Solus fire pit has a built-in open base or drilled access hole through which the gas line or propane line can be brought in. The gas line or propane line must be brought in through these line access holes so that the line is not pinched and that the positioning of the fire pit is not compromised. The gas line must be positioned in such a way that it is not a tripping hazard. For Auto Electric Burner, the wiring must be done by a certified...
Open the catalog to page 7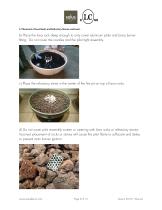
3. Placement of Lava Rocks and Refractory Stones continued… b) Place the lava rock deep enough to only cover aluminum plate and brass burner fitting. Do not cover the nozzles and the pilot light assembly. c) Place the refractory stone in the center of the fire pit on top of lava rocks. d) Do not cover pilot assembly screen or opening with lava rocks or refractory stones. Incorrect placement of rocks or stones will cause the pilot flame to suffocate and delay or prevent main burner ignition.
Open the catalog to page 8
Solus fire pit equipped with either Manual Lit System or if optioned Electronic Ignition Systems comes standard with the following: • Fire pit vessel • Cross-jet action brass burner • Aluminum burner plate and burner plate support • If optioned, Manual Lit System with Flame Supervision Gas Valve and Pilot/Thermocouple Assembly. • If optioned, Electronic Ignition System with Automatic Gas Valve, Pilot Assembly, Ignition Control Module and 24V Transformer. • LP Conversion Kits, consisting of the following parts: o LP Nozzles (4 pieces) - for both Electronic Ignition and Manual Lit System For Baso...
Open the catalog to page 9
5. Fire Pit Operation continued… WARRANTY REQUIREMENT: When not in use the fire pit must always be covered with the All-Weather Cover and/or Metal Tabletop from Solus. IMPORTANT: During the initial start-up, it may be necessary to purge air in gas lines after system installation. 5.2 Lighting Instructions IMPORTANT: During the initial start-up, it is necessary to purge air in gas lines after system installation. Purging the air is especially important for firepits equipped with Electronic Ignition System or Manual Lit System equipped with Flame Supervision Valve System. A) BEFORE LIGHTING: Smell...
Open the catalog to page 10
5.3 Manual-Lit System Lighting Instructions Manual Lit System with manual ball valve: 1. STOP! Read the safety information above and read the User Manual before proceeding to the next step. 2. Turn key valve clockwise to the OFF position. 3. Wait (5) minutes to clear out any gas. Then smell for gas. a. If you smell gas, STOP! See front page- “What to do if smell gas” section. b. If you do not smell gas, proceed to next step. 4. Turn key valve slowly counter-clockwise to the ON position, while simultaneously using a lighter to ignite the burner. Immediately after the pilot light is lighted, retrieve...
Open the catalog to page 11
5.5 Electronic Ignition System – Lighting Instructions 1. STOP! Read the safety information above and read the User Manual before proceeding to the next step. 2. Allow 10 minutes to purge the air off the system, then ON/OFF Switch (such as a wall switch) to ON position. 3. Never leave fire pit unattended by an adult. 5.6 Electronic Ignition System – Extinguishing 1. ON/OFF Switch to OFF position. 2. Carefully verify flame is OUT. 3. After cooling, cover fire pit with Solus cover. WARNING: If the flame will not stay lit after several attempts, turn the key valve to the OFF position and call your...
Open the catalog to page 12- Industrial contemporary table
- Commercial table
- Outdoor table
- Gray table
- Square table
- Brown table
- Beige table
- Garden table
- Fireplace mantel
- Stone fireplace mantel
- Gas fire pit
- Traditional fireplace mantel
- Garden fountain
- Concrete table
- Concrete fire pit
- Contemporary fountain
- Bioethanol fire pit
- Contemporary fireplace mantel