
- Catalogs
- Siemens Home Appliances
- 9000646020

9000646020

9000646020
Before installation, inspect the appliance for transport damage. Only a licensed expert should connect the appliance to maintain the warranty. The oven is for domestic use only and should not be operated unsupervised by children or those lacking sufficient knowledge. Avoid touching hot surfaces and never store combustible items in the cooking compartment.
The control panel features retractable control knobs and a display for setting various functions. The function selector sets the type of heating, while the temperature selector adjusts the temperature or grill setting. The oven light and cooling fan operate as needed to prevent overheating.
Set the clock and heat up the oven before first use. Clean all accessories thoroughly.
Select the type of heating and temperature. Rapid heating is available for quick preheating. Timer settings include cooking time and end time options.
Use appropriate cleaning agents and follow instructions for detaching and refitting parts like rails and the oven door. Regular maintenance ensures optimal performance.
Refer to the malfunction table for common issues. Replace the oven light bulb as needed.
Follow energy-saving tips and dispose of the appliance in an environmentally friendly manner.
Includes guidelines for baking, roasting, grilling, and preparing special dishes. Provides tips for energy-efficient cooking and reducing acrylamide in food.
The oven comes with various accessories like wire racks and universal pans. Special accessories are available for purchase to enhance cooking capabilities.
The document outlines various oven accessories and their uses, including different types of trays and pans such as the glass pan, pizza tray, bakestone, enamel baking tray, and universal pan, each designed for specific cooking needs. It also describes telescopic shelves for easy access and self-cleaning features for oven maintenance.
Before using the oven, users must set the clock and heat the oven to remove any new appliance smell. Detailed instructions are provided on setting the type of heating, temperature, and using rapid heating for efficient cooking.
The oven offers various time-setting options including a timer, cooking time, and end time settings. These features allow users to manage cooking schedules effectively, ensuring the oven switches off automatically when the cooking time elapses.
The oven includes a childproof lock to prevent accidental operation by children. Users can also customize basic settings to suit their preferences, ensuring safe and convenient use.
- Edges of the oven may be rough due to incomplete enamelling, but this does not affect anti-corrosion protection.
- Avoid using sharp or abrasive cleaning agents, high alcohol concentration cleaners, hard scouring pads, or high-pressure cleaners.
- For self-cleaning surfaces, use hot soapy water and a dish cloth. Do not use oven cleaner on ceramic coatings.
- To regenerate the ceramic coating, heat the empty oven at maximum temperature for 2 hours.
- Door Panels: Use glass cleaner and a soft cloth.
- Oven Light Cover: Clean with hot soapy water.
- Shelves and Accessories: Soak in hot soapy water and clean with a dish cloth or brush.
- Rails and oven door can be removed for cleaning. Ensure the oven is cool before detaching.
- Follow specific steps to detach and reattach the oven door and panels safely.
- Common malfunctions include power issues and dust on contacts. Refer to the troubleshooting table for solutions.
- For error messages, press the 0 button to clear. If unresolved, contact after-sales service.
- Preheat only if necessary and use dark baking tins for better heat absorption.
- Dispose of packaging and old appliances in an environmentally-friendly manner.
- Use the recommended shelf positions and temperatures for different types of baking.
- For even browning, start with lower temperatures and adjust as needed.
- Specific tables provide guidance on baking times and temperatures for various dishes.
1. Temperature and Time: Various baked goods such as cakes, biscuits, and bread have specific temperature and time settings. For example, small cakes require 150-160°C for 25-30 minutes, while bread needs 180-190°C for 35-40 minutes.
2. Preheating: Preheat the oven at a higher temperature before reducing it and inserting the food.
3. Common Baking Issues: Solutions are provided for issues like cakes collapsing, uneven browning, and dryness. Adjustments in temperature, baking time, and fluid content are recommended.
1. Meat Preparation: Use the universal pan with a wire rack for roasting. Adjust cooking times based on the weight of the meat.
2. Temperature and Time: Different meats have specific settings. For instance, a beef slow roast joint requires 130-140°C for 40 minutes plus additional time.
3. Resting Time: Allow meat to rest for 10 minutes after roasting for better juice distribution.
1. Preheating: Preheat the oven for about 3 minutes before grilling.
2. Grill Settings: Use specific grill settings for different meats and fish. For example, steaks require a grill setting of 5+3 for 4-5 minutes per side.
3. Placement: Place food directly on the wire rack with the universal pan underneath to collect juices.
1. Yoghurt Preparation: Boil milk, cool it, mix with yoghurt, and incubate in the oven at 50°C for 8 hours.
2. Proving Dough: Prepare dough, cover it, and let it prove in a preheated oven.
1. Defrosting: Follow packaging instructions and place food on suitable ovenware.
2. Drying: Use 3D hot air for drying fruits and vegetables, ensuring they are washed and dried thoroughly.
1. Jar Preparation: Use clean jars and rubber seals. Arrange jars in the oven without touching each other.
2. Temperature Settings: Use bottom heating for preserving, with specific temperature and time settings for different foods.
This document provides detailed instructions and guidelines for cooking and preserving various food items using an oven. It includes specifications for temperature settings, cooking times, and recommended practices to ensure optimal results and food safety.
- Yeast dough should be placed in the cooking compartment at 50°C for 5-10 minutes after preheating.
- Frozen foods like cream cakes and bread should be placed on a wire rack at level 1 with the temperature selector switched off.
- For drying fruits and herbs, use a universal pan and rack at 80°C for specified durations (e.g., apple rings for 5 hours, pear slices for 8 hours).
- Preserving fruits involves heating jars until bubbles form, then using residual heat for a specified time (e.g., apples for 25 minutes).
- Vegetables require a temperature adjustment to 120-140°C after bubbles form, with residual heat used for completion.
- To minimize acrylamide formation, keep cooking times short and avoid over-browning.
- Use specific temperature settings for baking (e.g., max 200°C for top/bottom heating).
- For grilling, use a wire rack with a universal pan to collect liquids and keep the oven clean.
- Viennese whirls and small cakes require preheating and specific baking tray arrangements.
- Apple pies should be baked using dark springform cake tins placed diagonally.
- Grilling instructions include preheating for toast and specific settings for beefburgers.
- Do not place hot jars on cold or wet surfaces to prevent bursting.
- Egg or egg yolk can reduce acrylamide production in baked goods.
Catalog excerpts

Built-in oven HB43AB.50B [en] Instruction manual
Open the catalog to page 1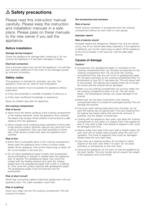
ã=Safety precautions Please read this instruction manual carefully. Please keep the instruction and installation manuals in a safe place. Please pass on these manuals to the new owner if you sell the appliance. Before installation Damage during transport Check the appliance for damage after unpacking it. Do not connect the appliance if it has been damaged in transit. Electrical connection Only a licensed expert may connect the appliance. You will lose your warranty entitlement in the event of any damage caused by incorrect connection. Hot accessories and ovenware Risk of burns! Never remove ovenware...
Open the catalog to page 4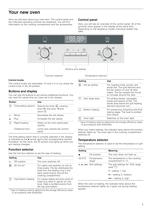
Your new oven Here you will learn about your new oven. The control panel and the individual operating controls are explained. You will find information on the cooking compartment and the accessories. Control panel Here, you will see an overview of the control panel. All of the symbols never appear in the display at the same time. Depending on the appliance model, individual details may differ. & %XWWRQV DQG GLVSOD\ )XQFWLRQ VHOHFWRU Control knobs The control knobs are retractable. To lock it in or out, press the control knob in the off position. 7HPSHUDWXUH VHOHFWRU Setting Use 4 Hot air grilling...
Open the catalog to page 5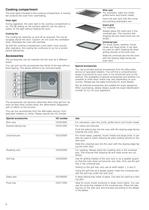
Cooking compartment The oven light is located in the cooking compartment. A cooling fan protects the oven from overheating. Wire rack For ovenware, cake tins, joints, grilled items and frozen meals. Oven light Insert the wire rack with the curvature pointing downward ¾. During operation, the oven light in the cooking compartment is on. The \ setting on the function selector can be used to switch on the light without heating the oven. Insert grid For roasting. Always place the insert grid in the universal pan. This ensures that dripping fat and meat juices are collected. Cooling fan The cooling...
Open the catalog to page 6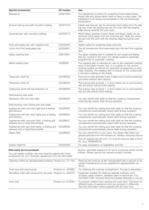
Special accessories HZ number Use Bakestone HZ327000 The bakestone is perfect for preparing home-made bread, bread rolls and pizzas which need to have a crispy base. The bakestone must always be preheated to the recommended temperature. Enamel baking tray with non-stick coating HZ331010 Cakes and biscuits can be removed more easily from the baking tray. Push the baking tray into the oven with the sloping edge facing towards the oven door. Universal pan with non-stick coating HZ332010 Moist cakes, pastries, frozen meals and large roasts can be removed more easily from the universal pan. Slide...
Open the catalog to page 7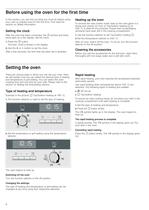
Before using the oven for the first time In this section, you can find out what you must do before using your oven to prepare food for the first time. First read the section on Safety information. Setting the clock Heating up the oven To remove the new cooker smell, heat up the oven when it is empty and closed. An hour of Top/bottom heating % at 240 °C is ideal for this purpose. Ensure that no packaging remnants have been left in the cooking compartment. After the oven has been connected, the 0 symbol and three zeros light up in the display. Set the clock. 1. Use the function selector to set...
Open the catalog to page 8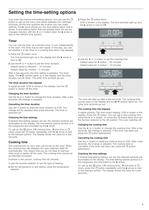
Setting the time-setting options Your oven has various time-setting options. You can use the 0 button to call up the menu and switch between the individual functions. All the time symbols are lit when you can make settings. The N arrow shows you the time-setting option that is active. A time-setting option that has already been set can be changed direction with the @ or A button when the N arrow is next to the relevant time symbol. 3. Press the 0 button twice. 0:00 is shown in the display. The time symbols light up and the N arrow is next to x . Timer You can use the timer as a kitchen timer....
Open the catalog to page 9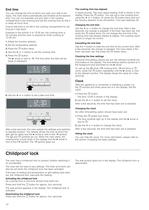
End time The cooking time has elapsed You can change the time at which you wish your dish to be ready. The oven starts automatically and finishes at the desired time. You can, for example, put your dish in the cooking compartment in the morning and set the cooking time so that it is ready at lunch time. A signal sounds. The oven stops heating. 0:00 is shown in the display. Press the 0 button. You can set a new cooking time using the @ or A button. Or press the 0 button twice and turn the function selector to the off position. The oven switches off. Ensure that food is not left in the cooking...
Open the catalog to page 10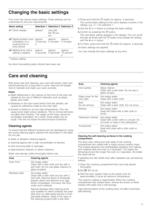
Changing the basic settings Your oven has various basic settings. These settings can be customised to suit your requirements. Basic setting Selection 1 Selection 2 Selection 3 c1 Clock display always* only with the 0 button approx. approx. c2 Signal duration upon approx. 10 second 2 minutes* 5 minutes completion of a s cooking time or timer period c3 Waiting time until a setting is applied approx. approx. approx. 2 seconds 5 seconds* 10 second s 1. Press and hold the 0 button for approx. 4 seconds. The current basic setting for the clock display is shown in the display, e.g. c1 1 for selection...
Open the catalog to page 11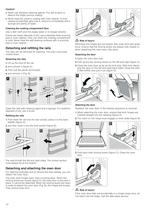
Caution! ■ ■ Never use abrasive cleaning agents. You will scratch or destroy the highly porous coating. $ % Never treat the ceramic coating with oven cleaner. If oven cleaner accidentally gets onto it, remove it immediately with a sponge and plenty of water. Cleaning the cooking compartment floor Use a dish cloth and hot soapy water or a vinegar solution. If there are heavy deposits of dirt, use a stainless steel scouring pad or oven cleaner. Only use when the cooking compartment is cold. Never treat the self-cleaning surfaces with a scouring pad or oven cleaner. Detaching and refitting the rails...
Open the catalog to page 12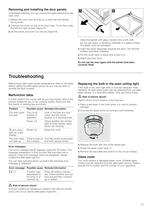
Removing and installing the door panels To facilitate cleaning, you can remove the glass panels from the oven door. $ % 1. Detach the oven door and lay on a cloth with the handle facing down. 2. Unscrew the cover on top of the oven door. To do this, undo the left and right screws (figure A). 3. Lift the panel, and pull it up and out (figure B). Clean the panels with glass cleaner and a soft cloth. Do not use sharp or abrasive materials or a glass scraper. The glass could be damaged. 4. Insert the panel diagonally towards the back. The smooth surface must face outwards. 5. Put the cover back in...
Open the catalog to page 13All Siemens Home Appliances catalogs and technical brochures
 Freestanding Appliances
42 Pages
 EZ977KZY1E
3 Pages
 CM678G4S6B
3 Pages
 HB672GBS1B
3 Pages
 HB676GBS6B
3 Pages
 EC9A5SB90
3 Pages
 WM14XEH4GB
3 Pages
 ET875FCP1D
2 Pages
 ET651HE17E
3 Pages
 Built-in Appliances Brochure
111 Pages
 catalog 2016
79 Pages
 Ovens 2009
22 Pages
 Free-standing Appliances
46 Pages
 Built in brochure
74 Pages
 Freestanding Brochure
46 Pages

Archived catalogs
 EX807LX67E
7 Pages
 2014 Built-in Appliances
77 Pages
 2022 Built-in Appliances
109 Pages
 9000371475
24 Pages
 9000443031
14 Pages
 9000455265
148 Pages
 9000523431
32 Pages
 9000538106
31 Pages
 9000644314
36 Pages
 9000644401
40 Pages
 9000645988
24 Pages
 9000650983
8 Pages
 90005263871
140 Pages
 90007104181
40 Pages
 9000731775
23 Pages
 90005805756
30 Pages
 90006317281
28 Pages
 90006502641
30 Pages
 90006944392
30 Pages
 9000755818
64 Pages
 90004930205
36 Pages
 90004930197
32 Pages
 Freestanding Cooling 09
20 Pages
 Freestanding Dishwashers 09
14 Pages
 Freestanding Washing 09
10 Pages
 Hobs 2009
9 Pages
 Cooker Hoods 2009
18 Pages
 Built-in Cooling 2009
20 Pages
 Built-in Laundry 2009
7 Pages
 Built-in Dishwashers 2009
16 Pages
 Tumble Dryers 2009
7 Pages
 Smart Living 2009
16 Pages

- Siemens electric oven
- Siemens range hood
- Range hood with built-in lighting
- Siemens cooktop
- Industrial coffee machine
- Siemens single oven
- Siemens cooktop with front controls
- Siemens wall-mounted range hood
- Siemens built-in cooktop
- Convection oven
- Automatic coffee machine
- Industrial dishwasher
- Siemens single-chamber oven
- Siemens ducted range hood
- Industrial wine cellar
- Black coffee maker
- Cappuccino coffee machine
- Siemens induction cooktop