
- Catalogs
- Siemens Home Appliances
- 9000371475

9000371475

9000371475
This document provides comprehensive instructions for the operation, maintenance, and installation of an extractor hood. It emphasizes the importance of adhering to safety guidelines and environmental protection measures, such as recycling packaging and old appliances according to the European Directive 2002/96/EC on waste electrical and electronic equipment (WEEE).
Intended Use: The extractor hood is intended for household use only. Improper use can result in injury or damage.
Technical Safety: The appliance should be inspected for damage before installation, and only qualified technicians should handle installation or repairs. It should not be used simultaneously with heating appliances that rely on ambient air to prevent poisoning from combustion gases.
Special Information for Gas Cookers: National regulations must be followed when installing above gas hobs, and the hood should not be placed directly next to high-sided units or walls to avoid heat build-up.
The hood should be cleaned before first use and always switched on when using a hotplate to prevent condensation and corrosion. Flambéing under the hood should be avoided, and grease filters should be cleaned regularly to prevent fire risks.
The hood must be installed at specified distances from the cooking area for safety. It should not be installed over solid fuel heating appliances unless specific conditions are met.
The extractor hood can function in exhaust-air mode, expelling air outside, or in circulating-air mode, filtering and recirculating air within the kitchen. An activated carbon filter is necessary for circulating-air mode.
The control panel features a rotary selector and function buttons for settings such as fan speed and lighting. Users can adjust settings like language, time, and display brightness.
Instructions are provided for removing and installing grease and carbon filters, as well as changing bulbs. Regular maintenance is crucial for optimal performance.
Details are provided for connecting pipes, making electrical connections, and installing the hood. Proper installation is essential for safe and efficient operation.
- The hood can operate in both exhaust air and circulating air modes. Users can set the timer, run-on time, and intermittent time using a rotary selector.
- The brand logo display can be toggled on or off, and settings are confirmed by pressing the 't' button for approximately 3 seconds.
- The blower should be activated at the start of cooking and left on for several minutes afterward to effectively remove kitchen fumes.
- Fan settings can be adjusted using function buttons, with an intensive setting available for strong odors.
- The light can be operated independently of the fan, with adjustable luminosity via a rotary selector.
- An intermittent ventilation feature allows for hourly kitchen ventilation.
- Grease filter saturation can be checked and reset using the information button. Filters should be cleaned monthly under normal use.
- Metal-mesh grease filters can be cleaned in a dishwasher or by hand with a detergent solution.
- Activated carbon filters should be replaced twice a year and are available from specialist outlets.
- Bulbs should be replaced immediately if defective, following safety instructions to avoid burns.
- The extractor hood is designed for wall mounting, with specific instructions for preparing the wall and securely attaching the hood.
- Exhaust air should be conveyed through a ventilation shaft or directly through the wall, adhering to statutory regulations.
- Electrical connections must be made by a qualified electrician, ensuring compliance with safety standards.
- Use non-abrasive cleaning agents to avoid damaging appliance surfaces.
- Ensure proper installation to maintain optimal performance and safety.
- Regular maintenance of filters and bulbs is crucial to prevent fire hazards and ensure efficient operation.
Removing Safety Caps:
- Use a suitable tool, such as a flat-blade screwdriver, to remove the locking caps from the brackets.
Installing the Flue Ducts:
- Risk of Injury: The insides of the flue ducts may have sharp edges. It is recommended to wear protective gloves during installation.
- Separate the flue ducts by removing the adhesive tape.
- Remove the protective film from both flue ducts.
- Insert one flue duct into the other, taking care to avoid scratching them. Use an installation template as protection over the edge of the outer flue duct.
- Note the position of the slots in the flue duct:
- Exhaust-air mode: Slots of the inner flue duct should face downwards.
- Circulating-air mode: Slots of the inner flue duct should face upwards.
Attaching the Flue Ducts:
- Place the flue ducts on the extractor hood, push the inner flue duct upwards, and attach the left and right sides to the fixing bracket.
- Secure the inner flue duct with 2 screws to the sides of the fixing bracket.
Additional Information:
- The document includes contact information for Siemens support and an online shop link.
- Accessories listed include LZ52250, LZ52350, and LZ52450.
Catalog excerpts
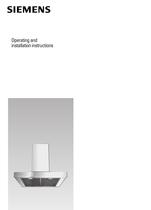
S Operating and installation instructions
Open the catalog to page 1
General information INFORMATION ON PROTECTION OF THE ENVIRONMENT BEFORE USING THE APPLIANCE FOR THE FIRST Disposal of transport packaging NOTE: These operating instructions apply to several appliance models It is possible that individual features are described which do not apply to your appliance. Your new appliance was sent to you in protective packaging. All utilised materials are environmentally safe and recyclable. Please help us by disposing of the packaging in an environmentally friendly manner. Packaging parts can be hazardous for children. Therefore keep them outside the reach of children....
Open the catalog to page 4
ṇ Safety instructions Intended use This extractor hood complies with the stipulated safety regulations. Improper use may result in injury or damage. The extractor hood may be used in the household only. The manufacturer is not liable for damage which is caused by improper use or incorrect operation. If the appliance is improperly installed, serviced or repaired, the user may be placed in considerable danger for which the manufacturer is not liable. Changes to the electrical or mechanical installation are dangerous and must not be undertaken! They may also cause the extractor hood to malfunction....
Open the catalog to page 5
ṇ Safety instructions Safe operation is possible provided the low pressure in the installation room of the heating appliance does not exceed 4Pa (0.04mbar). This can be achieved if the combustion air can flow through non-closable openings, e.g. in doors, windows, in conjunction with air intake/exhaust air wall boxes or by other technical measures. Special information for gas cookers When installing the extractor hood above gas hobs, observe the appropriate national statutory regulations (e.g. in Germany: Technische Regeln Gasinstallation TRGI). Observe the currently valid installation regulations...
Open the catalog to page 6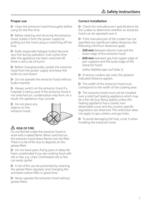
ṇ Safety instructions Proper use Correct installation Clean the extractor hood thoroughly before using for the first time. Check the manufacturer’s specifications for the cooker to determine whether an extractor hood can be operated over it. Before cleaning and servicing the extractor hood, isolate it from the power supply by pulling out the mains plug or switching off the fuse. Bulbs (especially halogen bulbs) become very hot during operation. Even some time after the appliance has been switched off, there is still a risk of burns! Before changing bulbs, isolate the extractor hood from the power...
Open the catalog to page 7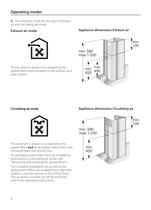
Operating modes The extractor hood can be used in exhaust air and circulating air mode. Exhaust-air mode Appliance dimensions Exhaust air min. 126 min. 580 max 1.030 The air which is drawn in is cleaned by the grease filters and conveyed to the exterior by a pipe system. Circulating-air mode min. min. 450 400 Appliance dimensions Circulating air min. 126 min. 580 max 1.030 The air which is drawn in is cleaned by the grease filters and an activated carbon filter and conveyed back into the kitchen. An activated carbon filter must be installed to bind odours in circulating-air mode (see ”Removing...
Open the catalog to page 8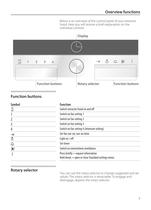
Overview functions Below is an overview of the control panel of your extractor hood. Here you will receive a brief explanation on the individual controls. Display on off 1 2 3 4 Function buttons Rotary selector Function buttons Function buttons Symbol Function w 1 2 3 4 ! 0 8 u t Switch extractor hood on and off Switch on fan setting 1 Switch on fan setting 2 Switch on fan setting 3 Switch on fan setting 4 (Intensive setting) Set fan run-on, run-on time Light on / off Set timer Switch on intermittent ventilation Press briefly = request information Hold down = open or close Standard settings menu...
Open the catalog to page 9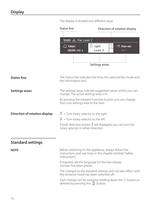
Display The display is divided into different areas: Status line 13:03 Direction of rotation display Fan: Level 2 Timer: 00:00 min s Light Level 0 Run-on: Settings areas Status line The Status line indicates the time, the selected fan mode and the information text. Settings areas The settings areas indicate suggested values which you can change. The active settings area is lit. By pressing the relevant Function button, you can change from one settings area to the next. Direction of rotation display b = Turn rotary selector to the right c = Turn rotary selector to the left If both direction arrows...
Open the catalog to page 10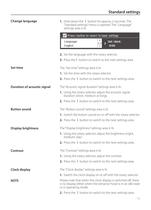
Standard settings Change language 1. Hold down the t button for approx. 3 seconds. The ”Standard settings” menu is opened. The ”Language” settings area is lit. Press i button to revert to basic settings Language: English Set clock: 0:00 2. Set the language with the rotary selector. 3. Press thet button to switch to the next settings area. Set time The ”Set time” settings area is lit. 1. Set the time with the rotary selector. 2. Press the t button to switch to the next settings area. Duration of acoustic signal The “Acoustic signal duration” settings area is lit. 1. Using the rotary selector,...
Open the catalog to page 11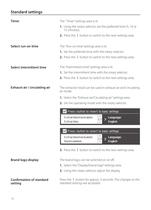
Standard settings Timer The ”Timer” settings area is lit. 1. Using the rotary selector, set the preferred time (5, 10 or 15 minutes). 2. Press the t button to switch to the next settings area. Select run-on time The ”Run-on time” settings area is lit. 1. Set the preferred time with the rotary selector. 2. Press the t button to switch to the next settings area. Select intermittent time The ”Intermittent time” settings area is lit. 1. Set the intermittent time with the rotary selector. 2. Press the t button to switch to the next settings area. Exhaust air / circulating air The extractor hood can...
Open the catalog to page 12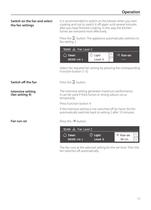
Operation Switch on the fan and select the fan settings It is recommended to switch on the blower when you start cooking and not to switch it off again until several minutes after you have finished cooking. In this way the kitchen fumes are removed most effectively. Press the w button. The appliance automatically switches to fan setting 2. 13:03 Fan: Level 2 Timer: 00:00 min s Light Level 0 Run-on: Select the required fan setting by pressing the corresponding Function button (1-3). Switch off the fan Press the w button. Intensive setting (fan setting 4) The Intensive setting generates maximum...
Open the catalog to page 13All Siemens Home Appliances catalogs and technical brochures
 Freestanding Appliances
42 Pages
 EZ977KZY1E
3 Pages
 CM678G4S6B
3 Pages
 HB672GBS1B
3 Pages
 HB676GBS6B
3 Pages
 EC9A5SB90
3 Pages
 WM14XEH4GB
3 Pages
 ET875FCP1D
2 Pages
 ET651HE17E
3 Pages
 Built-in Appliances Brochure
111 Pages
 catalog 2016
79 Pages
 Ovens 2009
22 Pages
 Free-standing Appliances
46 Pages
 Built in brochure
74 Pages
 Freestanding Brochure
46 Pages

Archived catalogs
 EX807LX67E
7 Pages
 2014 Built-in Appliances
77 Pages
 2022 Built-in Appliances
109 Pages
 9000443031
14 Pages
 9000455265
148 Pages
 9000523431
32 Pages
 9000538106
31 Pages
 9000644314
36 Pages
 9000644401
40 Pages
 9000645988
24 Pages
 9000646020
24 Pages
 9000650983
8 Pages
 90005263871
140 Pages
 90007104181
40 Pages
 9000731775
23 Pages
 90005805756
30 Pages
 90006317281
28 Pages
 90006502641
30 Pages
 90006944392
30 Pages
 9000755818
64 Pages
 90004930205
36 Pages
 90004930197
32 Pages
 Freestanding Cooling 09
20 Pages
 Freestanding Dishwashers 09
14 Pages
 Freestanding Washing 09
10 Pages
 Hobs 2009
9 Pages
 Cooker Hoods 2009
18 Pages
 Built-in Cooling 2009
20 Pages
 Built-in Laundry 2009
7 Pages
 Built-in Dishwashers 2009
16 Pages
 Tumble Dryers 2009
7 Pages
 Smart Living 2009
16 Pages

- Siemens oven
- Siemens electric oven
- Siemens range hood
- Range hood with built-in lighting
- Siemens cooktop
- Industrial coffee machine
- Siemens single oven
- Siemens cooktop with front controls
- Siemens wall-mounted range hood
- Siemens built-in cooktop
- Convection oven
- Automatic coffee machine
- Siemens built-in oven
- Siemens single-chamber oven
- Siemens ducted range hood
- Industrial wine cellar
- Black coffee maker
- Cappuccino coffee machine
- Siemens induction cooktop