


Studio 12 scan control

Studio 12 scan control
The manual provides essential safety information for the Studio 12 Scan Control console, emphasizing professional use only. Installation should be done by qualified personnel, and the unit should not be used in extreme conditions. Modifications are discouraged, and repairs should be handled by authorized service centers.
The console controls 12 or 24 dimmer channels and 12 intelligent fixtures using up to 36 DMX 512 channels. It features a user-friendly design with sophisticated electronics, ensuring high performance and reliability. It includes sections like manual presets, registers, light chase controls, masters, and DMX unit controls.
The console requires a +12V DC power supply and consumes 12W. It includes DMX IN/OUT, RS-232, MIDI, and SMPTE connections. The body is made of sheet metal with an epoxy powder finish, weighing 13kg.
- Manual Presets: 24 faders for channel presets and master controls.
- Registers: Automated section with faders for memory registers and function buttons.
- Light Chase Controls: For creating and controlling chase sequences.
- Masters: General level controls for memory registers and overall output.
- DMX Unit Controls: Built-in controller for managing 12 units using DMX protocol.
Includes connectors for DMX 512, up-down pedal, SMPTE, MIDI, RS-232, and audio input, enhancing the console's capabilities.
Outlines procedures for accessing internal components, cleaning, and performing checks. Describes different operating modes and advanced usage scenarios, including event recording and multiple unit control.
Uses built-in microphones when no direct audio source is connected. Requires a 0dB mono LINE signal. Provides pin-out details for DMX, SMPTE, MIDI, and RS-232 connections.
Powered by an AL4 switching power supply with a locking mechanism. Maintenance involves cleaning every 300 hours and a full check every 700 hours by qualified personnel.
Can operate in double preset mode (two 12-channel presets) and single preset mode (one 24-channel preset). Displays the current mode upon startup.
Manual section with light grey fader knobs and buttons. Uses HTP technology for highest light intensity output.
Core of the console, holding scenes, light chases, and programs. Features 144 memories divided into 12 pages.
Offers 12 chases with 12 program steps each. Allows extensive customization of chase parameters.
Focuses on chase running feature with twin chase speed regulation using RATE and SLOPE potentiometers.
Chases can be created or modified in DIRECT mode, supporting both "double preset" and "single preset" modes.
Controls units requiring up to 36 channels, with automation features for movement functions.
Allows manual control of individual fixtures, displaying modifiable parameters.
Programs consist of 1 to 12 scenes and units. Groups of units can be created, but they must be of the same type.
Offers utilities for remote lamp ignition and fixture reset.
Outlines procedures for setting up and operating the Studio Scan Control system, including assigning scanning areas and creating programs.
Can manage up to 12 programs, each with a maximum of 12 scenes.
Programs and scenes can be copied to other locations and added to a Memory Register.
Provides access to functions like addressing light channels and fixtures, changing display language, and managing memory.
Built-in memory for unit libraries and event recording. Operators can view available memory and delete unnecessary records.
New units can be added to the library by entering detailed parameters.
- Scanning areas can be customized for precision.
- Programs consist of scenes that control fixture effects.
- Memory management is crucial for efficient operation.
- New units require detailed configuration for integration.
Explains setup for channels controlling mirrors and moving heads, highlighting 8-bit and 16-bit control differences.
Allows setting the speed for transitioning between effects, with options for HARD or SOFT settings.
Operators can assign names to new units.
Sets parameters for Remote Reset and Remote Lamp On/Off functions.
Used for configuring the dipswitch for unit addressing.
Operators can set control channels for defining the operating area.
Users can choose between Linear and Tabular control for fixture effects.
Describes error messages and memory management for event recording.
Operators can modify existing units or delete obsolete ones from the library.
A twin pedal can be connected for hands-free scene changes.
Focuses on managing memory registers and MIDI connections, supporting SMPTE and MIDI connections for synchronization and control.
Features a SMPTE socket for time code synchronization and MIDI connectors for linking multiple consoles.
Allows connection to a PC for firmware updates and remote control.
Can record and replay sequences of events using a time code for synchronization.
Advises on advanced usage, such as controlling multiple units and creating new units.
Provides detailed instructions on configuring and operating the SGM Live 1200 console, focusing on creating multiple units and managing DMX channels effectively.
- Specifications and Setup: Manages all 512 DMX channels, allowing for the creation of multiple units.
- Practical Example: Demonstrates integrating 15 SGM Flasher DMX 1.5 units.
- Programming and Effects: Instructions on creating a "Super Flasher" unit.
- Advanced Configurations: Discusses creating multiple scanner units and using colour changers.
- Quick Reference Guide: Summarizes function buttons on the Studio 12 Scan Control.
- Practical User Guide: Offers step-by-step instructions for common tasks.
- Addressing and Channel Management: Proper address assignment is essential.
- Fixture Configuration: Detailed setup instructions for various fixture types.
- Operational Modes: Explanation of different modes and their impact.
To execute Chase 1, press the Direct button, select Chase 1, set the output level, choose the steps to run, and set the running time.
To assign Chase 1 to Register 1, hold the Reg button, select the register, choose Chase 1, set the output level, select steps, and set the running time.
To delete Chase 1 from Register 1, hold the Reg button, select the register, and delete the chase.
To switch off Chase 1, press the Direct button and switch off the chase.
To address channel 12 to DMX channel 512, use the Up/Down arrows to scroll, set the DMX channel, and configure the EQ curve.
To address a Victory II 250 starting from channel 50, use the Up/Down arrows, select the unit, set the start address, and configure the dipswitches.
To control Unit 1, press the Unit 1 button and adjust the scanner controls using the faders.
To create Program 1, press the Direct button, hold the Prog button, select scenes and units, set parameters, and store the scene.
To add Program 1 to a register, hold the Reg button, select the program, set running time, and store it in the register.
To delete Program 1, hold the Reg button, select the register, delete the program, and confirm the operation.
Catalog excerpts
Studio 12 control scan professional light desk user’s manual rel. 1.41
Open the catalog to page 1
General instructions Read the instructions in this handbook carefully, as they give important information regarding safety during installation, use and maintenance. Be sure to keep this instruction manual with the fixture in order to consult it in the future. If the fixture is sold or given to another operator, make certain that it always has its manual, to enable the new owner to read about its operation and relative instructions. • This unit is not intended for home use. • After having removed the packaging, check that the fixture is not damaged in any way. If in doubt, don’t use it and contact...
Open the catalog to page 2
4 1-Studio 12 Scan Control console layout 24 8 1.4.7 -Disconnecting the power supply 31 8 2.2 - Cleaning and periodical checks 34 10 4 ■ Manual Presets section 35 10 4.1 - Manual Presets in double preset mode 36 11 4.2 - Manual Presets in single preset mode 37 13 5.2 - Register operating modes 38 14 5.5 - Copying a stored scene to another scene 38 15 6 ■ Light Chase Controls section 39 16 6.2 - Creating and modifying chases 39 17 7 ■ DMX Unit Controls section 39 21 7.5.1 - Remote lamp ignition 45 7.6.3 - Adding a Program to a Memory Register 8.1 - Addressing light channels 8 5.1.9- Remote and...
Open the catalog to page 3
0 - Handbook layout All the parts of this user’s manual have been laid out in such a way as to facilitate learning the details of the Studio 12 Scan Control console. Each section is presented using the simplest possible terminology, although remaining necessarily technical. The new range of consoles to which the Studio 12 Scan Control belongs has been designed to ensure the utmost user-friendliness. Chapters 1 and 2 are deliberately generic and conversational and have the job of introducing the unit. The advanced use described in chapter 11 isn’t “totally technical”, but suitably documented....
Open the catalog to page 4
1. Studio 12 Scan Control console layout 1.1 Main Features SGM’s new Studio 12 Scan Control console is one of the results of our long experience in the manufacture of this type of control equipment, and is able to control 12 or 24 dimmer channels and 12 intelligent fixtures using up to a maximum of 36 DMX 512 serial digital signal channels. The quality and design policy are those the trade has come to expect from SGM and the sophisticated electronics used, combined with ground-breaking performance, places this unit among the best international products. Careful in-depth study of the functions,...
Open the catalog to page 5
1.3 Studio 12 Scan Control’s sections 1.3.1 - Manual presets This is the most traditional area of lighting consoles and comprises 2 rows of 12 faders each, which can be used as two 12 channel presets (A+B) or as a single 24-channel preset (A); 2 faders used as masters for presets A and B; 2 buttons for enabling presets A and B (when working in A+B mode) or switching the 24 buttons relative to the channels between the two banks of 12 which make up preset A (when working in 24-channel mode); 1 button for enabling the SOLO function and 1 button for enabling the LINK function. Mixing work between...
Open the catalog to page 6
The Studio console has 3 masters, i.e. general level controls. The REG master controls the outputs of the memory registers, the FLASH master controls the level of the FLASH buttons and the GRAND MASTER controls the overall output level of all the channels, including the REG master. The FLASH MASTER level is independent from that of the GRAND MASTER. This section includes the console’s built-in universal controller, able to control 12 units of any type (dimmers, scanners, moving head units, etc.) which use DMX protocol and a maximum of 36 channels each. Six channels are reserved for Pan, Tilt,...
Open the catalog to page 7
settings thru security lock Studio consoles have DMX 512 input/output. At present, the input isn’t enabled by the software. Balanced 2 x 0.25mm2 RS485 cables should be used for connection and must be good quality to avoid faulty equipment operation. Attention: cables’ screen (braid) must NEVER be connected to the system’s ground, as this will cause faulty fixture and controller operation. 1.4.2 - Up-down pedal This socket allows a pedal to be connected to the console for stepping up and down through the registers. Stepping is between registers on the same page (see PAGE function). If UP and DOWN...
Open the catalog to page 8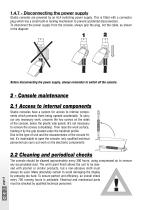
1.4.7 - Disconnecting the power supply Studio consoles are powered by an AL4 switching power supply. This is fitted with a connector plug which has a small built-in locking mechanism to prevent accidental disconnection. To disconnect the power supply from the console, always grip the plug, not the cable, as shown in the diagram: Before disconnecting the power supply, always remember to switch off the console. 2 - Console maintenance 2.1 Access to internal components Studio consoles have a system for access to internal components which prevents them being opened accidentally. To carry our any...
Open the catalog to page 9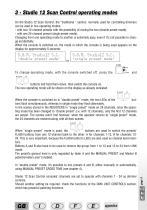
3 - Studio 12 Scan Control operating modes On the Studio 12 Scan Control, the “traditional “ section, normally used for controlling dimmers can be used in two operating modes: - with two 12-channel presets with the possibility of mixing the two (double preset mode); - with one 24-channel preset (single preset mode). Changing from one operating mode to another is extremely easy, even if it’s not possible to change accidentally. When the console is switched on, the mode in which the console is being used appears on the display for approximately 5 seconds: To change operating mode, with the console...
Open the catalog to page 10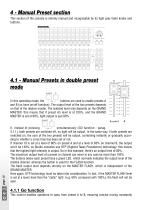
4 - Manual Preset section This section of the console is entirely manual and recognisable by its light grey fader knobs and buttons. manual presets 10 manual presets cross time 4.1 - Manual Presets in double preset mode A or p s e t 6 5 go In this operating mode, the buttons are used to enable presets A and B (so have on/off function). The output level of the two presets depends on that of the relative master. The selected level only depends on the GRAND MASTER: this means that if preset A’s level is at 100%, and the GRAND MASTER is set at 80%, light output is just 80%. go If, instead of pressing...
Open the catalog to page 11All SGM Light catalogs and technical brochures
 G·4 Wash-Beam
6 Pages
 i·5 RGBW POI
7 Pages
 i·5 UV POI
6 Pages
 Q·7 W POI
6 Pages
 Q-SERIES
26 Pages
 P-SERIES
24 Pages
 I-SERIES
24 Pages
 SGM SAFETY INFORMATION
8 Pages
 G‐WASH MOVING HEAD
68 Pages
Archived catalogs
 IDEA MOVING LED 300
22 Pages
 P-5
P-544 Pages
 X-5 / XC-5 LED Strobe
28 Pages
 PILOT 3000
116 Pages
- Light fixture
- Industrial LED light
- Commercial light fixture
- Dimmable light fixture
- Linear light fixture
- Surface-mounted light fixture
- Outdoor light fixture
- Plastic light fixture
- LED floodlight
- Outdoor projector
- Commercial floodlight
- IP65 light fixture
- Public space light fixture
- Flexible LED light strip
- IP66 floodlight
- IP65 floodlight
- Indoor projector
- Industrial management software
- Moving head spot
- Industrial strip light