
Catalog excerpts

INSTRUCTION AND MAINTENANCE MANUAL >
Open the catalog to page 1
NOTE - If not differently indicated by the text, the position numbers of the parts of the machine always refer to this figure. A F. 1 A CE label 16 Dump box 1 Left hand side panel 17 Steam spout (except COFFEE set-up) 2 Glass 18 Main switchIӔ -Electrical functions enabled Machine on ֖Pilot light on.OӔ -Electrical functions disabled Machine off -֓I button pilot light off. 3 Back panel 4 Cup warming plate 5 Pre-ground coffee door 6 Coffee bean hopper 7 Right hand side panel 19 Grind adjustment knob 8 Control panel 20 Grinder unit 9 Rubber protector 21 Mechanical pulse counterIt displays the...
Open the catalog to page 3
The position of this group ( 22 ) can be adjusted according to theheight of the container used .It is possible to position the brew group on the top or on the bottom.Many brewing heights can be thus obtained. > NOTE - The machines described in this brochure are in conformitywith the specific current European Regulations andtherefore all their potentially dangerous parts areprotected . Any overpressure in the water plant that produces steamand hot water, is detected by 3 safety valves.ՕA thermostat avoids boilers overheating.The position of the dump box (16) and of the door (15),...
Open the catalog to page 6
Warning! Water hardness should not be less than 8 F.We recommend that the machine be supplied with water treatedby a descaling device, particularly for water with high content ofcalcium and magnesium (hard water). Make sure the water networkprovides drinkable water, with pressure ranging between 1 and 8 bars.-Connect the water softener (C) to the water network (D). > ЕThe machine has to be installed in a dry and protected place,at the following ambient temperature : 10 C - 40 а C; maximumhumidity: 90%. > NOTE - Check if the surface where the machine is installed hasthe adequate dimension...
Open the catalog to page 7
Check if the electric cables of the system areproportioned to the machine power consumption.The connection point (electric plug or all-pole switch) mustbe located in an easily reachable place, in order todisconnect the machine from the electric line in case ofneed. NOTE - In case of plants with a 400 V two-phase current, usethe two phases to supply the machine with 230 V singlephase current (F. 8). As for the 230 V single-phaseconnection, require the special installation kit (code%1034.R09). ՕConnect the cord ( G - F. 7) to the electric network. Place the machine on the support and insert...
Open the catalog to page 8
With regard to the power supply, the machine can have thefollowing statuses: -Fill the hopper ( 6 ) with the selected coffee beans blend. Off and electrically insulated Be sure the coffee does not contain foreign bodies whichcould be dangerous for grinders. -Main switch ( 18 ) and all-pole switch on the ԓ position(or plug disconnected).-Only the memory for the programmed data storing is enabled. -Check if the removable components ( 13 and 16 ) are in theright position and if the door ( 15 ) is closed.If they are not, when the machine is switched-on, the display will indicate which component...
Open the catalog to page 9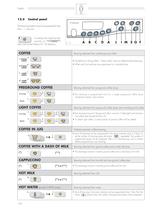
escent escent MILKCAPP MILKCAPP The brewing buttons have to be pressed for lessthan 1 second.It switches the machine tem-porarily on ( F STANDBYӔ )and confirms the buttons (H - G) selection. F. 11 > Brewing obtained from instantly-ground coffee > 1 strongcoffee The definitions ՓStrong coffee - ԓWeak coffee mean two different levels of brewing.ԕWhen sold, the machines are programmed on a standard base. This brewing is programmed only for a single pre-ground coffee doseintroduced instantly in the machine.Օ Press the button (once for Pre-ground CoffeeӔ, twice for Coffee lightӔ) and...
Open the catalog to page 10
(Except COFFEE set-up)Immerse the spout (17) in the beverage to be heated.ՕTurn the knob counterclockwise (12). When the requiredtemperature is reached, close the knob (clockwise). After every operation, clean the steam spout with a (dampand clean) cloth/sponge from the residues of the previouslyheated beverage. (*)Before any brewing, place the milk suction tube (30 - F. 4)inside the milk container.(**) Adjust the cream quantity using the pin (24 - F. 4)(Pr. 12.8). > The beverage quantities linked to the respective buttons, can bedirectly programmed by keypad.To program and re-program the...
Open the catalog to page 11
The quality of the cream in the beverages depends on the use ofthe adjustment lever ( 24 ).By turning the lever clockwise, there will be a greater quantityof cream.ՕBy turning the lever anti-clockwise, there will be a smaller quantityof cream. F. 12 > Milk temperature is adjusted through lever ( 25 ).By turning the lever upward, the temperature will grow.ՕBy turning the lever downward, the temperature will lower. F. 13 > Whatever the coffee blend is, a very fine grinding (notchon low values ) increases the density, the cream quantityand the brewing time of the beverage. On the contrary a...
Open the catalog to page 17
PUMP ERROR : one of the pumps is damaged. Switch the machineoff and call the AUTHORIZED CUSTOMER SERVICE CENTER. NOTE - Here follows a list of alarm messages (in addition tothose explained before) that can be displayed and therelative machine conditions. SENSOR ERROR 01 : is displayed when a temperature sensorfails. Switch the machine off and call the AUTHORIZED CUSTOMERSERVICE CENTER. STANDBY: the machine is switched off (the main switch is on I Ӕ)and the automatic switching-on/off functions enabled (Pr. 12.7.1). TEMPER. ERROR 01 : is displayed when one of the boilersresistance is damaged....
Open the catalog to page 18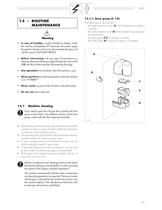
The following can be removed:-the upper protection cover ( A ), of the dispenser by pulling itoutwards;-the lower protection cover ( D ) of the dispenser, by unscrewingthe bottom knob;-the brew group ( > C-E ) by pulling it outwards;-the coffee fitting ( B ) by turning it approx. 90 degrees. In case of troubles , usually indicated on display, switchthe machine immediately off, disconnect the power supplythrough the all-pole switch or by disconnecting the plug, andcall the nearest CUSTOMER SERVICE. ABCDE Օ Before intervening with any type of maintenance orcleaning, disconnect the power...
Open the catalog to page 19All Saeco catalogs and technical brochures
-
 Oasi
Oasi8 Pages
-
 Brochure Phedra Evo
11 Pages
-
 MegaCold L
2 Pages
-
 MegaCold S/M
2 Pages
-
 Cristallo Evo 600
2 Pages
-
 Cristallo Evo 400
2 Pages
-
 Atlante Evo 700
2 Pages
-
 Aliseo Evo
2 Pages
-
 VENDING CAPSULE SYSTEM
13 Pages
-
 Atlante Evo 500
2 Pages
-
 Ambra
Ambra2 Pages
-
 Corallo 1830
2 Pages
-
 Aulika/Lirika
17 Pages
-
 Nextage
13 Pages
Archived catalogs
-
 EXPORT - CATALOGUE
21 Pages
-
 INCANTO SIRIUS
156 Pages
-
 GRAN CREMA
92 Pages
-
 AROMA
AROMA46 Pages
-
 AROMA SE2000
35 Pages
-
 ROYAL OFFICE
60 Pages
-
 COMBI SNACK
68 Pages
-
 7P PLUS
64 Pages
-
 ROYAL COFFEE BAR
16 Pages
-
 VIENNA DE LUXE
24 Pages