 Website:
Rosa Gres
Catalog excerpts

SWIMMING POOLS AND TERRACES CONSTRUCTION AND REHABILITATION
Open the catalog to page 1
Important construction information for making the tank 4 - 6 Building a pool with system 9, step by step 7 - 11 Position of accesories in swimming pools 12 Installing the ceramic rungs in pools 13 Execution Specifications the correct way to build a swimming pool 14 the correct construction of a private swimming pool without waterproofing 15 RENOVATING POOLS Conversion of a skimmer pool to a deck level pool 16 - 19 Execution Specifications Renovating a pool without removing the old covering 20 Renovating a stainless steel swimming pool or spa 21 Renovating a polyester pool 22 Renovating a...
Open the catalog to page 2
This brochure aims to set out the most important building tasks in the execution of a terrace and a swimming pool in this guide, whether for a new build or a renovation. We also offer some practical fact sheets for carrying out this work, which will be of great help to professionals. This brochure is a tool to assist builders and fitters, who will find new and unique solutions that will save on costs and help avoid pitfalls. It has been developed thanks to ROSAGRES and FIXCER deep knowledge of the construction site. Together they have set out quality solutions for construction to ensure the...
Open the catalog to page 3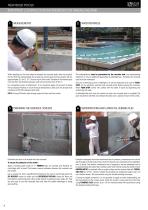
NEW BUILD POOLS IMPORTANT CONSTRUCTION INFORMATION FOR MAKING THE TANK When deciding on the final distance between the concrete walls, take into account the fact that the waterproofing, the screed, the cement glue and the ceramic tile are approximately 3.5 cm (1.37 ") thick at each of the walls. Therefore if the finished pool must be 25m, the distance between walls cannot be less than 25.07 m. For competition pools, an additional 1.5 cm should be taken into account to place the touchpads. Therefore, if we are trying to standardise a 25m pool, this should have a distance of 25.03m between...
Open the catalog to page 4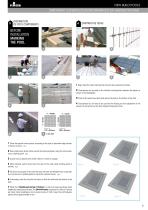
NEW BUILD POOLS IMPORTANT CONSTRUCTION INFORMATION FOR MAKING THE TANK DISTRIBUTION OF POOL COMPONENTS BEFORE INSTALLATION MARKING THE POOL 1 1 Begin tiling the walls following the coloured lines previously marked. 2 Cross-pieces can be used on the verticals, inserting them between the pieces as shown in the photograph. 3 Once all the walls have been tiled, place the parts on the bottom of the tank. 4 Cross-pieces do not need to be used for the flooring as final adjustment of the pieces can be carried out by hand, always following the lines. Place the special corner pieces, according to the...
Open the catalog to page 5
NEW BUILD POOLS IMPORTANT CONSTRUCTION INFORMATION FOR MAKING THE TANK WATERPROOF GROUT EXPANSION JOINTS Another way of improving the watertightness of the tank is to use a fully watertight, flexible and acid-proof mortar such as CERPOXI. The structural joints of the pool, if any, have to be respected and place expansion joints every 25 square metres and/or 5 linear metres, as a maximum. The JUNTATEC coloured mortar is a very good alternative. . It is resistant to weak acids and has a residual absorption value of just 2%. For the sealing, use SELLALASTIC FOAM as grouting and SELLASTIC...
Open the catalog to page 6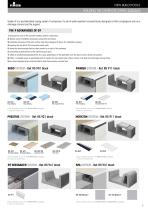
NEW BUILD POOLS BUILDING THE OVERFLOW DRAIN: SYSTEM 9 System 9 is a pre-fabricated coping system. It comprises of a set of water-repellent concrete blocks designed so that a singlepiece acts as a drainage channel and tile support. THE 9 ADVANTAGES OF S9 1. Reduces the costs of the concrete overflow system construction. 2. Speeds up the installation processes, saving time and labour. 3. Facilitates the layout of the parts as they have been designed to favour the installation process. 4. Improves the top finish of the concrete gunite walls. 5. Avoids the shortcomings that are often present as...
Open the catalog to page 7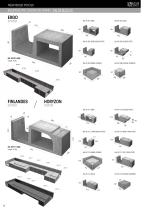
NEW BUILD POOLS BUILDING THE OVERFLOW DRAIN: THE S9 BLOCKS ERGO SYSTEM Ref. RS 902 OPEN WILT-IN STEPS Ref. RS 912 OPEN BUILT-IN STEPS Ref. RS 916 RIGHT OPEN STEPS Ref. RS 917 LEFT OPEN STEPS
Open the catalog to page 8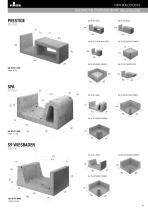
NEW BUILD POOLS BUILDING THE OVERFLOW DRAIN: THE S9 BLOCKS 303 Ref. RS 922 OPEN WIT-IN STEPS
Open the catalog to page 9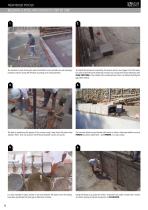
NEW BUILD POOLS BUILDING A POOL WITH SYSTEM 9, STEP BY STEP The concrete is cast, forming the walls, tank bottom and perimeter low wall, leaving a reception area for laying the S9 block according to its measurements. We start by positioning the pieces of the corners using a laser level. We place twine between them. Then we position the S9 blocks between corner and corner. It is also essential to place mortar in the joint between the blocks. Once the blocks have been positioned the back gap is filled with concrete. To simplify the process of concreting, this may be done in two stages. First...
Open the catalog to page 10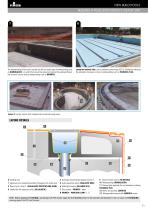
NEW BUILD POOLS BUILDING A POOL WITH SYSTEM 9, STEP BY STEP The waterproofing of the tank is carried out with an elastic type of waterproofing, such as HIDROELASTIC , on which the tiles will be placed on top. And the waterproofing of the channel is done using a waterproofing such as HIDROFIX. Laying the ceramic tiles: use an adhesive cement type C2 T S1 suitable for adhering the porcelain stoneware on top of waterproofing, such as TECNOCOL FLEX. System 9 can be used for both straight and curved swimming pools. 4 Drainage recommended approx every 4 m. 1 Expansion joint essential perimeter...
Open the catalog to page 11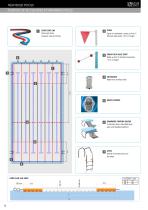
NEW BUILD POOLS POSITION OF ACCESORIES IN SWIMMING POOLS CORK FLOAT LINE Fitted with floats, polyester rope and hooks. Signs for backstroke, made up from 4 stainless steel poles 1.8 m in height. 3 SIGNS FOR A FALSE START Made up from 2 stainless steel poles 1.8 m in height. Made from stainless steel. 6 SWIMMERS STARTING BLOCKS In stainless steel. Adjustable polyester and fiberglass platform. With Ø 43 handrail and nonslip steps. CORK FLOAT LINE SIZES
Open the catalog to page 12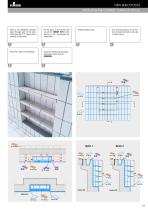
NEW BUILD POOLS INSTALLING THE CERAMIC RUNGS IN POOLS Insert a rod (preferably stainless steel) through each of the holes of the step Ref. 019 making them protrude at both ends. Fill the gaps in the blocks with non-shrink ,GROUT S10 mortar placing 6 mm cross-pieces between them. 1 If an insertion groove of the tank has not been planned on site, dig to open one up. Cover the insertion groove holes with epoxy mortar such as EPOXICOL. R«f. 122 Azul R*t. 019 Azul 013 Azul
Open the catalog to page 13All Rosa Gres catalogs and technical brochures
-
UNIQUE POOLS - HOME 2024
96 Pages
-
UNIQUE POOLS HOTEL AND SPA
124 Pages
-
Unique Pools - Sports Pool
56 Pages
Archived catalogs
-
outdoor living
21 Pages
-
INDUGRES
16 Pages
-
TRESOR
32 Pages
-
iconic
32 Pages
-
MYTHOS
23 Pages
-
Catálogo Unique Pools - Hotel & Spa
124 Pages
-
Unique Pools - Home
104 Pages


