

Rockfon® System VertiQ® T24 A Wall™

Rockfon® System VertiQ® T24 A Wall™
Rockfon® System Eclipse Island™ is a frameless acoustic solution ideal for spaces unsuitable for traditional suspended ceilings. It enhances room acoustics and is available in various shapes and colors. The system is designed for easy and quick installation, suitable for both new and existing buildings.
The system features a minimalistic painted straight A-edge with a smooth, deep matt, super white painted fleece that has anti-static properties. It can be suspended under existing structures or fixed directly to the soffit using specific accessories. Two suspension kit options are available: Classic and Design, both utilizing Rockfon spiral anchors.
- Shapes: Square, Rectangle, Circle, Triangle, Hexagon, Oval, and Bespoke.
- Dimensions: Various, specific to each shape.
- Weight: 3.0 kg to 17.0 kg depending on shape and size.
- Suspension: Requires specific numbers of hangers and spiral anchors based on shape and size.
Installation uses spiral anchors and suspension hangers, allowing for installation below existing ceilings or directly to the soffit. A specific kit is used for direct installation, maintaining a 45 mm space between the island and the soffit. The system supports a maximum load of 5 kg per spiral anchor.
The system is not suitable for swimming pools, outdoor environments, or areas with wind load and drafts. A minimum gap of 4 mm should be maintained between islands.
The maximum load per spiral anchor is 5 kg. The system is designed to integrate services like lighting, with guidelines for additional loads.
Includes suspension kits, spiral anchors, and profiles for both suspended and direct fix systems. The Design solution offers a refined finish with cylindrical capping.
Ensure the supporting structure can bear at least 25 kg. Use two people for handling and installation to prevent damage and ensure safety. Follow good manual handling practices and installation advice for optimal results.
Installation procedures for integrating lighting fixtures specify using plywood or similar yokes supported on aluminum profiles. The solution is applicable for lights or services weighing up to 5 kg. Installation involves cutting a hole in the island to match the light fixture size and shape, ensuring proper alignment for 'out of balance' lights.
Guidelines are provided for creating cutouts in various shapes, with specific minimum distances from edges and maximum allowable dimensions. Lighting fixtures must be installed independently and not rely on Rockfon Eclipse for support.
Install lights symmetrically and use a knife or jigsaw for cutouts, with protective measures to prevent scratches and dust. Multiple smaller cutouts are permissible within the maximum cutout area. Good manual handling practices are advised.
Rockfon provides tools online, including a CAD Library and BIM portal for project design assistance. An edge repair filler is available for repairing accidental damage during installation.
Rockfon is a registered trademark of the ROCKWOOL Group, with contact details provided for their London office.
Catalog excerpts

Part of the ROCKWOOL Group Rockfon® System Eclipse Island™ System Description Frameless island system Ideal solution for rooms where a suspended ceiling is technically or aesthetically not suitable Perfect solution for room acoustic improvement Available in different shapes and colours Quick and easy installation
Open the catalog to page 1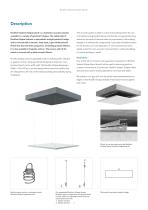
Rockfon® System Eclipse Island™ Description Rockfon® System Eclipse Island™ is a frameless acoustic solution This acoustic system is ideal in rooms and buildings where the use available in a variety of geometric shapes. The visible side of of a traditional suspended ceiling is technically not appropriate (e.g. Rockfon Eclipse features a minimalistic straight painted A-edge where the principle of thermal mass is incorporated in the building and is covered with a smooth, deep matt, super white painted design) or is aesthetically unappealing. It provides a flexible solution fleece that has anti-static...
Open the catalog to page 2
Rockfon® System Eclipse Island™ System components Rockfon Eclipse should be secured with a suspension kit comprising Rockfon Eclipse is available in a variety of geometric shapes: a 1500 mm long adjustable metal wire and a safety attachment hook. Rockfon Eclipse Once assembled, the wire is attached to the island by a spiral anchor Weight (kg/unit) that is delivered together with the Rockfon Eclipse suspension kit. Suspension hangers required We provide two suspension kits; the Classic solution and the Design solution, the latter is relevant for projects where aesthetics are important. 4 spiral...
Open the catalog to page 3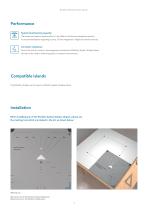
Rockfon® System Eclipse Island™ Performance System load bearing capacity The maximum load per spiral anchor is 5 kg. Refer to the Service Integration section for recommendations regarding cutouts, for the integration of lights and similar services. Corrosion resistance Due to the risk of corrosion, the suspension accessories of Rockfon System Eclipse Island should not be used in swimming pools or outdoor environments. Compatible islands Only Rockfon Eclipse can be used in a Rockfon System Eclipse Island. Installation When installing any of the Rockfon System Eclipse shapes, please use the marking...
Open the catalog to page 4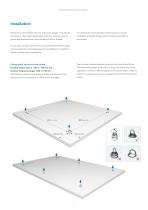
Rockfon® System Eclipse Island™ Installation Boxes should be handled with care and by two people. They should To minimise the risk of damage and for quicker and easier be stored in a flat, horizontal position. Each box contains a pair of installation, a Rockfon Eclipse island should be handled by gloves that should be worn when handling Rockfon Eclipse. For an optimum work environment, we recommend installers always observe good manual handling practices and follow the installation advice, as shown on our packaging. Fixing spiral anchors to the island The minimum distance between spiral anchors...
Open the catalog to page 5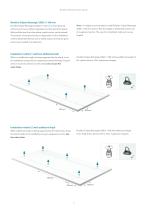
Rockfon® System Eclipse Island™ Rockfon Eclipse Rectangle 2360 x 1160 mm Rockfon Eclipse Rectangular 2360 x 1160 mm is manufactured Note: It is highly recommended to install Rockfon Eclipse Rectangle with two aluminum profiles integrated into the back of the island. 2360 x 1160 mm level so that the weight is distributed evenly over Both profiles have five holes where a spiral anchor can be placed. all suspension points. The use of an installation table can be very The position of the spiral anchors is dependent on the installation method (described below), but for safety reasons at least six...
Open the catalog to page 6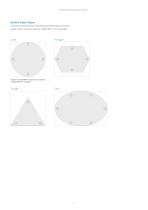
Rockfon® System Eclipse Island™ Rockfon Eclipse Shapes The spiral anchors should be distributed symmetrically as indicated below and at a minimum distance of 100-150 mm from the edge. Eclipse circle of 800mm diameter can also be suspended with 3 hangers.
Open the catalog to page 7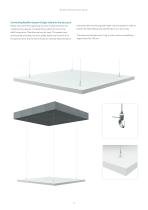
Rockfon® System Eclipse Island™ Connecting Rockfon System Eclipse Island to the structure Please ensure that the supporting structure is solid and that it has raising the island to the required height. Use two people in order to a load bearing capacity of at least 25 kg. Attach the wire to the prevent the island being only attached by one or two hooks. soffit fixing points. Slide the wire into the hook. The system locks automatically providing maximum safety. Attach the hooks to all of The maximum load per wire is 5 kg, and the minimum installation the spiral anchors. Ensure that all hooks are...
Open the catalog to page 8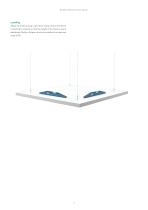
Rockfon® System Eclipse Island™ Levelling Adjust the level by using a spirit level. Always ensure the island is attached at all points so that the weight of the island is evenly distributed. Rockfon Eclipse can also be installed at a maximum angle of 45°.
Open the catalog to page 9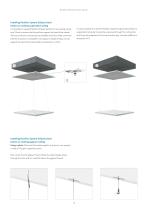
Rockfon® System Eclipse Island™ Installing Rockfon System Eclipse Island below an existing suspended ceiling It is possible to suspend Rockfon Eclipse islands from an existing ceiling It is also possible to install the Rockfon System Eclipse Island below a grid. Check to ensure that the grid can support the load of the islands. suspended ceiling by having the wires pass through the ceiling tiles Various connection accessories are available and it should be confirmed and fixing the suspension kit to the structure (eg. concrete soffit) as in that the accessory is compatible, can support a weight...
Open the catalog to page 10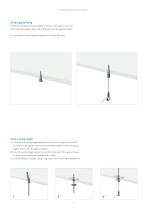
Rockfon® System Eclipse Island™ Using a gypsum plug Check with the gypsum plug supplier to ensure it can support a load of 5 kg. Screw the gypsum plug with an M6 fixing into the gypsum board. Fix the Rockfon Eclipse Design suspension kit to the M6 fixing. Using a spring toggle 1) heck with the spring toggle supplier to ensure it can support a load of 5 C kg. Drill into the gypsum board. Screw the M6 threaded rod into the spring toggle. Insert it into the gypsum board. 2) nce the spring toggle passes through the other side of the gypsum board, O it opens out and holds the threaded rod in place....
Open the catalog to page 11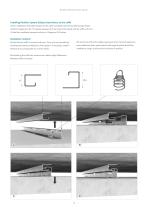
Rockfon® System Eclipse Island™ Installing Rockfon System Eclipse Island direct to the soffit Direct installation of Rockfon Eclipse to the soffit is possible with the Rockfon Eclipse Direct Solution Suspension Kit. The space between the rear side of the island and the soffit is 45 mm. Follow the installation sequence shown in Diagrams A-D below. Installation method Ensure that the soffit is smooth and even. Carry out any smoothing/ We recommend that for safety purposes and to maintain alignment, levelling work before installation of the system. If necessary, install a some additional basic galvanised...
Open the catalog to page 12All ROCKFON catalogs and technical brochures
 Chicago Metallic™ W Profiles
5 Pages
 Chicago Metallic™ J Profiles
5 Pages
 Chicago Metallic™ C Profiles
5 Pages
 Rockfon Eclipse® wall panel
4 Pages
 Rockfon® System Eclipse Island™
23 Pages
 Rockfon® System B Adhesive™
9 Pages
Archived catalogs
 Rockfon® Bass Plus™
4 Pages
 Rockfon® Scholar™ wall panel
4 Pages
 Rockfon® Samson™ wall panel
4 Pages
 Rockfon® Metal™
4 Pages
 Rockfon® Universal™ Baffle
4 Pages
 Rockfon Humitec® Baffle
4 Pages
 Rockfon® Industrial™ Baffle
4 Pages
 Rockfon® Koral™ Tenor
4 Pages
 Rockfon® Mono® Acoustic
4 Pages
 Rockfon® MediCare® Air
4 Pages
 Chicago Metallic™ Clip-in
6 Pages
 Rockfon® Soundstop™
4 Pages
 Rockfon Blanka® Bas
4 Pages
 Rockfon Blanka® Activity
4 Pages
 Rockfon Blanka®
4 Pages
 Rockfon® Acoustimass®
4 Pages
 Rockfon Eclipse®
4 Pages
 Rockfon® Artic™
4 Pages
 Rockfon® Scholar™
4 Pages
 Rockfon Artic
2 Pages
 Rockfon Color-all®
40 Pages
 Rockfon® Mono® Acoustic_2017
16 Pages
 Rockfon Eclipse®_2017
9 Pages
 Rockfon Blanka®_2017
20 Pages


- Industrial insulation
- Acoustic panel
- Panel insulation
- Commercial acoustic panel
- Rectangular acoustic panel
- Decorative acoustic panel
- Acoustic wall panel
- Office acoustic panel
- Indoor ceiling
- Acoustic suspended ceiling
- Ceiling acoustic panel
- Metal profile
- Interior acoustic panel
- Wall insulation
- High-performance insulation
- Public building acoustic panel
- Thermal-acoustic insulation
- Mineral insulation