Whirlpool Electronic TLCD
1 /124Pages

Whirlpool Electronic TLCD
1 /124Pages
Catalog excerpts

Whirlpool TLCD - Manual Installation and Operations Manual RIHO baths (whirlpools) Contents Page Installation of RIHO baths (whirlpools) 1.1 Safety regulations for bathrooms 1.2 Whirlpool installation 1.3 Delivery 1.4 Pre-installation actions 1.5 Bath installation 1.5.1 Ventilation grid 1.5.2 Inspection hatch(es) 1.5.3 Panels 1.5.4 Hot and cold water supply 1.5.5 Water drain 1.5.6 Electrical connection 1.5.7 Potential difference equaliser RIHO acrylic baths (Whirlpools) Basic Functions 4.1.1 Menu bar 4.1.2 Light or colour therapy 4.1.3 Option heating 4.1.4 Option cleanpool 4.1.5 Run dry function...
Open the catalog to page 3
Installation of RIHO Whirlpools The Whirlpool baths are fully in conformity with the applicable EN and national guidelines. NOTICE: = The installation of the bathtub must be carried out by an appropriately certified worker. = The installation of the bathtub must be carried out in accordance with the assembly instructions given in these instructions and drawings for the bath, where its dimensions are stated; The position of the supports and fasteners is unique for each bathtub and must be found on the bathtub supplied. = The customer is responsible for the proper preparation of construction, wiring...
Open the catalog to page 4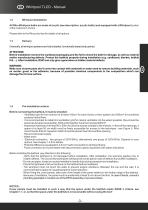
Whirlpool TLCD - Manual Whirlpool installation All Riho Whirlpool baths are made of acrylic (see description: acrylic baths) and equipped with a Whirlpool system of the customer's choice. Please refer to the Riho price lists for details of all options. 1.3 Generally, all whirlpool systems are fully installed, functionally tested and packed. WARNING: Make sure chrome parts don't come into contact with materials or water used to remove building materials, such as mortar, grout or tile adhesive, because of possible chemical components in the composition which can damage the chrome surface. Pre-installation...
Open the catalog to page 5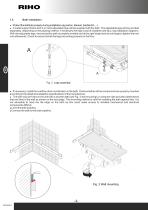
Bath installation Protect the bathtub properly during installation (eg carton, blanket, bubble foil, ...) A metal support frame with 4 or more adjustable legs will be supplied with the bath. The adjustable legs will be provided separately, depending on the packing method. If necessary the legs must be installed (see fig.2, leg installation diagram). With the adjustable legs, ensure that the bath is properly levelled and at the right height and do not forget to tighten the lock nuts afterwards. Check to ensure that all the legs are resting properly on the floor. = = If necessary, install the overflow-drain...
Open the catalog to page 6
Whirlpool TLCD - Manual
Open the catalog to page 7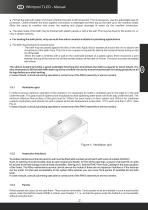
Whirlpool TLCD - Manual = Fill half the bath with water and check whether the bath is still horizontal. This is necessary. Use the adjustable legs for correction. Check whether the drain pipeline connection is watertight and then top up the bath up to the overflow outlet. Allow the same to overflow and check the sealing and proper drainage of water via the overflow connection. = The open sides of the bath may be finished with plastic panels or with a tile wall. This may be done for the entire rim, or only in certain sections. For sealing the bath joints, only use acid-free silicon sealant suitable...
Open the catalog to page 9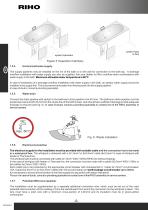
электрический ящик электрический ящик system Hydro/Aero system Hydro or Aero Figure 5 Inspection hatch(es) 1.5.4 Hot and cold water supply. The supply pipelines may be installed on the rim of the bath or on the wall for connection to the bath tap. A drainage overflow installation with water supply can also be supplied. Ask your dealer for Riho overflow-drain combinations with water supply in the bath. Maximum allowable water temperature is 60°C In case of installation of a drainage overflow installation with water supply in the bath, an aerator water supply should be installed in the supply line....
Open the catalog to page 10
Whirlpool TLCD - Manual Riho Acrylic (PMMA) baths (Whirlpools) All Riho baths are made of acrylic (polymethyl methacrylic) and supported in the bottom with chipboard and reinforced with glass fibre polyester. Acrylic is a plastic and coloured all the way through. The properties of acrylic provide the user with the maximum bathing comfort, provided the appropriate installation and maintenance instructions are duly followed. = The repair of small cracks and similar damage to the bath. If you want to repair minor damage, due care is recommended. You may proceed as follows: =If there are fine scratches,...
Open the catalog to page 11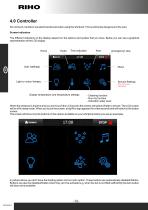
4.0 Controller Do not touch, handle or use electrical devices when using the whirlpool. This is extremely dangerous to the user. Screen indicators The different indicators on the display depend on the options and system that you have. Below you can see a graphical representation of the LCD display Time indication User (settings) (emergency) stop Light or colour therapy Service Settings Only for service mechanics Display temperature and temperature settings - Cleaning function - Run dry function - Indication water level When the whirlpool is inactive and you don't touch the LCD screen the screen...
Open the catalog to page 12
Whirlpool TLCD - Manual In addition to the programming mode the other part of the display gives information on the status of your system. See example below. You will see the icon turn white when the function is active. This applies to multiple keys. Hydro inactive Hydro active 4.1 Basic Functions Before starting the Whirlpool bath, fill the bath to 5 cm above the highest jet (hydro-system) and about 15 cm below the rim when you have only an aero system. The bath indication will then show full. Important: As a protection, the system will switch off automatically after 20 minutes, unless the system...
Open the catalog to page 13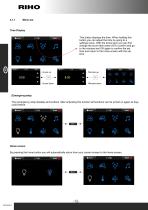
Time Display This button displays the time. When holding this button you can adjust the time by going to a settings menu. With the arrow keys you can first change the hours then press OK to confirm and go to the minutes and OK again to confirm the set time and return to the home screen with the set time. Hours down Minutes down (Emergency)stop The (emergency) stop disables all functions. After activating this function all functions can be turned on again as they could before. Home screen By pressing the home button you will automatically return from your current screen to the home screen.
Open the catalog to page 14All RIHO catalogs and technical brochures
 DEVOTION
2 Pages
 MODESTY
1 Page
 Whirlpool 1 Button
64 Pages
 Whirlpool 4 Button
68 Pages
 BALTIC B207
12 Pages
 FromScratch - Solid 2.0
32 Pages
- Wash stand
- Light fixture
- Contemporary wash basin
- Industrial LED light
- Metal light fixture
- Commercial light fixture
- Washbasin cabinet
- Rectangular wash basin
- Ceramic washbasin
- Countertop wash basin
- Modern washbasin cabinet
- White bathtub
- Linear light fixture
- Washbasin cabinet with drawers
- Wooden vanity cabinet
- Self-supporting bathtub
- Wall-mounted vanity cabinet
- Surface-mounted light fixture
- Home light fixture