- Catalogs
- RainWater Harvesting
- carat assembly instructions Rainwater Harvesting.co.uk 'Fitting a Carat Tank'
carat assembly instructions Rainwater Harvesting.co.uk 'Fitting a Carat Tank'
carat assembly instructions Rainwater Harvesting.co.uk 'Fitting a Carat Tank'
- The system features a leaf filter in the tank turret and a submersible pressure-sensitive pump.
- Applicable for product IDs ending in GUK1, DUK2, DUK3, DUK4, or DUK5.
- Installation is not recommended if the water table is within a meter of the ground surface.
- Tank Installation: Assemble the tank using two half shells with a rubber seal, backfill with pea shingle, and cover with topsoil.
- Pump Installation: Prime the pump with 5 liters of water, secure it on the tank floor, and attach a nylon cord to the turret wall.
- Electrical Connections: Connect the pump cable to an IP66 rated junction box on the turret wall.
- Use black pipes with green stripes for non-potable water.
- Frost protect all exposed pipes.
- Construct the soakaway to prevent water backup.
- Avoid surface water entry to prevent contamination and pump damage.
- Ensure the tank does not affect nearby building structures.
- Maintain a minimum two-meter distance between the tank and soakaway.
- Cleaning Procedure: Clean the filter several times a year by detaching the sieve from the transparent cover.
- Accessory: An XL handle is available for easier maintenance.
Catalog excerpts

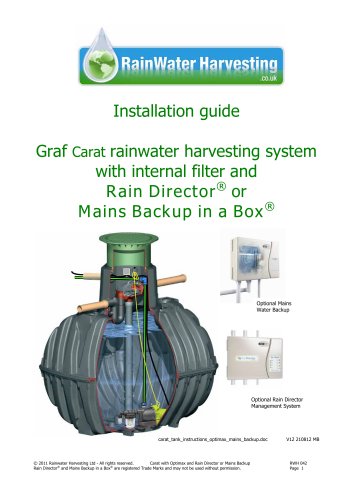
Installation guide Graf Carat rainwater harvesting system with internal filter and ® Rain Director or Mains Backup in a Box® Optional Mains Water Backup Optional Rain Director Management System carat_tank_instructions_optimax_mains_backup.doc © 2011 Rainwater Harvesting Ltd - All rights reserved. Carat with Optimax and Rain Director or Mains Backup Rain Director® and Mains Backup in a Box® are registered Trade Marks and may not be used without permission. V12 210812 MB RWH 042 Page 1
Open the catalog to page 1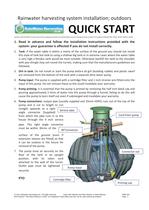
Rainwater harvesting system installation; outdoors QUICK START Systems with leaf filter in the turret of the underground tank and submersible pressure‐sensitive pump, product ID numbers ending GUK1, DUK2, DUK3, DUK4 or DUK5 1. Read in advance and follow the installation instructions provided with the system: your guarantee is affected if you do not install correctly. 2. Tank: if the water table is within a metre of the surface of the ground you should not install this style of tank but look to using a shallow dig tank or in extreme cases where the water table is very high a Rondus tank would be most suitable. Otherwise backfill the tank to the shoulder ...
Open the catalog to page 2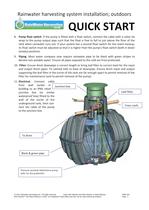
Rainwater harvesting system installation; outdoors QUICK START 8. Pump float switch: if the pump is fitted with a float switch, connect the cable with a nylon tie wrap to the pump output pipe such that the float is free to fall to just above the floor of the tank when rainwater runs out. If your system has a second float switch for the mains backup, its float switch must be adjusted so that it is higher than the pump’s float switch (both in down (empty) position). 9. Piping: Most water company now require rainwater pipe to be black with green stripes to denote non‐potable water. Ensure all pipes exposed to the cold are frost protected. ...
Open the catalog to page 3
Installation instructions These instructions aid assembly of the Graf Carat water tanks, associated plumbing and mains backup (if fitted), for supplying a domestic or garden water system. Read these and the manufacturer’s installation instructions (below) thoroughly before starting assembly. Your guarantee is affected if you do not install correctly You should also have the instructions for your mains backup option (Rain Director® or Mains Backup in a Box®) prior to commencing. Each is delivered with the product but you can get a download at any time at www.rainwaterharvesting.co.uk/downloads/raindirector_manual.pdf...
Open the catalog to page 4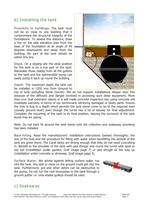
b) Installing the tank Proximity to buildings. The tank must not be so close to any building that it compromises the structural integrity of the foundations. To assess this distance, draw a line on the side elevation plan from the base of the foundation at an angle of 45 degrees downwards and away from the building. No part of the tank should be within this line. Slope. On a sloping site the ideal position for the tank is on a low part of the land. Rainwater flows readily from all the gutters to the tank and the submersible pump can easily pump it back up round the building. Depth. The maximum...
Open the catalog to page 5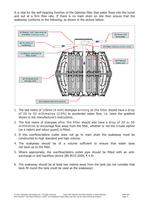
It is vital for the self-cleaning function of the Optimax filter that water flows into the turret and out at a firm flow rate. If there is no main drain on site then ensure that the soakaway conforms to the following, as shown in the picture below: (4) Debris “out” also acts as overflow if Optim ax used (6) To drain or soakaw ay (3) From roof dow npipe (7) Filter (Optimax shown here) (1) Siphon attached to filter outlet (8) Filtered w ater out (2) Underground storage tank (9) C almed inlet (not show n) 1. The last metre of 110mm (4 inch) drainpipe arriving at the filter should have a drop of...
Open the catalog to page 6
7. We also recommend building a one metre cubed leaf collection chamber with manhole between the tank and the soakaway. If the inlet and outlet are close to the top of this collection chamber then bulky leaves will drop into the chamber and can be cleaned out of the chamber through the manhole every autumn. The soakaway then does not clog up with leaves. Soakaway options 1 ) L as t me tr e o f pip e in to th e ta nk an d fi rs t me tr e a ft er th e ta n k s ho u ld ha ve 2 -5 % dr op t o e n su re f low ov er t he fi lter . 2 ) If th e pr op e rt y is su r ro u nd ed b y tre e s, fit a d e br...
Open the catalog to page 7
d) Fitting the submersible pump 1) The routing connections and inclines are shown in the manufacturers’ instructions (below). 2) Clean out from the bottom of the tank any grit or debris which might have fallen there. Use a separate dirty water pump. 3) Ensure the pump cartridge filter (if supplied) is attached to the inlet of the pump (usually entering the cylindrical pump housing from the narrow end) with its arrow pointing towards the pump. And that the 1 inch strainer is attached onto the input of this filter. The floating intake (which might appear in out-of-date print material) has been...
Open the catalog to page 8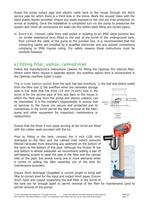
Route the pump output pipe and electric cable back to the house through the 4inch service pipe for which there is a third hole in the dome. Block the unused holes with the black plastic blanks provided. Ensure any pipes exposed to the cold are frost protected. on arrival at building. Once the installation is completed turn on the pump to pressurise the system and check all connections for leaks (do this before back filling any buried pipes). 9) Electrical: Connect cable from wall socket in building to an IP66 rated junction box (or similar waterproof box) fitted to the wall of the turret of the...
Open the catalog to page 9
Place the filter assembly with U-tube in the centre of the tank with the calmed inlet on the bottom. Attach the filter input to the 4 inch rainwater pipe from the roof with the slip collar provided and slide the U-tube outlet through the tank (from inside to out) then connect to the 4 inch pipe to drain or soakaway, similarly. Did you prime the pump? If not, take it out and do it now. See page 8. f) Connecting the mains back-up You should read the instructions for your mains backup option (or prior to commencing. Individual instructions are delivered with the product but you can get a download...
Open the catalog to page 10All RainWater Harvesting catalogs and technical brochures
 Rain Activ
2 Pages
 F-Line Shallow Dig Tanks
2 Pages
 rain backup in a box
3 Pages
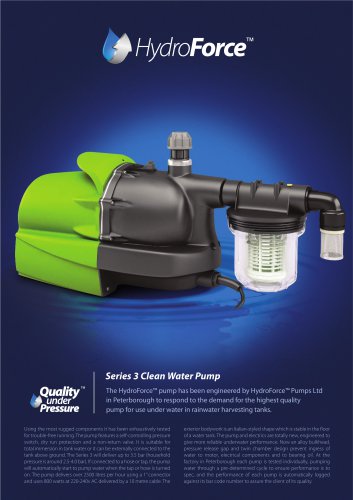 HydroForce
2 Pages
 Rain Director® brochure
3 Pages
 Rainwater H2OG
1 Page