Promat
1 /30Pages

Promat
1 /30Pages
Catalog excerpts

HOW TO: Line a masonry or timber frame construction with PROMAFOUR® PROMAFOUR® fire surround lining systems inspiring ways V ^ of living
Open the catalog to page 1
HOW TO: LINE A MASONRY OR TIMBER FRAME CONSTRUCTION WITH PROMAFOUR If you are installing a new stove, stove surround or updating an existing one you must ensure that the wall lining in the fireplace is safe and doesn't pose a fire risk. You must ensure that the board has the legal certification that it can both: • Withstand the maximum and continuous temperatures of up to 1000°C; and • Is classified A1 non-combustible and will not catch fire or contribute to a fire Promat PROMAFOUR® meets this criteria. It has been fully tested to international fire testing standard, BS EN 13501-1 and carries...
Open the catalog to page 2
Why PROMAFOUR®Benefits for installer and homeowner Safe and reliable PROMAFOUR® boards are classified A1 non-combustible in accordance with BS EN 13501-1 and resistant to very high continuous temperatures up to 1000°C during prolonged exposure. The boards are composed of calcium silicate and don't contain any bonding agent which could emit an irritating odour. Aesthetics and comfort PROMAFOUR® has good heat permeability and very good thermal storage capacity. This ensures less heat loss and uniform heat emission into your home even after the fire has gone out. PROMAFOUR® boards have a naturally...
Open the catalog to page 3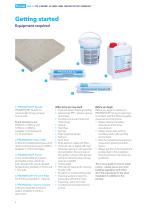
HOW TO: LINE A MASONRY OR TIMBER FRAME CONSTRUCTION WITH PROMAFOUR promafour' glue iooo Promafour W 1. PROMAFOUR® Boards PROMAFOUR® boards are mechanically strong and easy to work with. Board dimensions are: 2500mm x 1250mm and 1250mm x 1250mm. Available in thicknesses of 12, 15 and 18mm. 2. PROMAFOUR® Glue 1000 A refractory silicate based glue which resists to temperatures up to 1000°C. Available in 310ml cartridges. 3. PROMAFOUR® Primer A non-combustible and vapour permeable primer, which has been designed for use at elevated temperatures. Available in 3 Litre and 1 Litre tubs. 4. PROMAFOUR®-HT...
Open the catalog to page 4
Step by step guide There are 4 stages for the lining of a masonry fireplace: Preparing the existing fireplace Installing PROMAFOUR® Fixing PROMAFOUR® Finishing PROMAFOUR® STAGE 1: PREPARING THE EXISTING FIREPLACE 1 over the surrounding area to the installation C eview the opening of the fireplace and look R with dust sheets to ensure any dust is contained. to see how uneven the surfaces are. For new properties this should not be an issue but older properties can have uneven surfaces. You can check how straight by using a right angle set square. As shown opposite. Using a right angle set square...
Open the catalog to page 5
HOW TO: Line a masonry or tim ber fram e construction with P ROMAFOU R ® STAGE 2: INSTALLING PROMAFOUR® IN A MASONRY FIREPLACE 1 easure the three surfaces of the fireplace. M With older properties take several measurements at different levels just to check how uneven the wall might be. Measuring the surfaces of the fireplace. ou will need to cut the rear panel first as this is Y the first one to be installed. TIP Always carry and stack PROMAFOUR® boards carefully. Two people should carry a full board. Each board should be carried on it’s edge, taking care not to bend it as this can cause internal...
Open the catalog to page 6
STAGE 2: INSTALLING PROMAFOUR® IN A MASONRY FIREPLACE (CONT.) 4 he rear PROMAFOUR® board is held in place T using PROMAFOUR® Glue 1000 as a bonding compound. Check to ensure it is level and the surface is even. When screw fixing into the masonry you would need to use a suitable metal wall plug and countersunk wood screw. Checking the board is level. TIP As is common with older properties some of the walls might be uneven – if this is the case you could use a PROMAFOUR® wedge as shown opposite to pack out behind the board to overcome any unevenness on their side. Using a PROMAFOUR® wedge to...
Open the catalog to page 7
HOW TO: Line a masonry or tim ber fram e construction with P ROMAFOU R ® STAGE 3: FIXING PROMAFOUR® 1 re-drill and countersink oversize screw holes P in the rear board and at the back of the left and right boards at a maximum of 300mm centres. This is to allow for heat expansion. See diagram. Screws should be loosely fitted to the boards and fixed into metal plugs. If they are too tight they can put additional tension on the board when the screw expands with the heat, which can cause the board to crack. Alternatively, you can use countersunk concrete/masonry screws but be careful not over tighten....
Open the catalog to page 8
STAGE 3: FIXING PROMAFOUR® (CONT.) 4 ROMAFOUR® Glue is then applied between P the joints of the left and right boards to the rear board. most installations the edge of the In PROMAFOUR® boards will be hidden by a hearth. Here we show a way of finishing the boards into the surround if this is not possible. If there is no surround you may want to use the joint filler to blend into the wall. If this area gets too hot the non PROMAFOUR® components, such as beading and plaster, may expand or contract with heat and lead to cracking. Repeat process on other side of steel beam, fixing into angle as detailed...
Open the catalog to page 9
HOW TO: Line a masonry or tim ber fram e construction with P ROMAFOU R ® STAGE 4: FINISHING PROMAFOUR® Required materials/equipment: — — — — — PROMAFOUR®-HT Joint Filler PROMAFOUR® Glue Glass paper or sanding machine with fine grit Dust extraction equipment PROMAFOUR® Primer pply PROMAFOUR® Joint Filler to the screw A heads to make an even surface. Once filler has dried you will need to sand it down for a smooth surface. The filler may contract overnight and require re‑applying and re-finishing the following day. This should be done before decorating. PROMAFOUR®-HT Joint Filler is applied to...
Open the catalog to page 10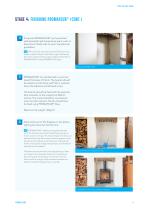
STAGE 4: FINISHING PROMAFOUR® (CONT.) required PROMAFOUR® can be painted If with specialist high temperature paint, such as Keim Paint. Please refer to paint manufacturer guidelines. TIP We have only discussed a paint finish but if you prefer a tiled finished, install with rough side facing the room and prime the rough surface and fix tiles to PROMAFOUR® using PROMAFOUR® glue. Painting PROMAFOUR®. PROMAFOUR® can be tiled with a minimum board thickness of 18mm. The boards should be sealed on both faces with PVA or watered down tile adhesive and allowed to dry. The boards should be fixed with...
Open the catalog to page 11All Promat catalogs and technical brochures
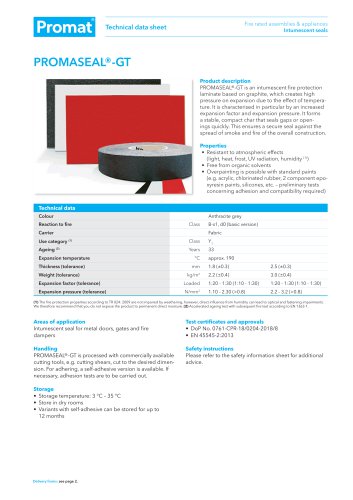 PROMASEAL®-GT
2 Pages
 PROMATECT®-XW
24 Pages
 PROMATECT®-L500
6 Pages
 Promat DURASTEEL®
32 Pages
 PROMASEAL®
32 Pages
 VICUCLAD®
2 Pages
 PROMAFOUR
6 Pages
 Promat PROMAFOUR-SUPALUX®
4 Pages
 MONOLUX®
2 Pages
 FLAMEBRAKER?
3 Pages
 Promat PROMATECT®-250
2 Pages
 VERMICULUX®
2 Pages
 Promat PROMAFORM®
1 Page
 Promat DALFRATEX®
6 Pages
 Promat PROMATECT® -HD
3 Pages
 PROMAT® SYSTEMGLAS
12 Pages
 Promat TLFR Board®
6 Pages
 Promat TL Board®
8 Pages
 Promat TD Board®
20 Pages
 Promat DURAWALL®
16 Pages
 Promat MASTERBOARD®
6 Pages
 PROMAT SUPALUX®
32 Pages

Archived catalogs
 Promat MASTERBOARD®
6 Pages
- Industrial insulation
- Industrial plaster
- Indoor paint
- Wall paint
- Panel insulation
- Building coating
- Outdoor paint
- Indoor coating
- Thermal insulation
- Partition
- Commercial partition
- Industrial acrylic paint
- Outdoor coating
- Synthetic insulation
- Office partition
- Interior panel
- Protective paint
- Commercial panel
- Wall insulation
- High-performance insulation