- Catalogs
- PROFILITEC
- Bordertec BD-BDC
- Company
- Products
- Catalogs
- News & Trends
- Exhibitions
Bordertec BD-BDC
1 /3Pages
Bordertec BD-BDC
1 /3Pages
Catalog excerpts

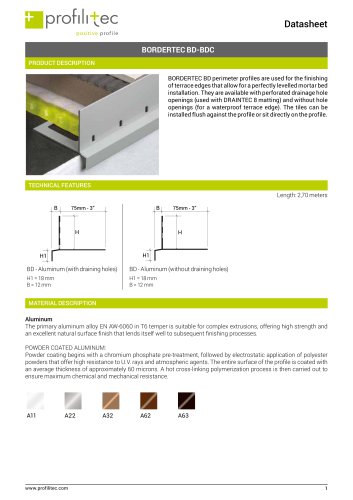
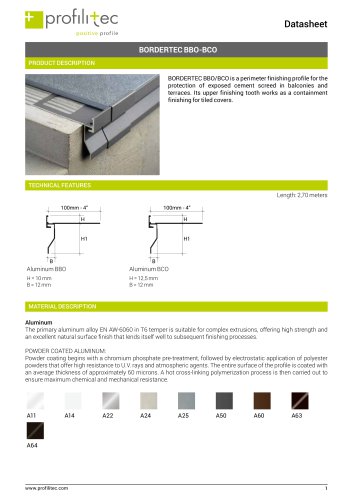
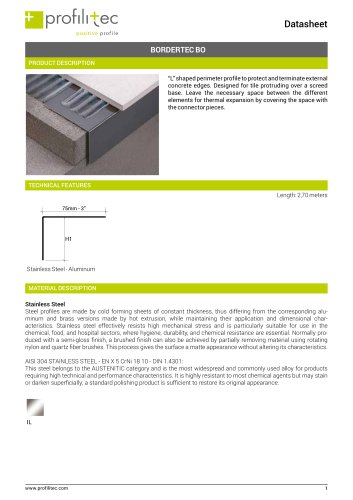
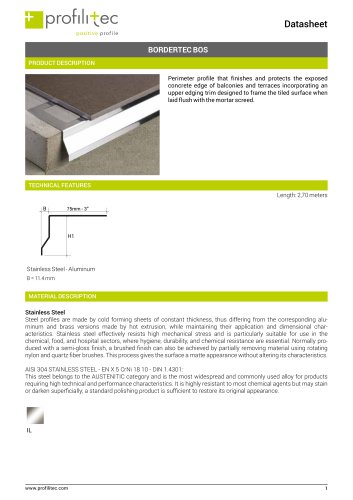
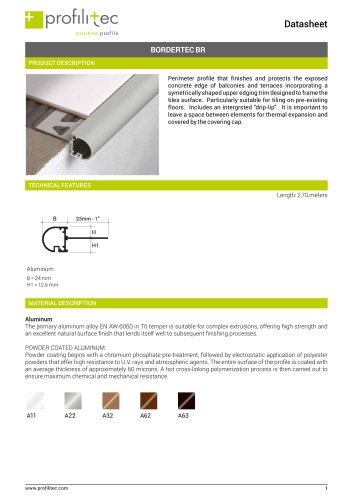
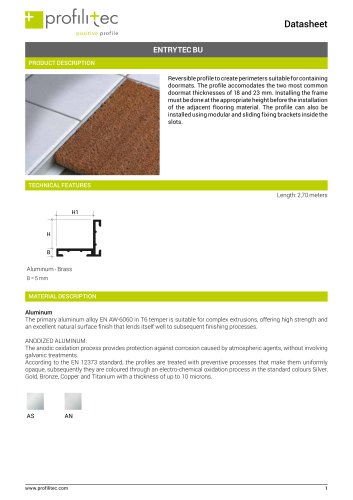
Datasheet BORDERTEC BD-BDC PRODUCT DESCRIPTION BORDERTEC BD perimeter profiles are used for the finishing of terrace edges that allow for a perfectly levelled mortar bed installation. They are available with perforated drainage hole openings (used with DRAINTEC 8 matting) and without hole openings (for a waterproof terrace edge). The tiles can be installed flush against the profile or sit directly on the profile. TECHNICAL FEATURES Length: 2,70 meters BD - Aluminum (with draining holes) BD - Aluminum (without draining holes) MATERIAL DESCRIPTION Aluminum The primary aluminum alloy EN AW-6060 in T6 temper is suitable for complex extrusions, offering high strength and an excellent natural surface finish that lends itself well to subsequent finishing processes. POWDER COATED ALUMINUM: Powder coating begins with a chromium phosphate pre-treatment, followed by electrostatic application of polyester powders that offer high resistance to U.V. rays and atmospheric agents. The entire surface of the profile is coated with an average thickness of approximately 60 microns. A hot cross-linking polymerization process is then carried out to ensure maximum chemical and mechanical resistance.
Open the catalog to page 1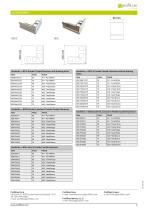
prof ill vec positive profile BDE bordertec >> BD in Powder Coated Aluminum with draining holes bordertec >> BDE External Junction in Powder Coated Aluminum bordertec >> BDG Joint in Powder Coated Aluminum bordertec >> BDC in Powder Coated Aluminum without draining holes bordertec >> BDCE External Junction in Powder Coated Aluminum Via Scotte, 3 - 36033 Isola Vicentina (Vicenza), ITALY e-mail: [email protected] Profilitec Corp. Profilitec France e-mail: [email protected] e-mail: [email protected] Profilitec Iberica, S.L.U. e-mail: [email protected]
Open the catalog to page 2
APPLICATION 1. Choose the H-size profile corresponding to the thickness of the covering to be laid, taking care to ensure that the profile does not exceed the edge of the covering but is positioned 0,5 to 1 mm lower; 2. Cut to the desired length; 3. Fix the profiles to the screed with nails, taking care to separate them by at least 1 cm from the screed and taking care to leave at least 0.5 cm of space between adjacent profiles and mask that space with the joint; 4. Spread the adhesive in the profile application area with the help of a notched trowel; 5. Apply the desired waterproofing system...
Open the catalog to page 3All PROFILITEC catalogs and technical brochures
 Showertec System
15 Pages
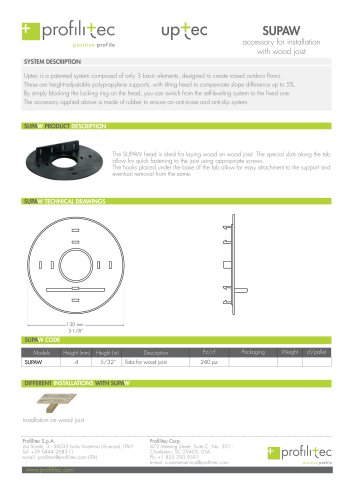 SUPAW
SUPAW1 Page
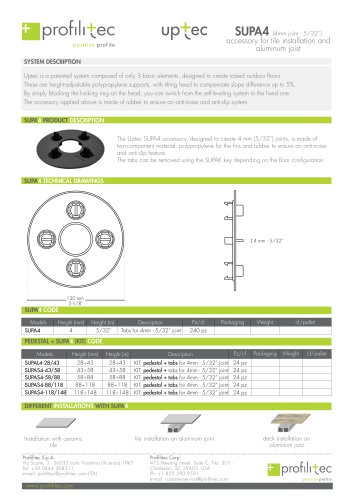 SUPA4
SUPA41 Page
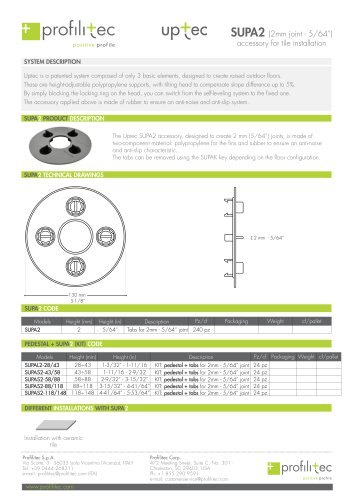 SUPA2
SUPA21 Page
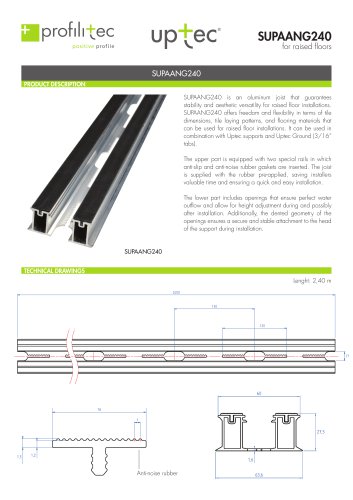 SUPAANG
2 Pages
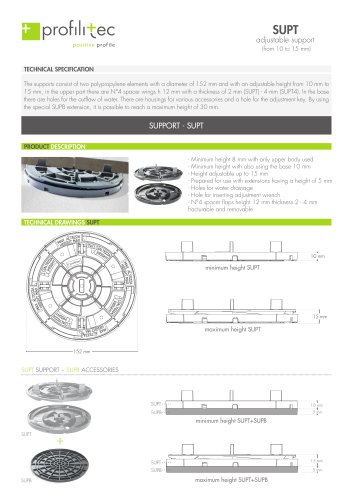 SUPT
SUPT2 Pages
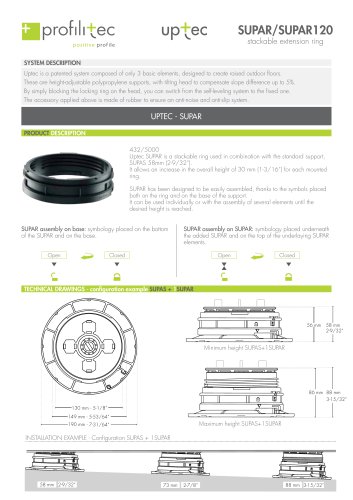 SUPAR - SUPAR120
3 Pages
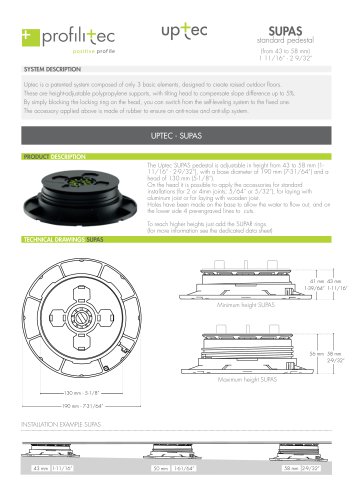 SUPAS
SUPAS2 Pages
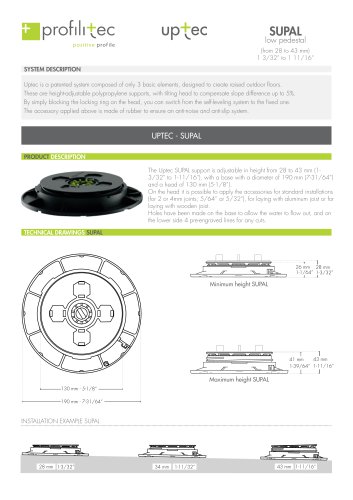 SUPAL
SUPAL2 Pages
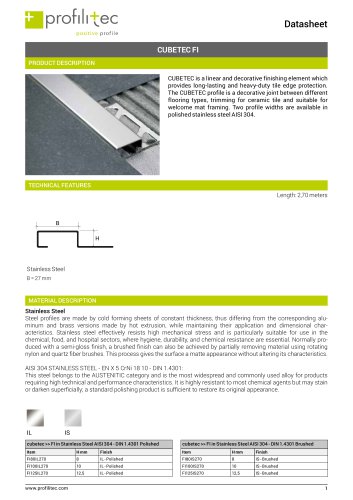 Cubetec FI
2 Pages
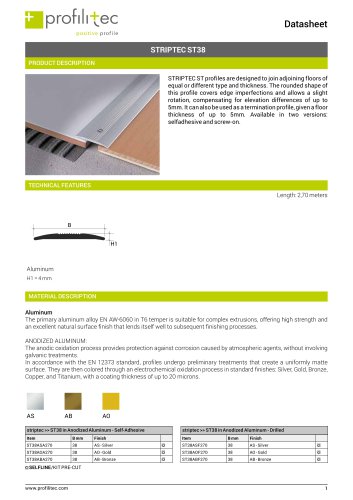
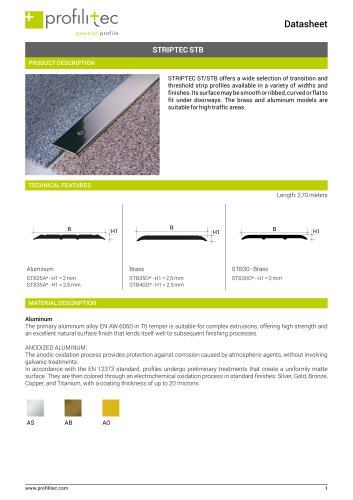 Striptec STB
4 Pages
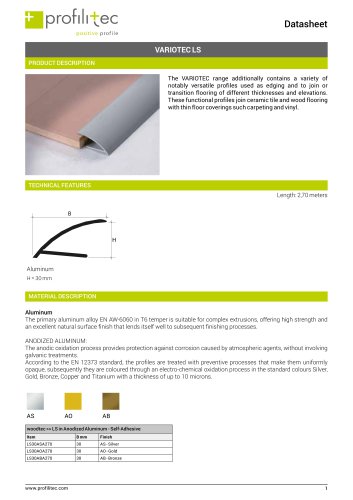 Variotec LS
2 Pages
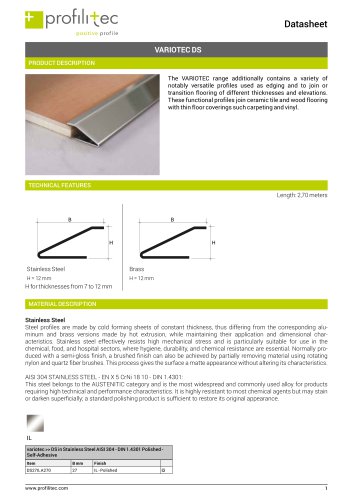 Variotec DS
3 Pages
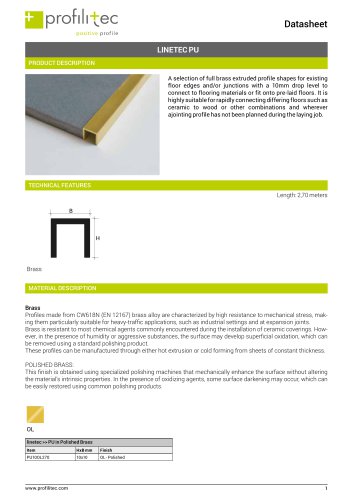 Linetec PU
2 Pages
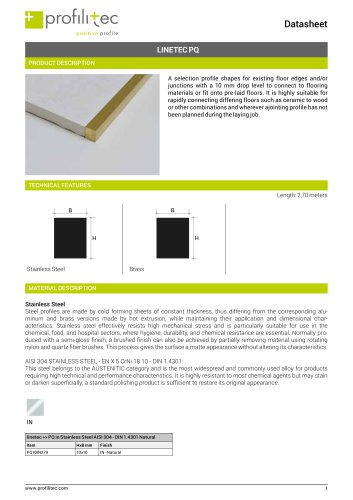 Linetec PQ
3 Pages
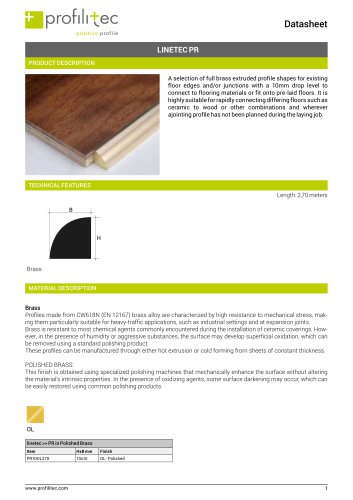 Linetec PR
2 Pages
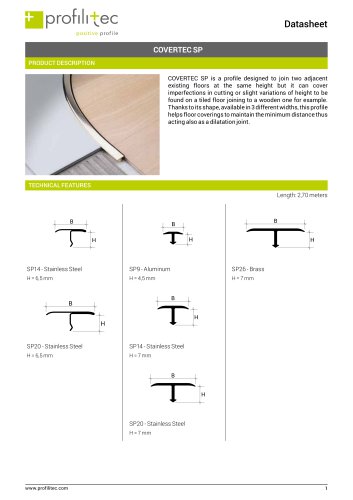
 Covertec SP
5 Pages
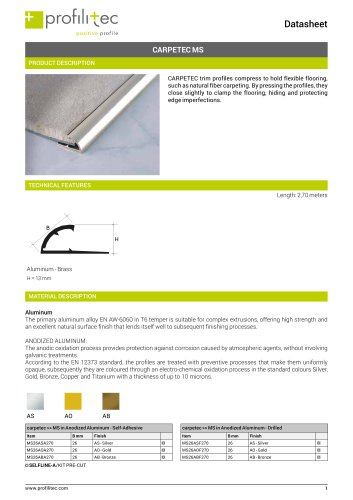 Carpetec MS
4 Pages
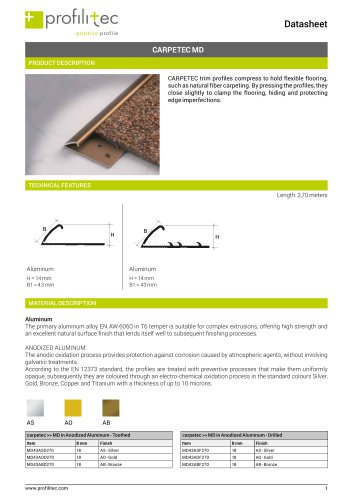 Carpetec MD
3 Pages
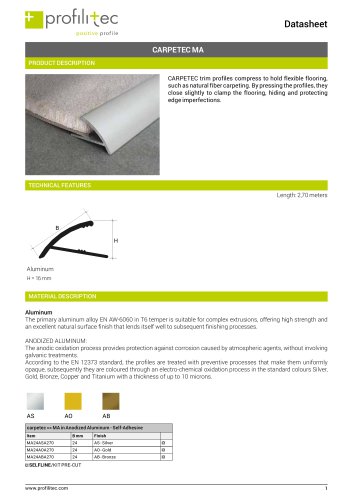 Carpetec MA
2 Pages
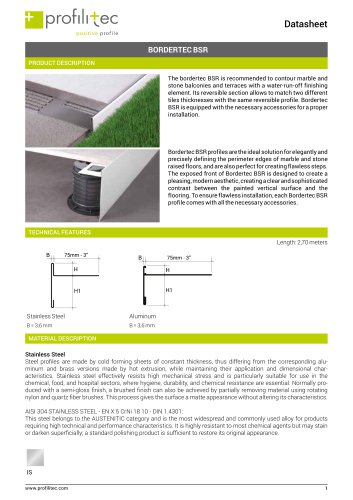 Bordertec BSR
6 Pages
 Mosaictec SJM
3 Pages
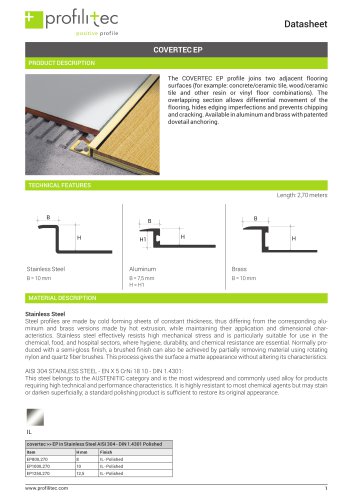 Covertec EP
4 Pages
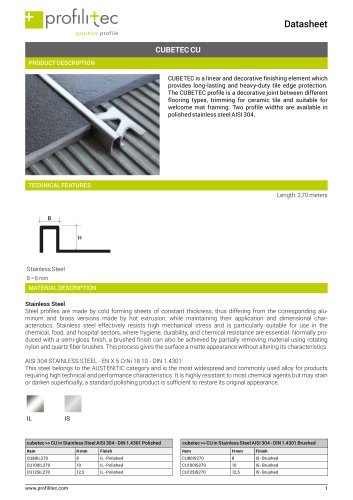 Cubetec CU
2 Pages
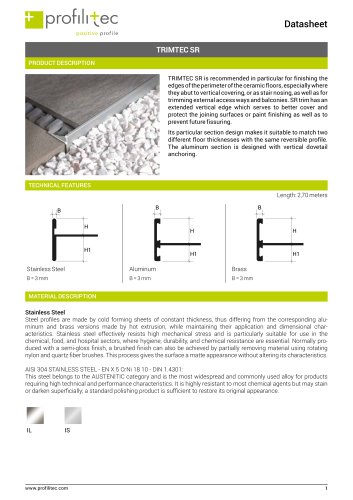
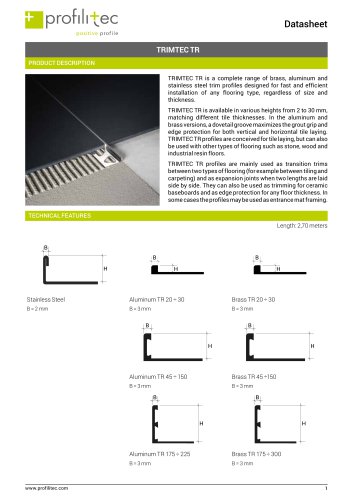 Trimtec TR
6 Pages
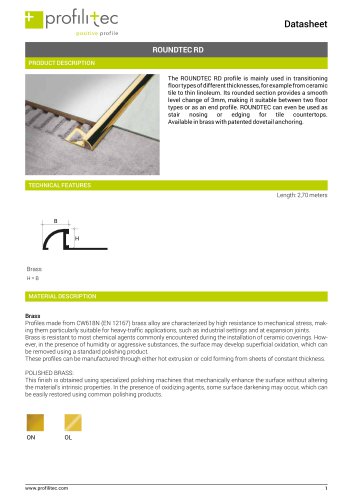 Roundtec RD
2 Pages
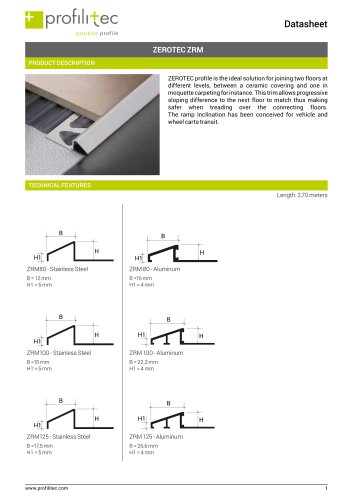 Zerotec ZRM
4 Pages
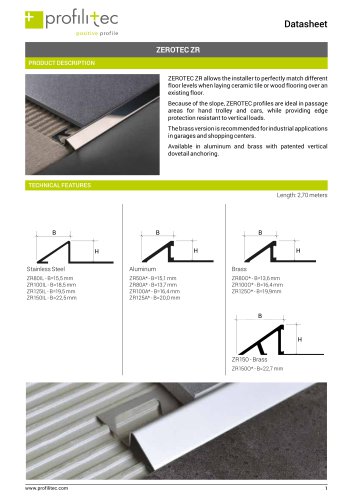 Zerotec ZR
5 Pages
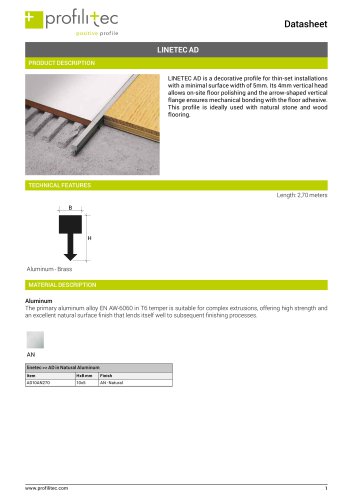 Linetec AD
3 Pages
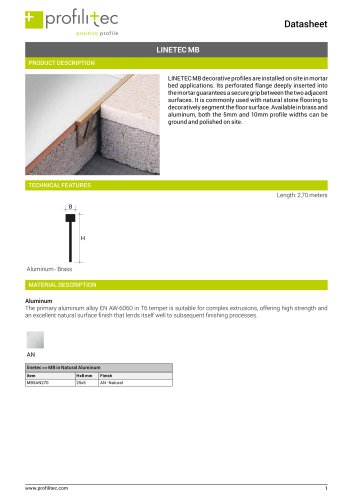 Linetec MB
3 Pages
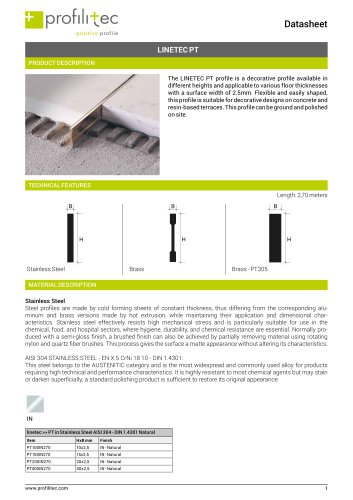 Linetec PT
3 Pages
 Covertec SP
5 Pages
 Striptec ST 38
3 Pages
 Striptec ST
5 Pages
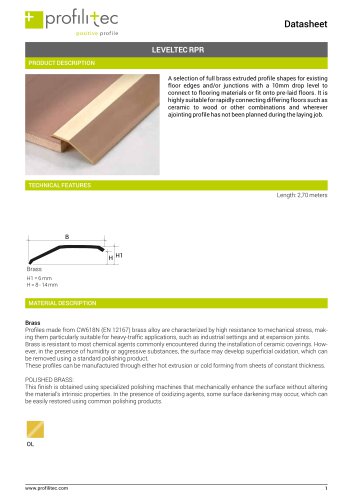 Leveltec RPR
3 Pages
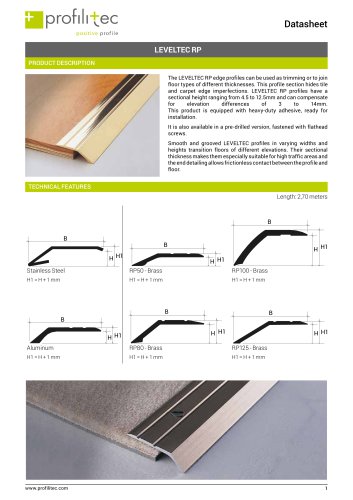 Leveltec RP
5 Pages
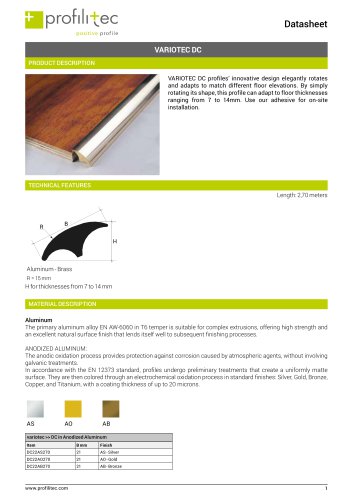 Variotec DC
3 Pages
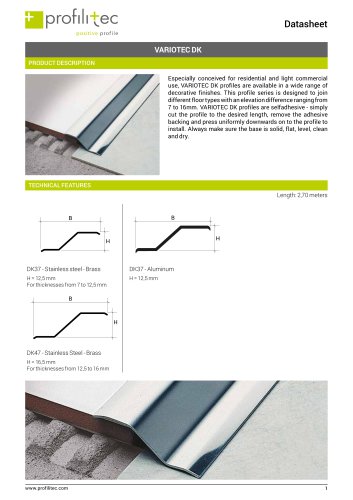 Variotec DK
4 Pages
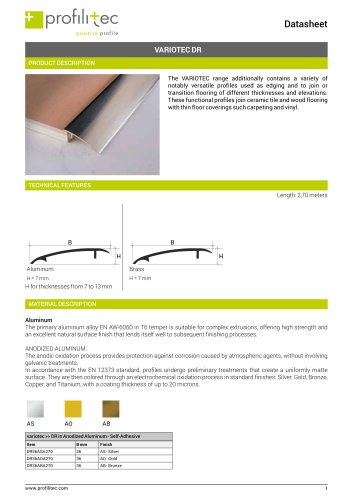 Variotec DR
3 Pages
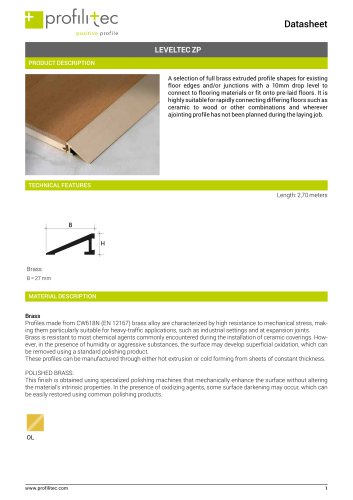 Leveltec ZP
2 Pages
 Fixxtec
2 Pages
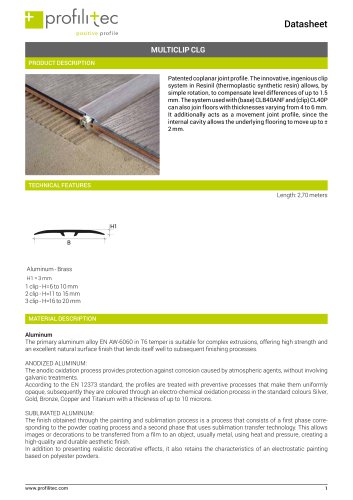 Multiclip CLG 370
4 Pages
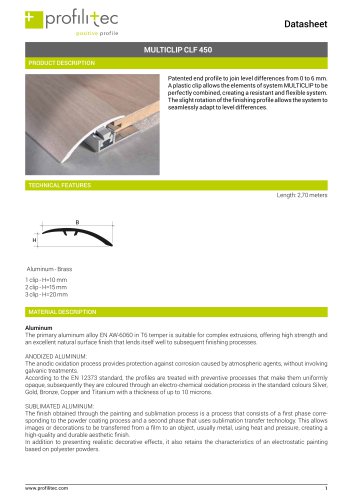 Multiclip CLF 450
4 Pages
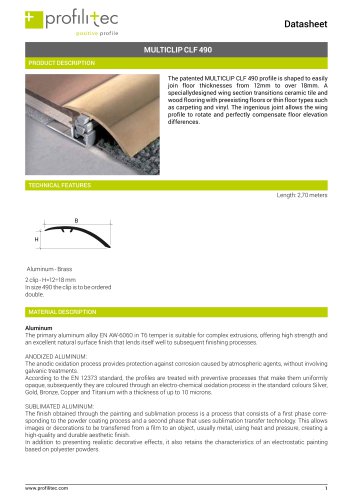 Multiclip CLF 490
4 Pages
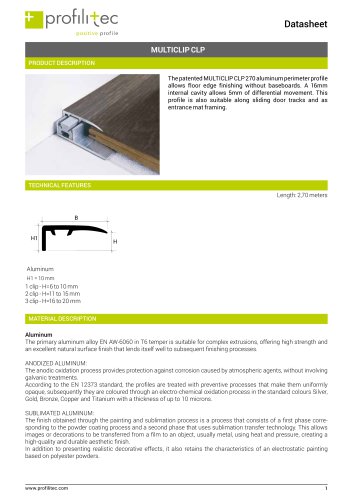 Multiclip CLP
3 Pages
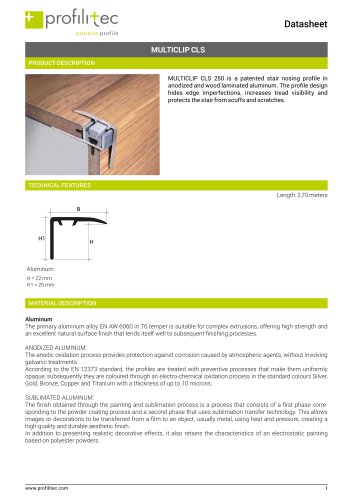 Multiclip CLS
3 Pages
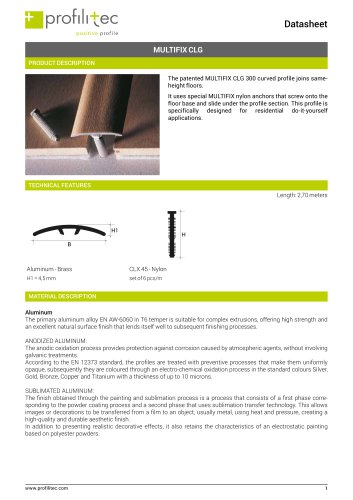 Multifix CLG
3 Pages
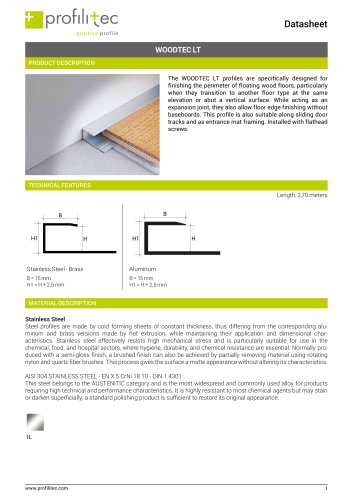 Woodtec LT
5 Pages
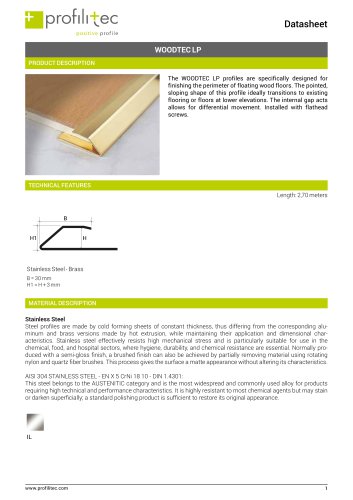 Woodtec LP
3 Pages
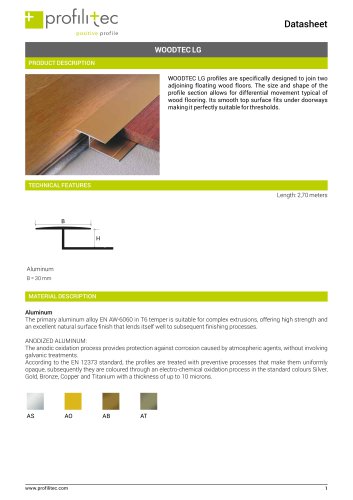 Woodtec LG
3 Pages
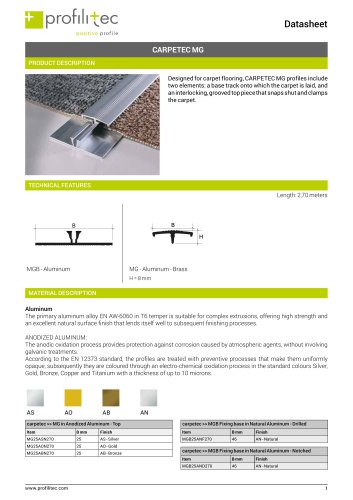 Carpetec MG
3 Pages
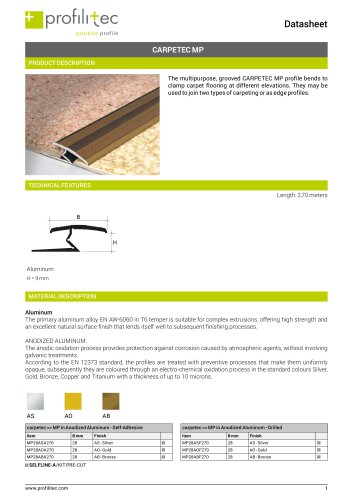 Carpetec MP
3 Pages
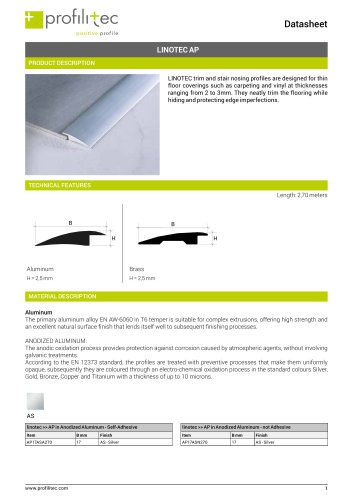 Linotec AP
3 Pages
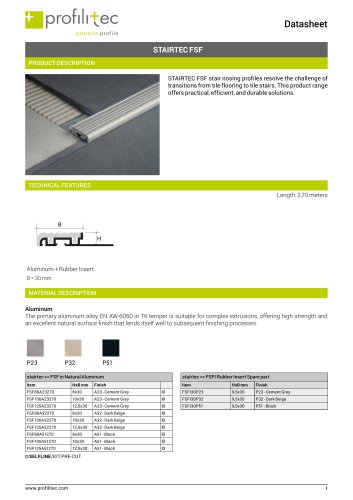 Stairtec FSF
2 Pages
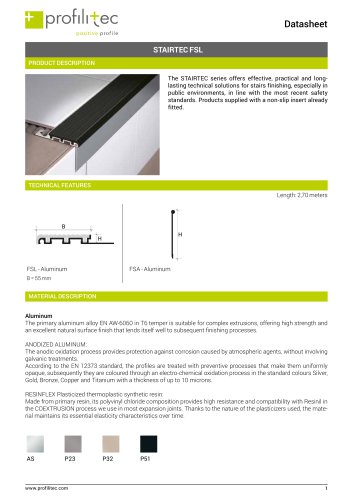 Stairtec FSL
3 Pages
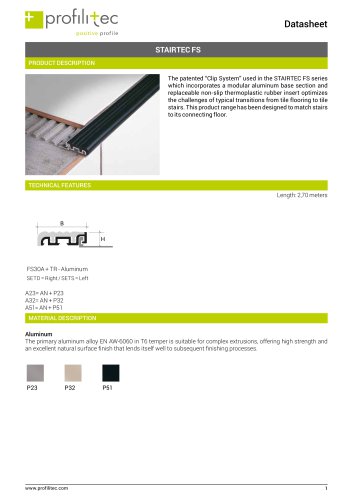 Stairtec FS
3 Pages
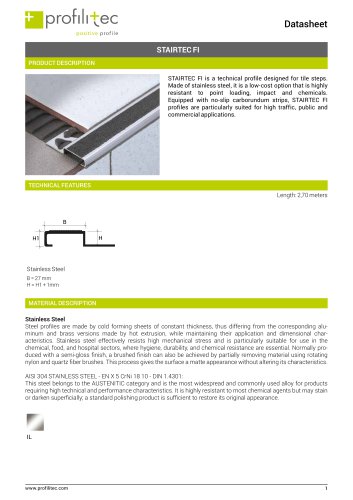 Stairtec FI
3 Pages
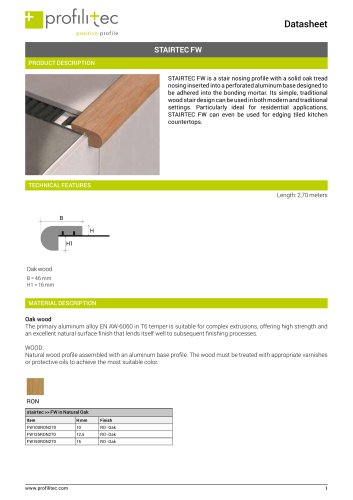 Stairtec FW
2 Pages
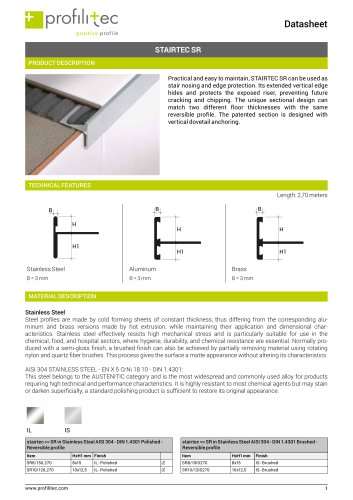 Stairtec SR
4 Pages
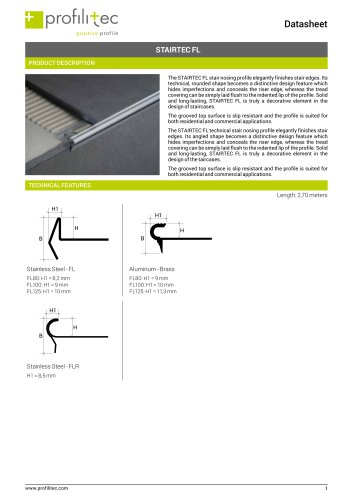 Stairtec FL
5 Pages
 Roundtec RD
2 Pages
 Squarejolly SJ
9 Pages
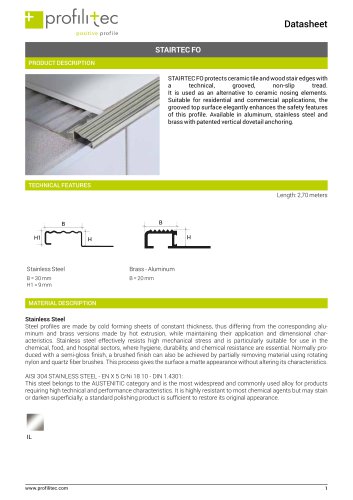 Stairtec FO
4 Pages
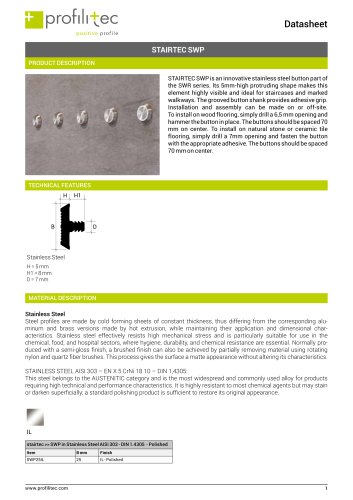 Stairtec SWP
2 Pages
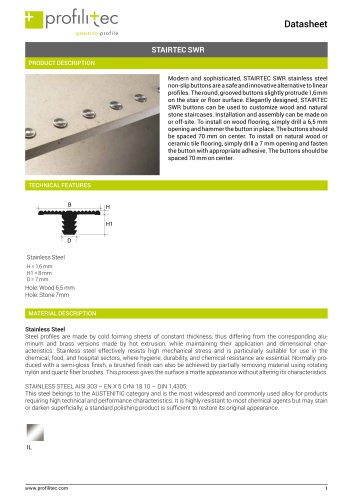 Stairtec SWR
3 Pages
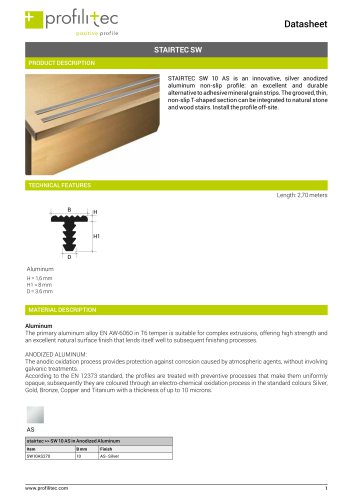 Stairtec SW
2 Pages
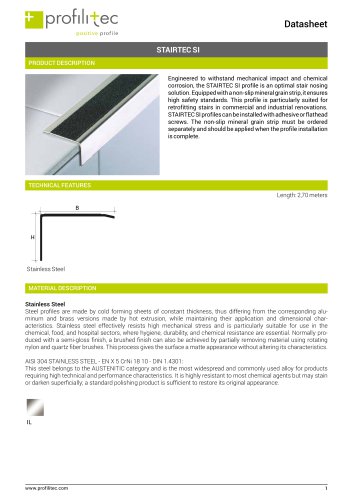 Stairtec SI
3 Pages
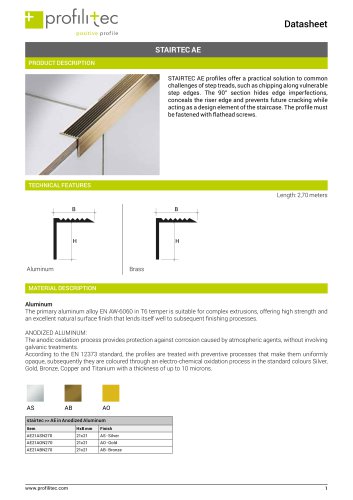 Stairtec AE
3 Pages
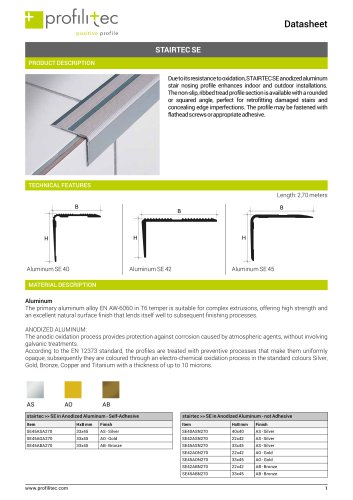 Stairtec SE
2 Pages
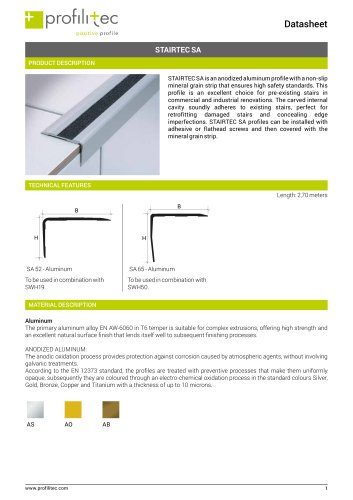 Stairtec SA
3 Pages
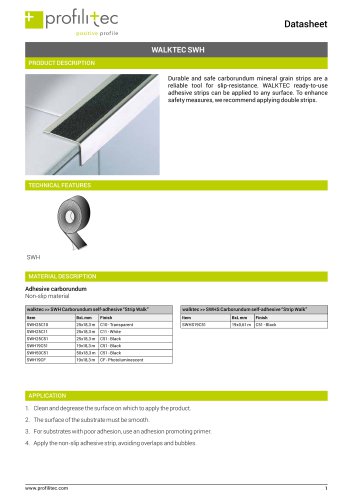 Walktec SWH
2 Pages
 Stairtec SL
3 Pages
 Stairtec SC
2 Pages
 Stairtec SM
4 Pages
 Mosaictec SJM
3 Pages
 Mosaictec RJM
3 Pages
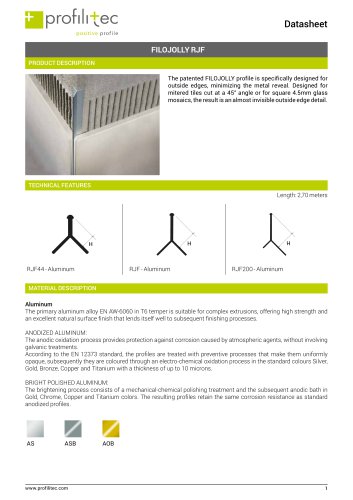 Filojolly RJF
3 Pages
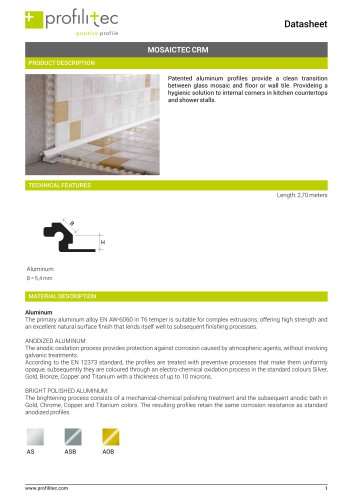 Mosaictec CRM
3 Pages
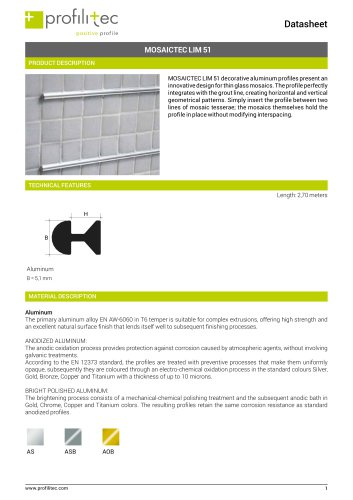 Mosaictec LIM 51
3 Pages
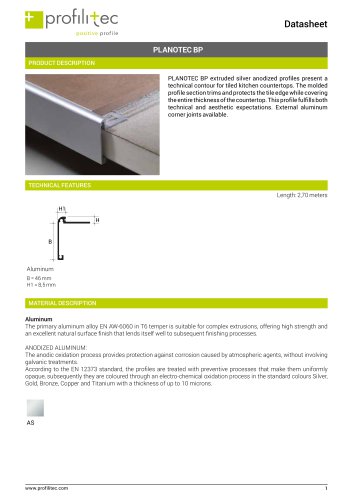 Planotec BP
3 Pages
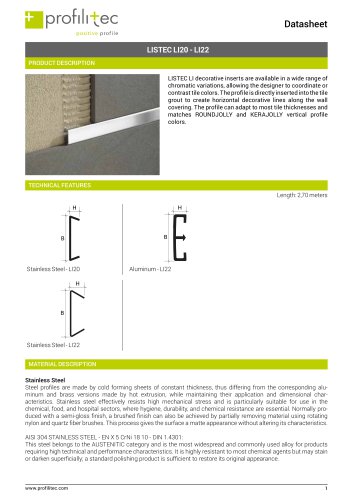 Listec LI 20 - LI 22
4 Pages
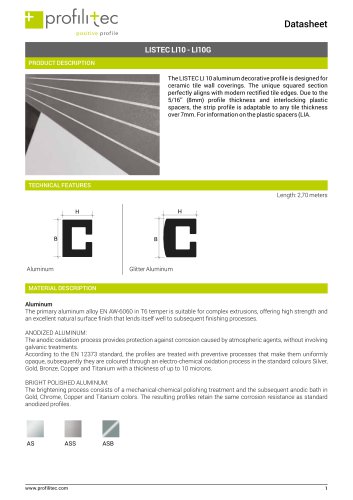 Listec LI 10
3 Pages
 Listec LI 15
3 Pages
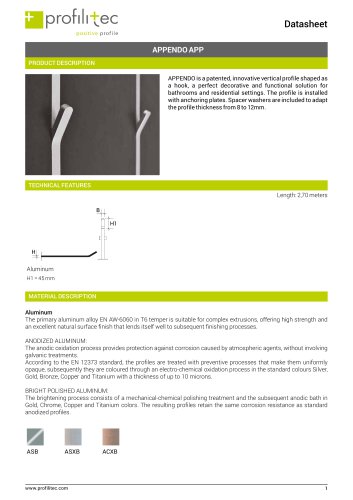 Appendo APP
3 Pages
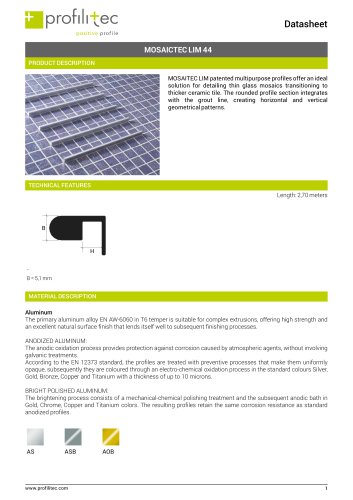 Mosaictec LIM 44
3 Pages
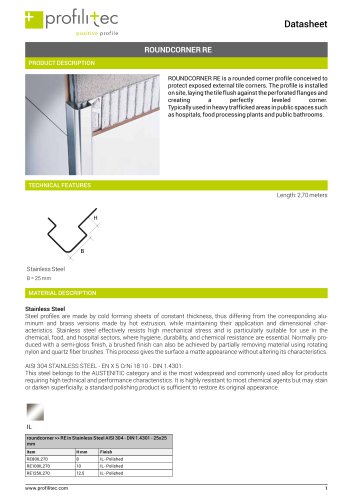
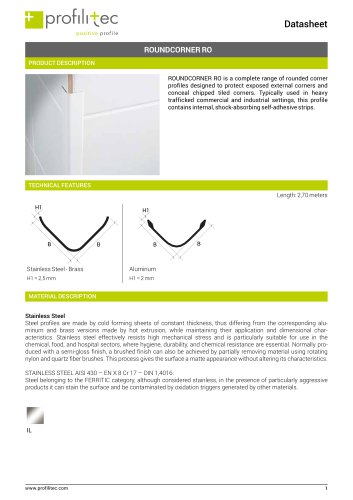 Roundcorner RO
4 Pages
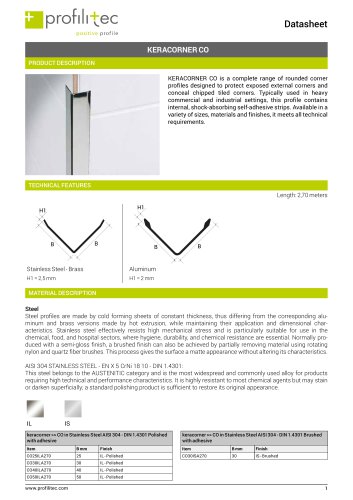 Keracorner CO
4 Pages
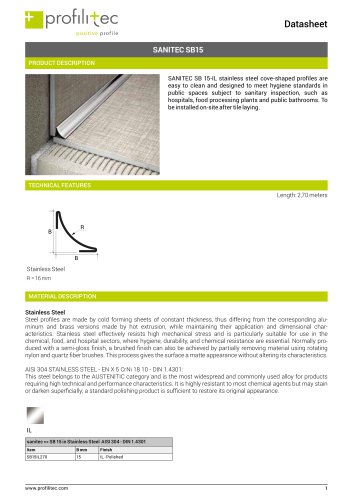 Sanitec SB 15
2 Pages
 Sanitec SB 20
2 Pages
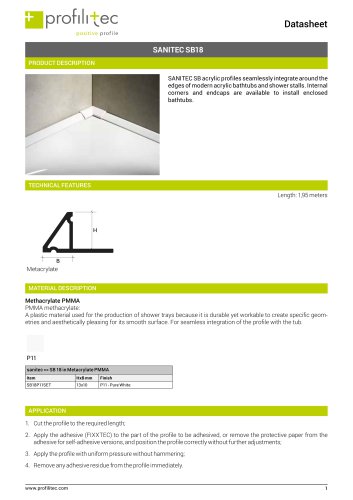 Sanitec SB 18
2 Pages
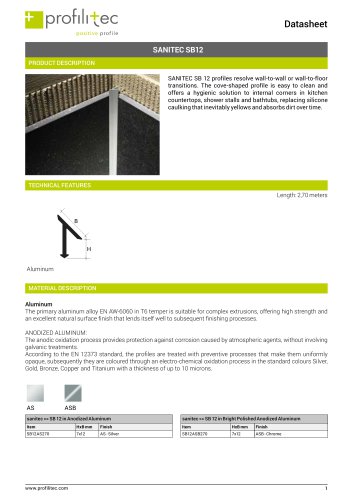 Sanitec SB 12
2 Pages
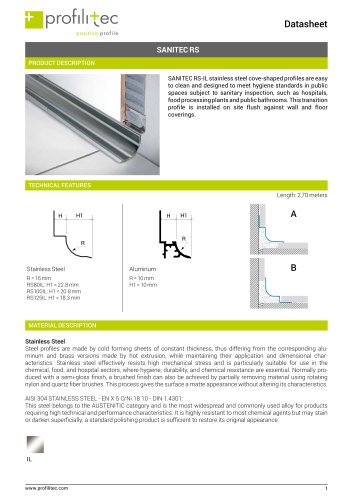 Sanitec RS
4 Pages
 Roundcorner RE
2 Pages
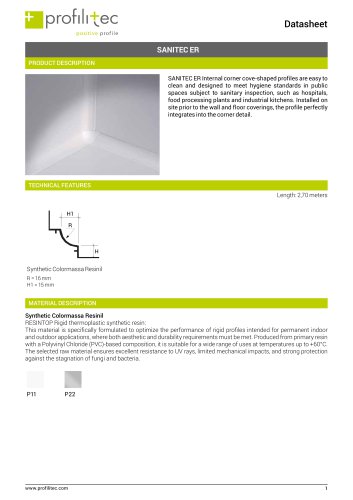 Sanitec ER
3 Pages
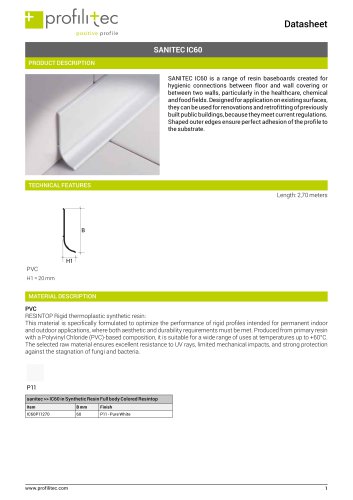 Sanitec IC60
2 Pages
 Coflex CE
2 Pages
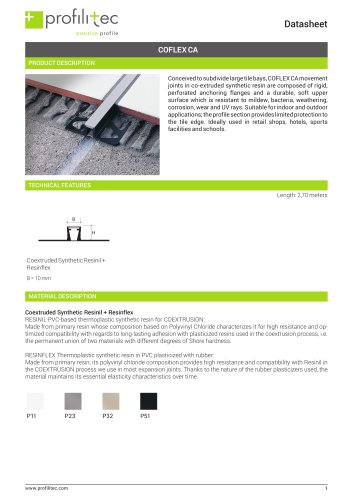 Coflex CA
3 Pages
 Coflex CAJ
3 Pages
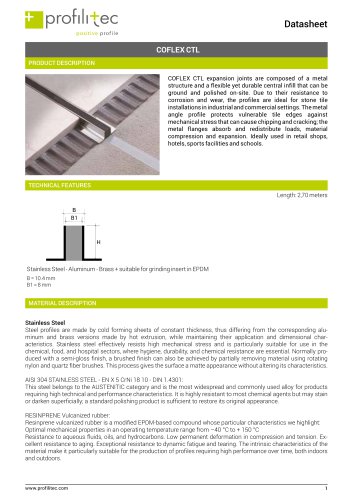 Coflex CTL
5 Pages
 Coflex CB
4 Pages
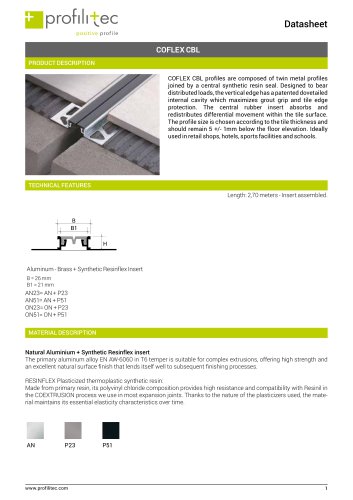 Coflex CBL
4 Pages
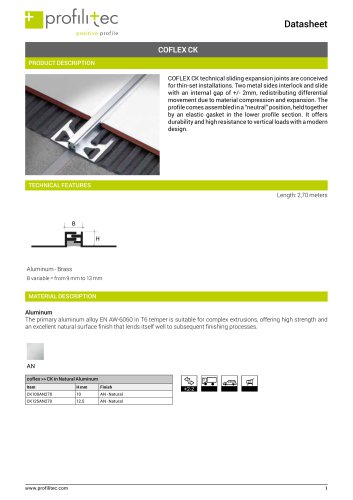 Coflex CK
3 Pages
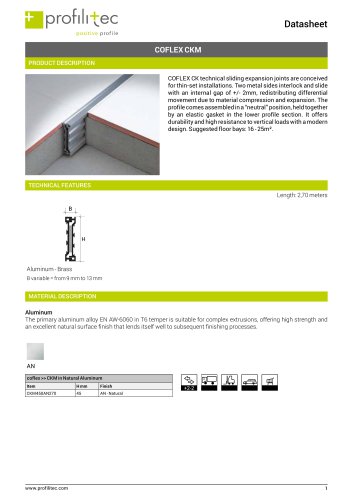 Coflex CKM
3 Pages
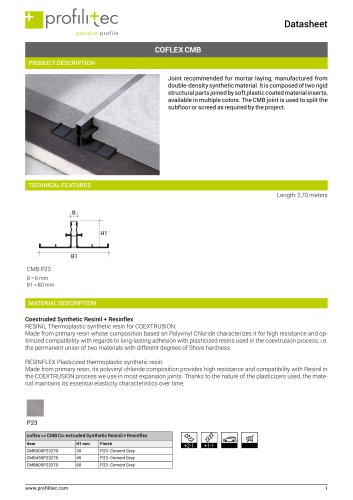 Coflex CMB
2 Pages
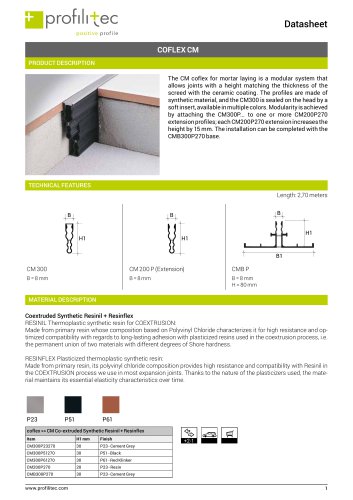 Coflex CM
2 Pages
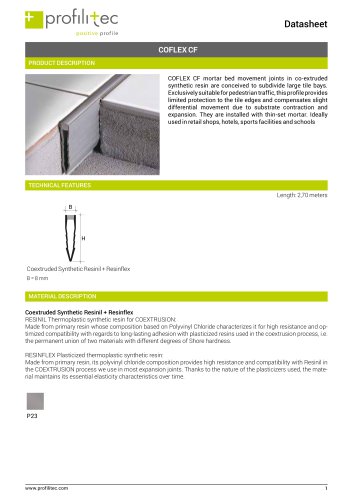 Coflex CF
2 Pages
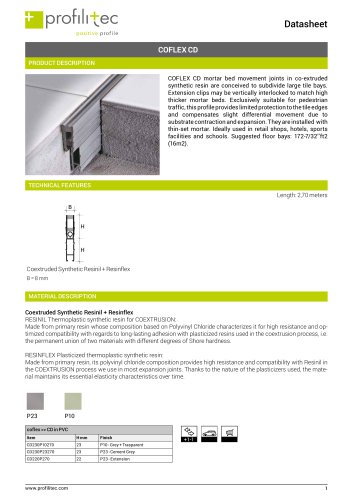 Coflex CD
2 Pages
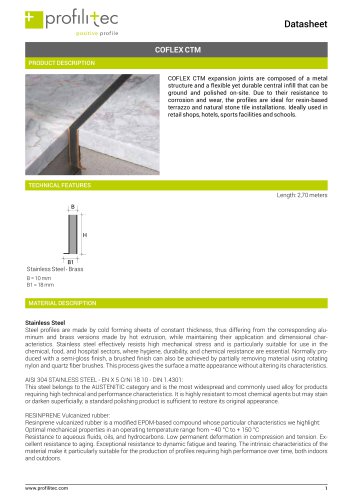 Coflex CTM
3 Pages
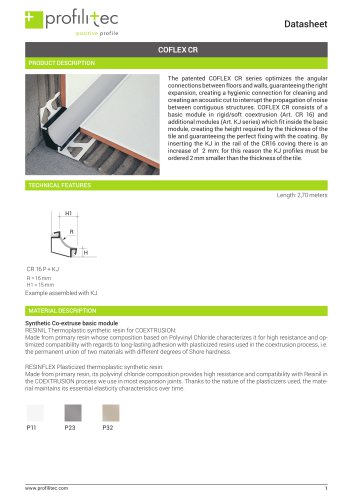 Coflex CR
3 Pages
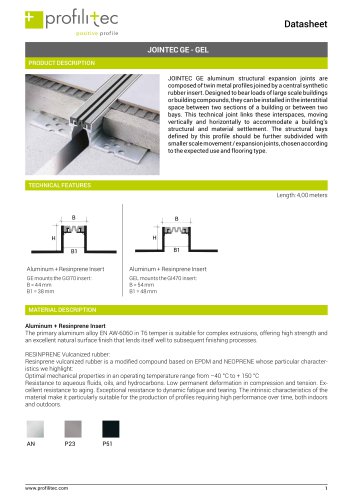 Jointec GE
3 Pages
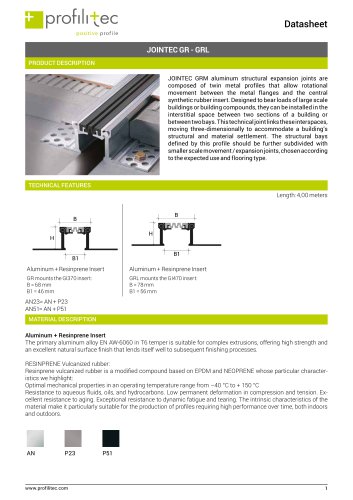 Jointec GR
3 Pages
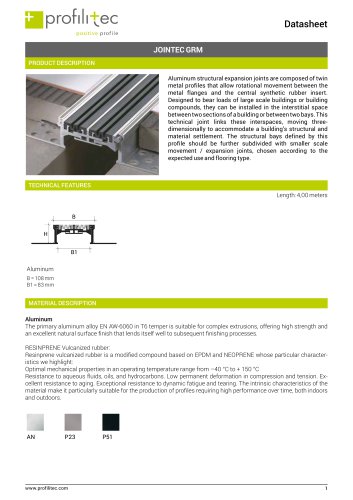 Jointec GRM
3 Pages
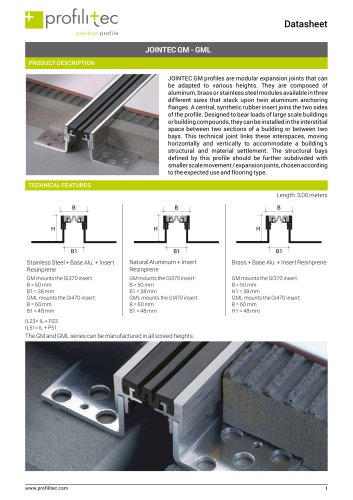 Jointec GM
5 Pages
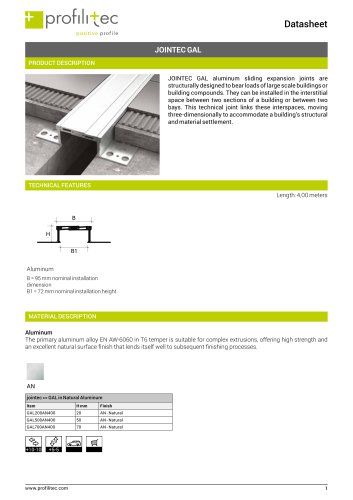 Jointec GAL
3 Pages
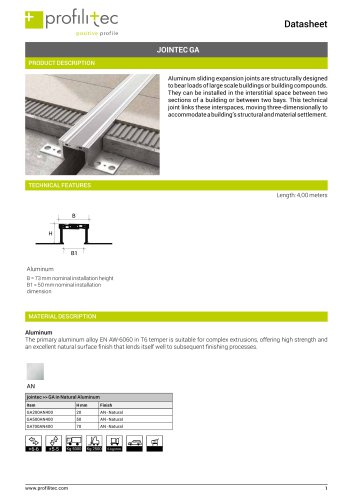 Jointec GA
3 Pages
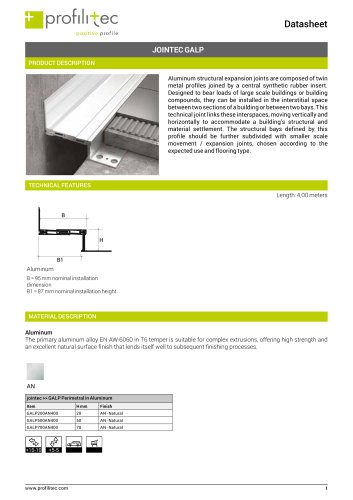 Jointec GALP
3 Pages
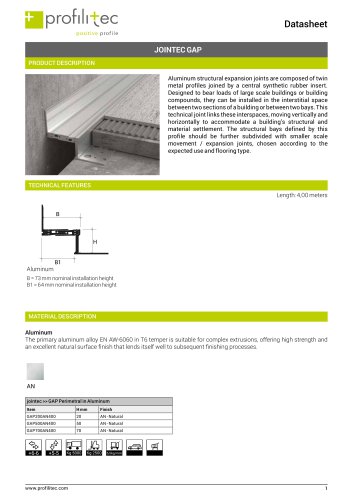 Jointec GAP
3 Pages
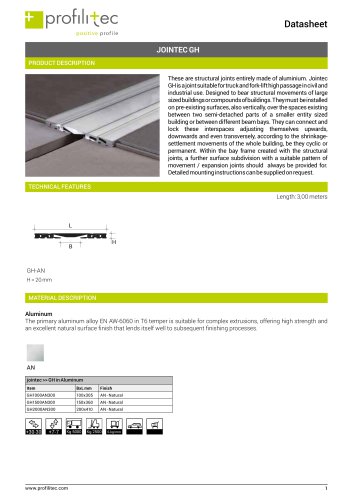 Jointec GH
3 Pages
 Plano BFW
3 Pages
 Squarejolly SJ
9 Pages
 roundjolly RJ
14 Pages
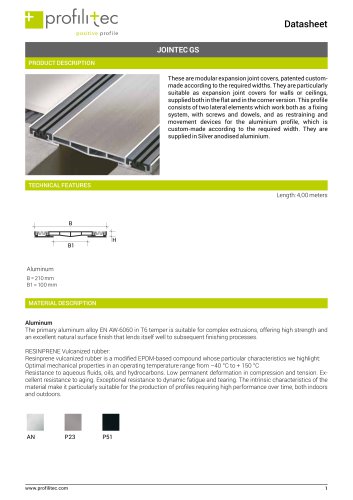 Jointec GS
3 Pages
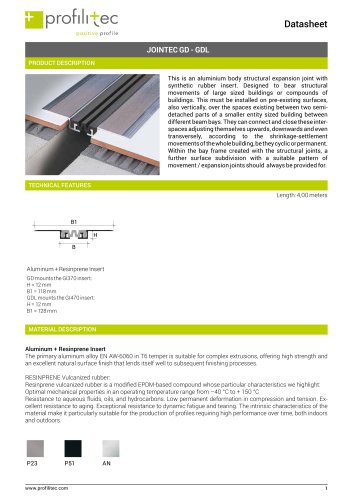 Jointec GD
3 Pages
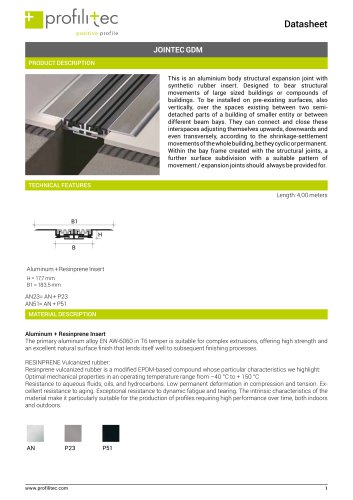 Jointec GDM
3 Pages
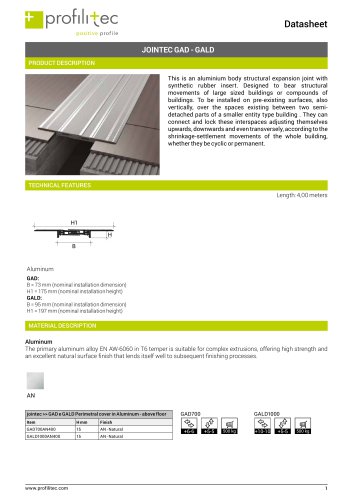 Jointec GAD
2 Pages
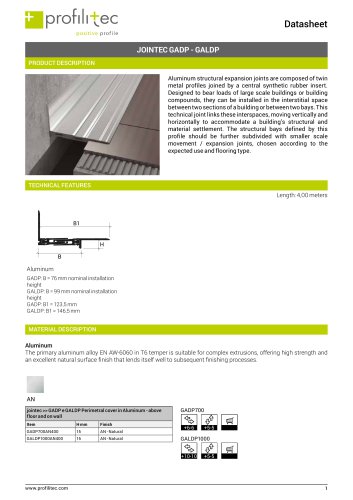 Jointec GADP
3 Pages
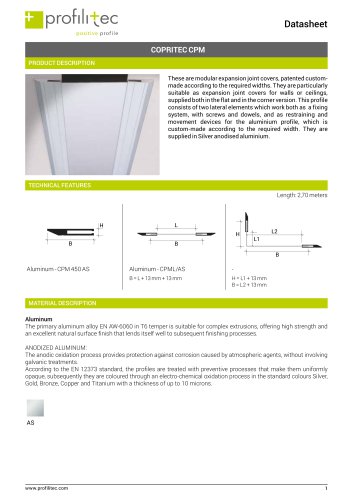 Copritec CPM
3 Pages
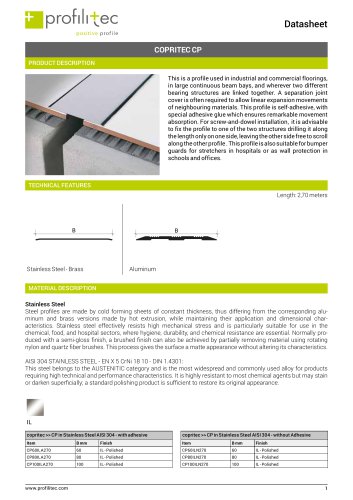 Copritec CP
4 Pages
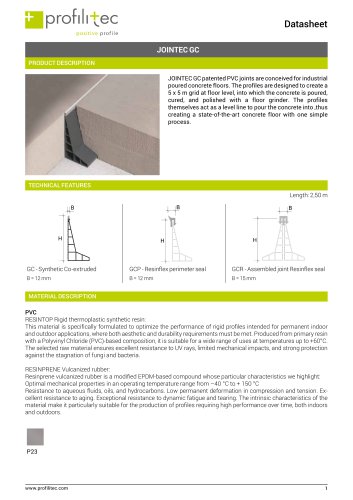 Jointec GC
3 Pages
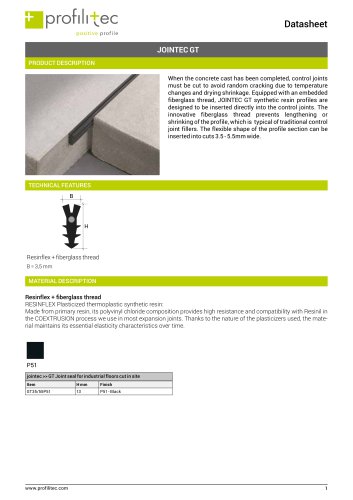 Jointec GT
2 Pages
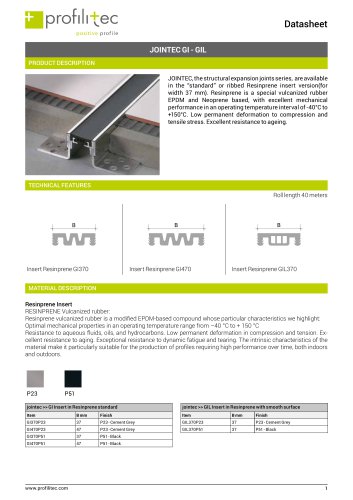 Jointec GI-GIL
2 Pages
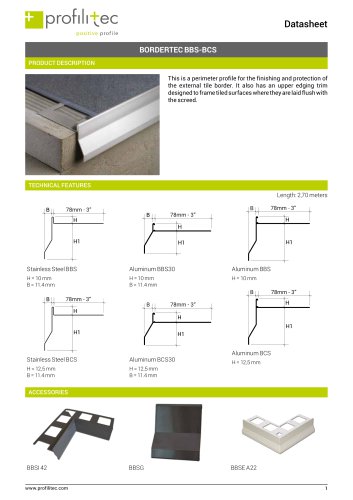 Bordertec BBS-BCS
8 Pages
 Bordertec BBO-BCO
4 Pages
 Bordertec BO
5 Pages
 Bordertec BOS
5 Pages
 Bordertec BR
3 Pages
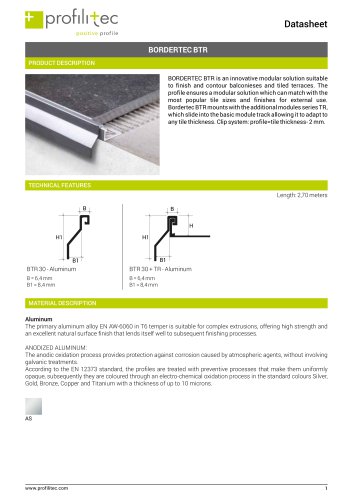 Bordertec BTR
3 Pages
 Bordertec BSR
6 Pages
 Trimtec SR
4 Pages
 Foiltec
3 Pages
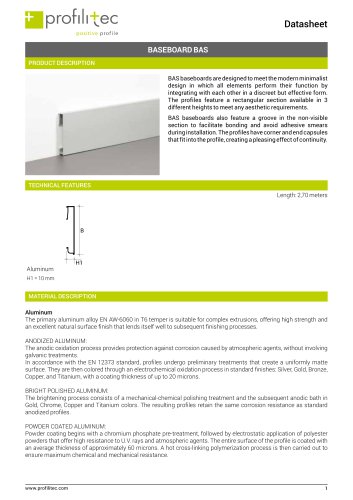
 Battiscopa BA
5 Pages
 Battiscopa BAR
3 Pages
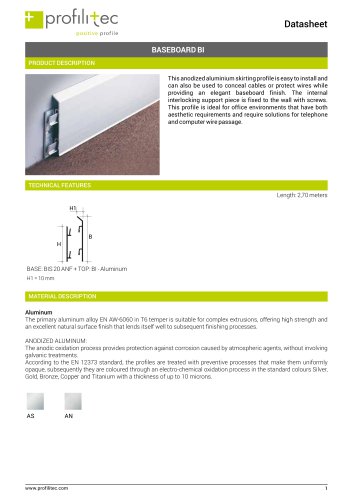 Battiscopa BI
3 Pages
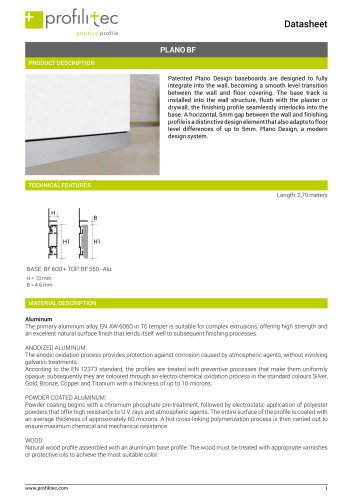 Plano BF
3 Pages
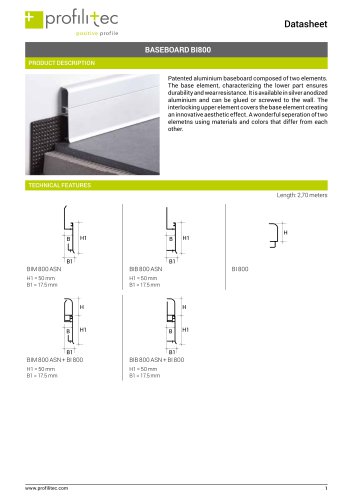 skirting BIM
3 Pages
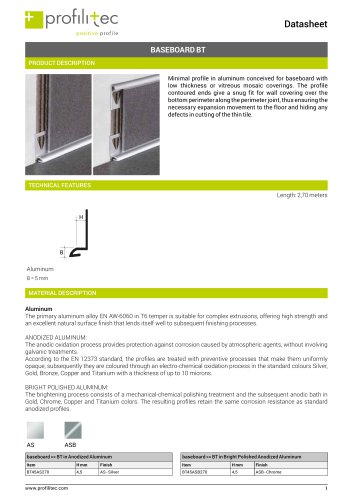 Battiscopa BT
2 Pages
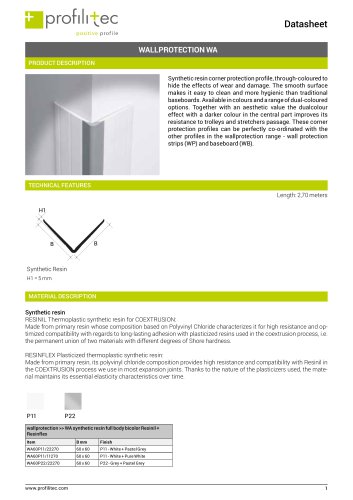 Wallprotection WA
2 Pages
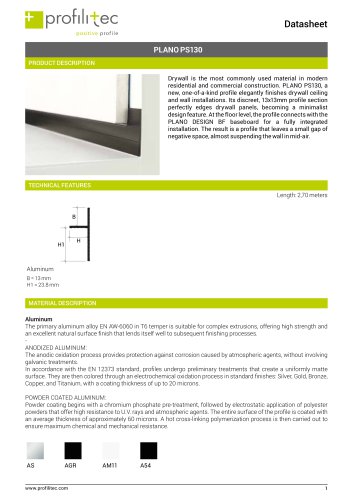 Plano PS 130
2 Pages
 Sanitec IC 60
2 Pages
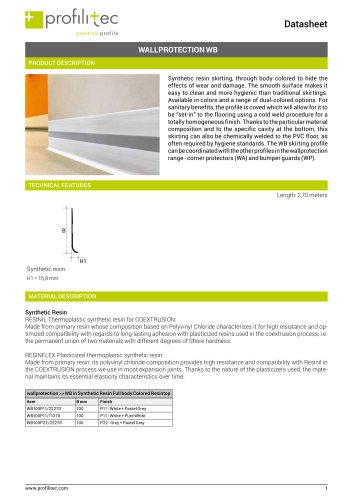 Wallprotection WB
2 Pages
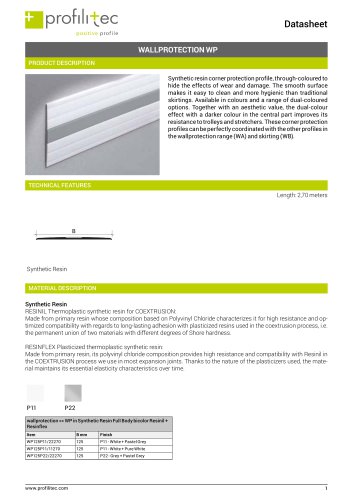 Wallprotection WP
2 Pages
 Entrytec BU
3 Pages
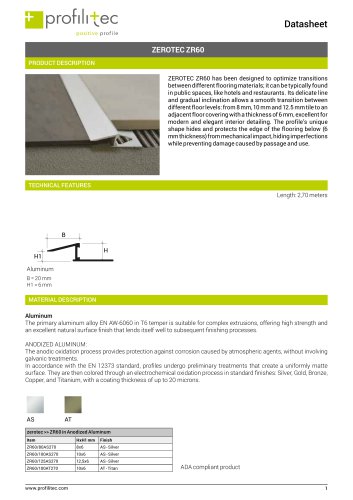 Zerotec ZR60
2 Pages
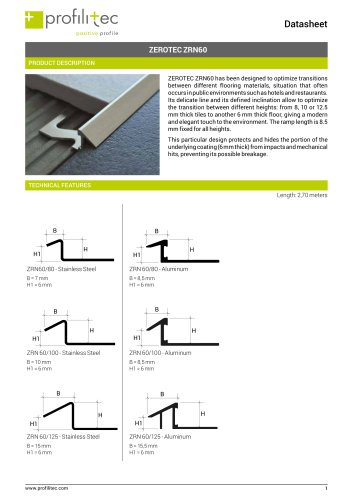 Zerotec ZRN60
4 Pages
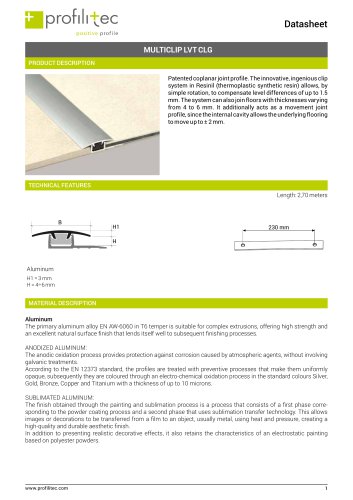 Multiclip LVT CLG260
3 Pages
 Multiclip LVT CLF320
3 Pages
 Multiclip LVT CLP240
3 Pages
 Stairtec SVT
3 Pages
 Bordertec BSJ
3 Pages
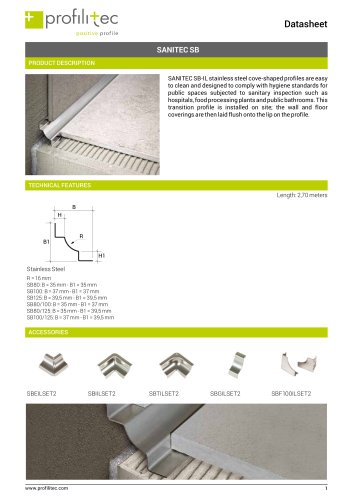 Sanitec SB
3 Pages
 Coflex CT
3 Pages
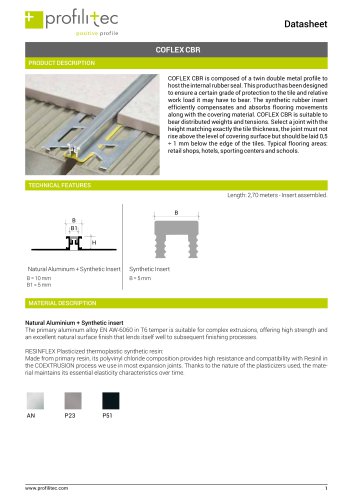 Coflex CBR
3 Pages
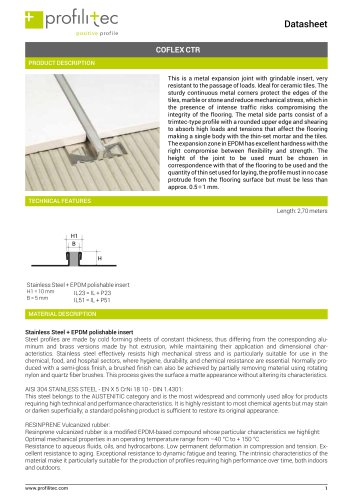 Coflex CTR
3 Pages
 Battiscopa BAS
3 Pages
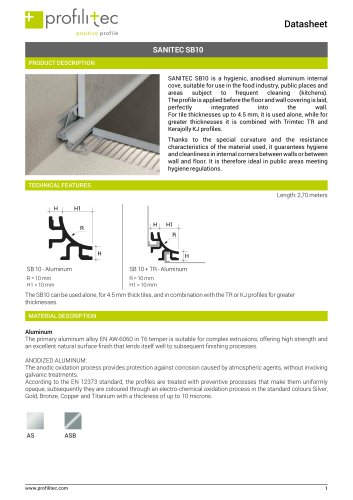 Sanitec SB10
3 Pages
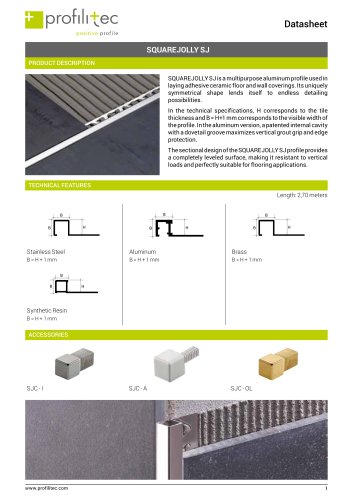 Squarejolly SJ
9 Pages
 Filojolly RJF
3 Pages
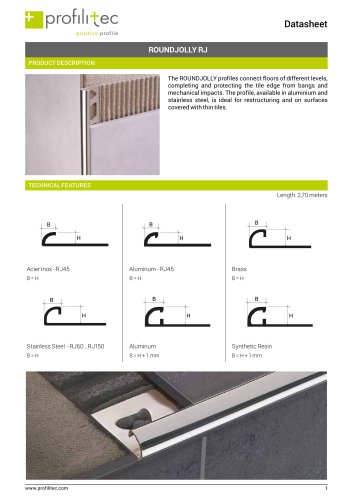 roundjolly RJ
14 Pages
 roundjolly RJE
2 Pages
 Squarejolly SJQ
3 Pages
 Interjolly IJ
3 Pages
 Kerajolly KJ
9 Pages
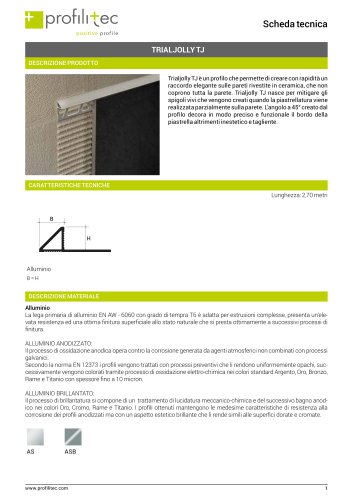 Trialjolly TJ
3 Pages
 Book Showertec STL
21 Pages
 Copridrain PD
1 Page
- Shower tray
- Waterproofing membrane
- PROFILITEC edge trim
- Angled shower base
- Roll waterproofing membrane
- PROFILITEC expansion joint
- Metal profile
- Plastic waterproofing membrane
- Protection waterproofing membrane
- PROFILITEC baseboard
- PROFILITEC tile edge trim
- Building fastening system
- PROFILITEC aluminum edge trim
- Sealant
- PROFILITEC metal expansion joint
- Aluminum profile
- PROFILITEC aluminum expansion joint
- Shower base with side drain
- PROFILITEC raised floor pedestal