Installation manual
1 /2Pages
Installation manual
1 /2Pages
Catalog excerpts

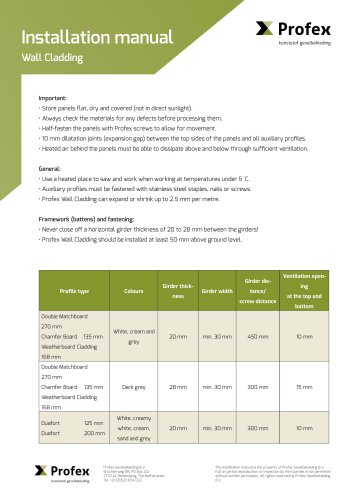
Installation manual Wall Cladding Important: • Store panels flat, dry and covered (not in direct sunlight). • Always check the materials for any defects before processing them. • Half-fasten the panels with Profex screws to allow for movement. • 10 mm dilatation joints (expansion gap) between the top sides of the panels and all auxiliary profiles. • Heated air behind the panels must be able to dissipate above and below through sufficient ventilation. General: • Use a heated place to saw and work when working at temperatures under 5 °C. • Auxiliary profiles must be fastened with stainless steel staples, nails or screws. • Profex Wall Cladding can expand or shrink up to 2.5 mm per metre. Framework (battens) and fastening: • Never close off a horizontal girder thickness of 20 to 28 mm between the girders! • Profex Wall Cladding should be installed at least 50 mm above ground level. Profile type Girder thickness Girder disGirder width tance/ screw distance Ventilation opening at the top and bottom Weatherboard Cladding 168 mm Double Matchboard 270 mm Chamfer Board 135 mm Dark grey Weatherboard Cladding 168 mm White, creamy white, cream, sand and grey Profex Gevelbekleding B.V. Bruchterweg 88, PO Box 122 7770 AC Hardenberg, The Netherlands Tel. +31 (0)523 654 022 This installation manual is the property of Profex Gevelbekleding B.V. Full or partial reproduction or inspection by third parties is not permitted without written permission. All rights reserved by Profex G
Open the catalog to page 1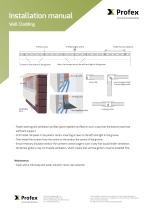
Installation manual Wall Cladding Profex screw Screws in the centre of the groove Profile length centre Girder/screw distance Here, the screws are on the left and right in the groove Starting profile Internal angle profile/ External angle profile Starting profil Pest-repellent profile Coupling profile • asten starting and ventilation profiles (pest-repellent profiles) in such a way that the bottom panel has F sufficient support. • First install the panel in the panel’s centre, inserting screws to the left and right in the groove. • Then install the screws from the centre to the ends in the centre...
Open the catalog to page 2All Profex catalogs and technical brochures
- Wall cladding panel
- Outdoor wall cladding panel
- Decorative wall cladding panel
- Contemporary wall cladding panel
- Textured wall cladding panel
- Gray wall cladding panel
- Brown wall cladding panel
- 100% recyclable wall cladding panel
- Old support wall cladding panel
- New support wall cladding panel
- Colored wall cladding panel
- Sustainable wall cladding panel
- Natural finish wall cladding panel
- Wood look wall cladding panel
- Recycled wall cladding panel
- 3D wall cladding panel
- White wall cladding panel
- High-resistance wall cladding panel
- Renovation wall cladding panel
- Beige wall cladding panel