Installation manual Fascia Boards (ENG)
1 /1Page
Installation manual Fascia Boards (ENG)
1 /1Page
Catalog excerpts
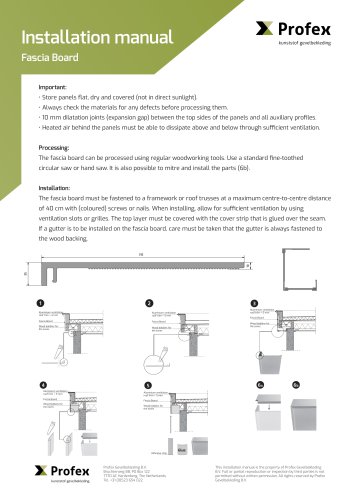
Installation manual Fascia Board Important: • Store panels flat, dry and covered (not in direct sunlight). • Always check the materials for any defects before processing them. • 10 mm dilatation joints (expansion gap) between the top sides of the panels and all auxiliary profiles. • Heated air behind the panels must be able to dissipate above and below through sufficient ventilation. Processing: The fascia board can be processed using regular woodworking tools. Use a standard fine-toothed circular saw or hand saw. It is also possible to mitre and install the parts (6b). Installation: The fascia board must be fastened to a framework or roof trusses at a maximum centre-to-centre distance of 40 cm with (coloured) screws or nails. When installing, allow for sufficient ventilation by using ventilation slots or grilles. The top layer must be covered with the cover strip that is glued over the seam. If a gutter is to be installed on the fascia board, care must be taken that the gutter is always fastened to the wood backing. Aluminium ventilation roof trim > 5 mm Fascia Board Aluminium ventilation roof trim > 5 mm Aluminium ventilation roof trim > 5 mm Fascia Board Wood bobbins for the eaves Aluminium ventilation roof trim > 5 mm Fascia Board Wood bobbins for the eaves Fascia Board Wood bobbins for the eaves Wood bobbins for the eaves Aluminium ventilation roof trim > 5 mm Fascia Board Wood bobbins for the eaves Adhesive strip Profex Gevelbekleding B.V. Bruchterweg 88, PO Box 122 7770 AC Hardenberg, The Netherlands Tel. +31 (0)523 654 022 This installation manual is the property of Profex Gevelbekleding B.V. Full or partial reproduction or inspection by third parties is not permitted without written permission. All rights reserved by Profex Gevelbekleding
Open the catalog to page 1All Profex catalogs and technical brochures
 Installation manual
2 Pages
- Wall cladding panel
- Outdoor wall cladding panel
- Decorative wall cladding panel
- Contemporary wall cladding panel
- Textured wall cladding panel
- Gray wall cladding panel
- Brown wall cladding panel
- 100% recyclable wall cladding panel
- Old support wall cladding panel
- New support wall cladding panel
- Colored wall cladding panel
- Sustainable wall cladding panel
- Natural finish wall cladding panel
- Wood look wall cladding panel
- Recycled wall cladding panel
- 3D wall cladding panel
- White wall cladding panel
- High-resistance wall cladding panel
- Renovation wall cladding panel
- Beige wall cladding panel