- Catalogs
- POLIESPANSO SRL
- TECHNICAL NOTEBOOK WALL PLASTBAU® 3
TECHNICAL NOTEBOOK WALL PLASTBAU® 3
1 /18Pages

TECHNICAL NOTEBOOK WALL PLASTBAU® 3
1 /18Pages
Catalog excerpts
POLIESPANSO CONSTRUCTION SYSTEM Introduction - Description - Specification Item STEP 1 ■ STEP 4 Laying of Wall Plastbau® 3 elements Concrete casting Laying of reinforcement steel bars and execution details Installations and finishing STEP 3 Formwork (ICF - Insulated Concrete Form]
Open the catalog to page 1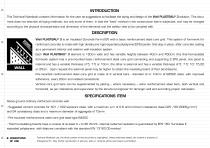
INTRODUCTION This Technical Notebook contains information for the user as suggestions to facilitate the laying and design of the Wall PLASTBAU® 3 solution. This document does not describe all laying methods, but only some of them, in that the “best” method in the construction site is subjective, and may be changed according to the physical characteristics and dimension of the elements and the safety rules to be complied with. DESCRIPTION Wall PLASTBAU® 3 is an Insulated Concrete Form (ICF) with a basic reinforcement steel core grid. This system of formwork for reinforced concrete is made with...
Open the catalog to page 2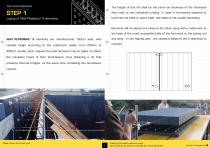
Technical Notebook The height of this rib shall be the same as thickness of the horizontal floor/slab to the unfinished building. In case of formworks destined to Laying of Wall Plastbau® 3 elements build internal walls or spine walls, this detail is not usually necessary. Elements will be placed one close to the other, tying with a metal wire at the base of the most accessible trellis of the formwork to the jutting rod Wall PLASTBAU® 3 elements are manufactured 120cm wide, with and tying – in the highest part - the closest trellises of the 2 elements to variable height according to the customer’s...
Open the catalog to page 3
Laying the Wall PLASTBAU® 3 Laying the Wall Plastbau® 3 (ICF) elements is a manual operation, and is facilitated by U-shaped hot-dip galvanized steel profiles, previously fixed to the base, at the internal slab level of the panel. The same steel profile, used on the upper edge of the slab, shall keep the panels perfectly aligned. Laying of formwork panel - wall
Open the catalog to page 5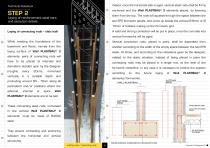
Technical Notebook STEP 2 Laying of reinforcement steel bars and execution details Laying of connecting rods - slab/wall While creating the foundations of the basement and floors, namely from the laying surface of Wall PLASTBAU® 3 elements, pairs of connecting rods will have to be placed at intervals and diameters decided upon by the designer (roughly every 20cm), immersed vertically in a suitable depth and protruding around 60 - 70cm along all perimeters and/or positions where the external, internal or spine Wall PLASTBAU® 3 elements are to be laid. These connecting steel rods, immersed in the...
Open the catalog to page 6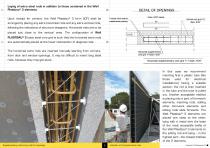
Laying of extra steel rods in addition to those contained in the Wall Plastbau® 3 elements Upon receipt for cement, the Wall Plastbau® 3 form (ICF) shall be arranged by placing any extra horizontal rods and any extra vertical rods, following the indications of structure designers. Horizontal rods are to be placed just close to the vertical ones. The configuration of Wall PLASTBAU® 3 basic steel core grid is such that the horizontal extra rods are automatically placed at the lower intersection of diagonal rods. . The horizontal extra rods are inserted manually starting from corners, from door...
Open the catalog to page 7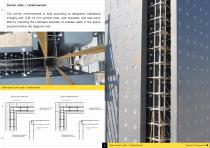
Corner node / reinforcement The corner reinforcement is built according to designer’s indications (roughly with 4 0 14 mm vertical rods, with brackets, and tied every 20cm), inserting the U-shaped brackets of suitable width in the space prepared below the diagonal rods Semi-open corner node / reinforcement ARMURE HORIZONTAL INTtGRATTVE 1*1 OtAM W Open corner node / reinforcement
Open the catalog to page 8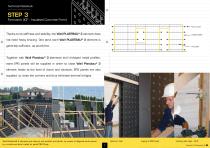
Technical Notebook STEP 3 Formwork (ICF - Insulated Concrete Form) Thanks to its stiffness and stability, the Wall PLASTBAU® 3 element does not need heavy bracing. One strut each Wall PLASTBAU® 3 element is generally sufficient, as plumb-line. Together with Wall Plastbau® 3 elements and U-shaped metal profiles, extra EPS panels will be supplied in order to close Wall Plastbau® 3 element heads at the level of doors and windows; EPS panels are also supplied, to close the corners and thus eliminate thermal bridges. Wall Plastbau® 3 elements put close to one another and plumb, by means of diagonal...
Open the catalog to page 9
After placing Wall PLASTBAU® 3 elements and U-shaped metal profiles, connecting them with horizontal core grids, and placing the corners and shoulders, it is necessary to put them plumb before casting, acting according to the usual practice. Wall PLASTBAU® 3 elements are kept plumb by push-pull struts, or any other equipment the builder considers suitable. Metal push-pull elements Fixing the upper part of the strut to the wall is possible thanks to the polypropylene PB3 Plugs, which can be unscrewed allowing to block the strut head. Alternatively, it is possible to screw the strut fulcrum with...
Open the catalog to page 10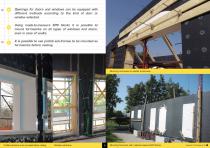
Openings for doors and windows can be equipped with different methods according to the kind of door or window selected. Using made-to-measure EPS blocks it is possible to mount formworks on all types of windows and doors, even in case of vaults. It is possible to use prefab sub-frames to be mounted as formworks before casting. Mounting formworks to vaulted architraves Prefab sub-frame to be mounted before casting Wooden sub-frame 9 Mounting formwork with made-to-measure EPS blocks Copyright of Poliespanso Srl |
Open the catalog to page 11
Technical Notebook STEP 4 Concrete casting To make a perfect concrete casting, we recommend you check that: Wall Plastbau® 3 elements are all perfectly and closely linked to one another. There are no damaged panels or weak points that could open during the casting operation. Casting with bucket Casting with pump The concrete casting can be performed with bucket, with various types Plumb and alignment of Wall Plastbau® 3 elements of pumps, or with conveyors. Casting range speed must not exceed 8 10m³/h and the concrete casting itself must be oriented to the vertical The corners, the heads and...
Open the catalog to page 12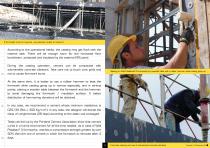
If the height of jet so requires, use extension tubes to reduce it According to the operational habits, the casting may get flush with the internal slab. There will be enough room for the horizontal floor bond-beam, protected and insulated by the external EPS panel. During the casting operation, cement can be compacted with submersible concrete vibrators. Take care not to touch core grids and not to cause formwork burst. Beating on Wall Plastbau® 3 formworks by a wooden table and a rubber hammer while casting going up At the same time, it is better to use a rubber hammer to beat the formwork...
Open the catalog to page 13All POLIESPANSO SRL catalogs and technical brochures
 PARTITION WALL PLASTBAU
8 Pages
 Plastbau 3 Wall
8 Pages


