
- Catalogs
- Podium pros
- usermanual


- Company
- Products
- Catalogs
- News & Trends
- Exhibitions
usermanual
usermanual
- OSD Menu Controls: The monitor features buttons for adjusting audio levels, navigating the OSD menu, and activating/deactivating the menu. The remote control sensor and power indicator provide status updates through LED signals.
- Terminal Panel: Includes connectors for AC power, microSD card, DisplayPort, HDMI, VGA, audio inputs/outputs, LAN, USB, RS-232C, and remote daisy-chaining. Each connector serves specific input/output functions for video, audio, and control signals.
- The remote control allows for power management, input selection, menu navigation, volume adjustment, and picture mode selection. Some buttons are non-functional as indicated.
- Operating range is specified, with caution against direct sunlight or strong illumination affecting functionality.
- Installation: Must be performed by qualified technicians, with specific cautions against improper handling and positioning to prevent damage or overheating.
- Battery Installation: Instructions for installing AAA batteries in the remote control, with cautions on battery usage to prevent leaks or damage.
- Connections: Detailed guidance on connecting external equipment, including computers and media players, with emphasis on using specified cables to avoid interference.
- Instructions for adjusting sound and screen settings, including volume, image position, and backlight adjustments.
- Recommendations for reducing image persistence through specific settings adjustments.
- Wiring diagrams illustrate connections for various devices, including computers, DVD players, and amplifiers, with notes on signal types and terminal settings.
- Guidance on connecting devices via HDMI and DisplayPort, with notes on potential issues and recommended settings for optimal performance.
- DisplayPort cables have a locking function; press the top button to release.
- For audio output via DisplayPort, set AUDIO INPUT to DisplayPort in the OSD or use the remote control.
- If the monitor is powered on after the computer, images may not display; restart the computer.
- USB (2A) port is for Media Player function; ensure correct alignment and use a 2A supporting cable.
- The power indicator is blue when the monitor is on. The main power switch must be on to use the remote control or power button.
- Aspect ratios vary by input type (VIDEO, VGA, DisplayPort, HDMI).
- The monitor follows VESA DPM for energy saving, reducing power when inactive.
- Power Save function must be enabled for automatic power-off after signal loss.
- Plays images, videos, and music from USB or microSD cards.
- Supports various file formats for still images, motion images, and BGM.
- Maximum resolution for motion images is 1920x1080.
- microSD cards up to 32GB are supported; format in FAT32 or FAT16.
- Slideshow settings include screen size, play mode, interval, and repeat options.
- Network settings allow configuration of IP, subnet mask, and shared folders.
- Shared folders can be set for copying files to microSD cards.
- Configure network settings for media player access.
- Shared folder settings allow copying files from network to microSD card.
- Ensure correct folder names and access rights for successful connection.
1. Folder Management: Users can insert a folder name with a maximum of 255 alphanumeric characters.
2. Reload: Updates data on the microSD memory card.
3. Display Options: Files can be viewed as icons or thumbnails, with descriptions available.
4. Sorting: Folders on the microSD card can be sorted by selected criteria.
5. Network Connection: Connect to other monitors on the same network to access their SD-CARD VIEWER.
Contents Copy
Data from a USB device or shared folder can be copied to a microSD card. Ensure shared folder settings are configured. Note that copying will delete existing data on the microSD card. Avoid ejecting the card or turning off the monitor during copying to prevent data corruption.
Emergency Contents
An EMERGENCY CONTENTS folder should be created on the microSD card for emergency playback. Instructions are available in the "External_control.pdf" file.
Information OSD
The Information OSD displays input source, picture size, and other details. Access it via the DISPLAY button on the remote.
Picture Mode
Five picture modes are available: HIGHBRIGHT, STANDARD, sRGB, CINEMA, CUSTOM1, and CUSTOM2. Each mode is suited for different viewing needs.
OSD Controls
Various picture settings such as brightness, gamma, color, and contrast can be adjusted. Some functions are model-dependent.
Input and Picture Settings
Users can select input signals and adjust picture settings like brightness, color temperature, and aspect ratio. Advanced settings include overscan and noise reduction.
Audio Settings
Volume, balance, surround sound, and equalizer settings can be adjusted. Audio input sources can be selected, and internal speakers can be turned off.
Schedule Settings
Users can create up to 30 schedules for monitor operation, including power, input, and picture mode settings. Holiday and weekend settings are available.
Date & Time Settings
Real-time clock settings include year, month, day, and time. Daylight saving settings can be configured.
Multi Input
Input detection methods can be selected when multiple signal sources are connected.
1. HDMI CEC Settings: The internal speaker should be muted when an HDMI CEC audio amplifier is connected. If no HDMI CEC device is connected, set the option to NO. The SEARCH DEVICE function allows for the detection of connected HDMI CEC devices, displaying their type and name upon successful detection.
2. System Information: Displays monitor model, serial number, firmware version, carbon savings, and usage estimates. Factory reset options are available, excluding LAN, password, security, and ping settings.
3. Schedule Creation: Up to seven schedules can be programmed for power on/off, input source selection, and picture mode. Overlapping schedules prioritize higher-numbered entries.
Recommendations and Best Practices:
1. Image Persistence: To prevent image persistence, avoid displaying static images for long periods. Use screen savers and power management functions to mitigate risks.
2. Long Life Use: Recommendations include avoiding fixed images, using power management, and maintaining lower environmental temperatures to prolong monitor lifespan.
Remote Control Functions:
1. Remote Control ID: Allows control of up to 100 monitors using specific IDs. The remote can operate a specific monitor by matching the remote control ID with the monitor ID.
2. Wired Remote Control: Multiple monitors can be controlled via a stereo mini plug cable connection.
Network and RS-232C Control:
1. RS-232C Control: Allows control of power, input signals, and sound mute via a computer connection. Requires a null modem cable for operation.
2. LAN Control: Network settings and alert mail settings can be configured using an HTTP server function. Requires a LAN cable and IP address assignment.
Additional Notes:
1. Proxy Server Use: Operation via a browser using a proxy server may be limited depending on the server type and settings.
2. Address Handling: Host names can be used for network settings if registered in the DNS or configured in the computer's HOSTS file.
- Display: The document details specifications for two LCD models, C431 and C501, with screen sizes of 43" and 50" respectively. Both models support a resolution of 1920x1080 and a contrast ratio of 4000:1.
- Color and Brightness: They offer over 1073 million colors and a brightness of 400 cd/m2.
- Input Signals: Supported inputs include DisplayPort, VGA, HDMI, and RCA, with various resolutions and refresh rates.
- Audio: Includes stereo mini jack inputs and outputs, with internal speakers providing 10W + 10W output.
- Power and Environment: Power consumption is approximately 50W for C431 and 65W for C501. Operational temperature ranges from 0-40°C.
- Natural Color Matrix: Allows six-axis color control and supports the sRGB standard for color accuracy.
- OSD Controls: Provides easy access to screen adjustments.
- Plug and Play: Facilitates setup with Windows operating systems.
- IPM System: Offers power-saving modes to reduce emissions and costs.
- FullScan Capability: Utilizes the entire screen area for most resolutions.
- HDCP: Protects against illegal copying of video data.
- TILE MATRIX: Allows for image display over multiple screens.
- Common issues include no picture, power button unresponsiveness, image persistence, and sound problems. Solutions involve checking connections, settings, and compatibility.
- Specific advice is given for resolving issues like blinking images, unstable displays, and remote control malfunctions.
- LCD Module: 55" diagonal, 1920x1080 resolution, 400 cd/m2 brightness, 4000:1 contrast ratio, 89° viewing angle.
- Frequency: Horizontal 15.625-91.1 kHz, Vertical 50-85 Hz (Analog), 24-85 Hz (Digital).
- Input Signal: DisplayPort, VGA, HDMI, and VIDEO with various supported resolutions.
- Audio: Stereo Mini Jack and HDMI/DisplayPort connectors for audio input and output.
- Control: RS-232C, LAN, Remote IN/OUT, SD card slot, USB port.
- Power Supply: 100-240V AC, 50/60Hz, 75W normal operation.
- Environment: Operational temperature 0-40°C, storage -20-60°C.
- Dimensions: 1238.4 x 709.2 x 45.0 mm, weight 18.8 kg.
- Mounting: VESA compatible 300x300 mm.
- NEC is committed to environmental protection and offers recycling procedures for end-of-life products.
- Energy-saving features include a single Energy Saving mode with power consumption of 2W or less.
- WEEE Mark compliance for proper disposal of electronic products in the EU.
- MPEG-4 AVC and MPEG-4 Visual licenses are included for personal and non-commercial use.
Catalog excerpts
Large Format Display MultiSync C431 MultiSync C501 MultiSync C551 MODEL: C431, C501, C551 Please find your model name in the label on the rear side of the monitor.
Open the catalog to page 1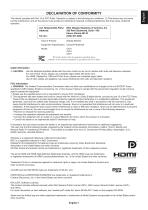
This device complies with Part 15 of FCC Rules. Operation is subject to the following two conditions. (1) This device may not cause harmful interference, and (2) this device must accept any interference received, including interference that may cause undesired operation. U.S. Responsible Party: Address: Tel. No.: Type of Product: NEC Display Solutions of America, Inc. 500 Park Boulevard, Suite 1100 Itasca, Illinois 60143 (630) 467-3000 Display Monitor Equipment Classification: Class B Peripheral Model: We hereby declare that the equipment specified above conforms to the technical standards as...
Open the catalog to page 3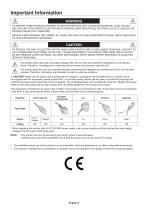
WARNING TO PREVENT FIRE OR SHOCK HAZARDS, DO NOT EXPOSE THIS UNIT TO RAIN OR MOISTURE. ALSO, DO NOT USE THIS UNIT'S POLARIZED PLUG WITH AN EXTENSION CORD RECEPTACLE OR OTHER OUTLETS UNLESS THE PRONGS CAN BE FULLY INSERTED. REFRAIN FROM OPENING THE CABINET AS THERE ARE HIGH VOLTAGE COMPONENTS INSIDE. REFER SERVICING TO QUALIFIED SERVICE PERSONNEL. CAUTION TO REDUCE THE RISK OF ELECTRIC SHOCK, MAKE SURE POWER CORD IS UNPLUGGED FROM WALL SOCKET. TO FULLY DISENGAGE THE POWER TO THE UNIT, PLEASE DISCONNECT THE POWER CORD FROM THE AC OUTLET. DO NOT REMOVE COVER (OR BACK). NO USER SERVICEABLE PARTS...
Open the catalog to page 4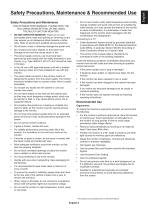
Safety Precautions and Maintenance FOR OPTIMUM PERFORMANCE, PLEASE NOTE THE FOLLOWING WHEN SETTING UP AND USING THE MULTI-FUNCTION MONITOR: • DO NOT OPEN THE MONITOR. There serviceable parts inside and opening or removing covers may expose you to dangerous shock hazards or other risks. Refer all servicing to qualified service personnel. • Do not bend, crimp or otherwise damage the power cord. • Do not place any heavy objects on the power cord. Damage to the cord may cause shock or fire. • The power supply cord you use must have been approved by and comply with the safety standards of your country....
Open the catalog to page 5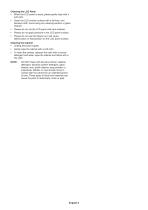
Cleaning the LCD Panel • When the LCD panel is dusty, please gently wipe with a soft cloth. • Clean the LCD monitor surface with a lint-free, nonabrasive cloth. Avoid using any cleaning solution or glass cleaner! • Please do not rub the LCD panel with hard material. • Please do not apply pressure to the LCD panel surface. • Please do not use OA cleaner as it will cause deterioration or discoloration on the LCD panel surface. Cleaning the Cabinet • Unplug the power supply • Gently wipe the cabinet with a soft cloth • To clean the cabinet, dampen the cloth with a neutral detergent and water, wipe...
Open the catalog to page 6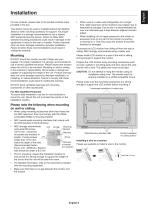
For box contents, please refer to the printed contents sheet provided in the box. This device cannot be used or installed without the Tabletop Stand or other mounting accessory for support. For proper installation it is strongly recommended to use a trained, NEC authorized service person. Failure to follow NEC standard mounting procedures could result in damage to the equipment or injury to the user or installer. Product warranty does not cover damage caused by improper installation. Failure to follow these recommendations could result in voiding the warranty. Mounting DO NOT mount the monitor...
Open the catalog to page 7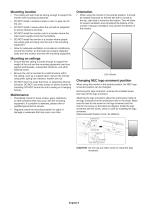
Mounting location • The ceiling and wall must be strong enough to support the monitor and mounting accessories. • When using the monitor in the portrait position, it should be rotated clockwise so that the left side is moved to the top, right side is moved to the bottom. This will allow for proper ventilation and will extend the lifetime of the monitor. Improper ventilation may shorten the lifetime of the monitor. • DO NOT install in locations where a door or gate can hit the unit. • DO NOT install in areas where the unit will be subjected to strong vibrations and dust. • DO NOT install the monitor...
Open the catalog to page 8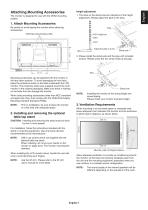
Height adjustment 1. The lines on the stand pole are indicators of the height adjustment. Please adjust the pipe to the lines. The monitor is designed for use with the VESA mounting system. 1. Attach Mounting Accessories Be careful to avoid tipping the monitor when attaching accessories. VESA Mounting Interface (M6) Adjust the pipe to a line. 2. Please install the stand pole and the pipe with included screws. Please screw the two screw holes at the pipe. Mounting accessories can be attached with the monitor in the face down position. To avoid damaging the front face, place the protective sheet...
Open the catalog to page 9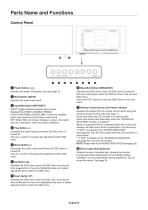
A Power Button ( o Switches the power on/standby. See also page 16. B Mute Button (MUTE) Switches the audio mute on/off. C Input/Set Button (INPUT/SET) INPUT: Toggle switches between below inputs. [DisplayPort], [HDMI1], [HDMI2], [HDMI3], [VGA (YPbPr/RGB)], [VIDEO], [MP]. These are available inputs only, shown as their factory preset name. SET: When OSD (On Screen Display) is shown, this button acts as a “set button” when you make a selection. D Plus Button (+) Increases the audio output level when the OSD menu is turned off. Acts as (+) button to increase the adjustment within OSD menu. E Minus...
Open the catalog to page 10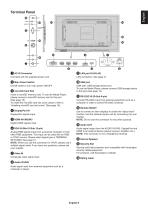
English I LAN port IN (RJ-45) LAN connection. See page 41. A AC IN Connector Connects with the supplied power cord. B Main Power Switch On/Off switch to turn main power ON/OFF. C microSD Card Slot Insert a microSD memory card. To use the Media Player, please connect a microSD memory card to this port (See page 19). To install the microSD card slot cover, pleas e refer to “Installing microSD card slot cover” (See page 19). D DisplayPort IN DisplayPort signals input. E HDMI IN1/IN2/IN3 Digital HDMI signals input. F VGA IN (Mini D-Sub 15-pin) Analog RGB signals input from a personal computer or...
Open the catalog to page 11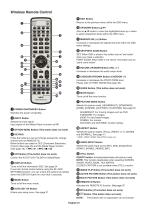
A POWER ON/STANDBY Button Switches the power on/standby. B INPUT Button Selects the input signal. Input signal for the Media Player is shown as MP. C OPTION MENU Button (This button does not work) D KEYPAD Press the buttons to set and change passwords, change channel and set REMOTE ID. Below buttons are used for CEC (Consumer Electronics Control) (See page 35) and the Media Player function (See page 18): ll , 2 ►, 3 ►M, 5 1, 6 II. E ENT Button (This button does not work) Confirm the AUTO PLAY FOLDER in MediaPlayer. F DISPLAY Button Turns on/off the information OSD. See page 24. If you lock remote...
Open the catalog to page 12All Podium pros catalogs and technical brochures
 Aluminum Accessible Catalog
6 Pages
 LG 43UH5J-H User's Manual
122 Pages
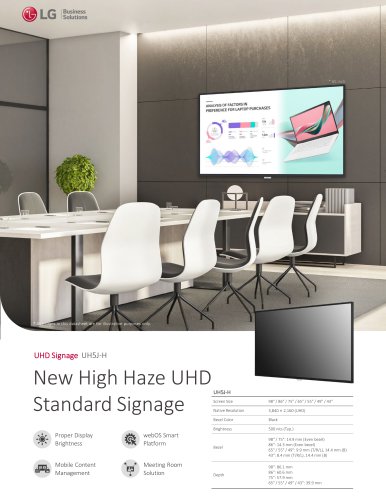 LG UH5J-H Spec Sheet
6 Pages
Archived catalogs
 MultiSync® P
5 Pages