100 Series Procedure Chair
1 /20Pages

100 Series Procedure Chair
1 /20Pages
Catalog excerpts
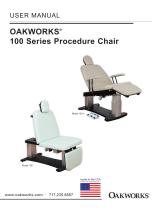
USER MANUAL OAKWORKS 100 Series Procedure Chair ®
Open the catalog to page 1
Printed in U.S.A. All rights are reserved. No part of this document may be photocopied, reproduced or translated to another language without prior written consent of OAKWORKS®, Inc. OAKWORKS® is a registered trademark of OAKWORKS®, Inc. The information contained within this document is subject to change without notice and should not be construed as a commitment by OAKWORKS®, Inc. OAKWORKS®, Inc. encourages requests for technical specifications and the like documentation to ensure accuracy. The appropriate documentation is available upon request. OAKWORKS®, Inc. shall not be liable for incidental...
Open the catalog to page 2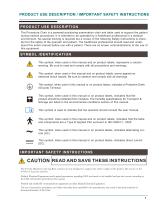
The Procedure Chair is a powered positioning examination chair and table used to support the patient during medical procedures. It is intended to be operated by a healthcare professional in a medical environment. No special training is required but a review of the following Safety Instructions is important for the safety of the operator and patient. The healthcare professional should read and understand this entire manual before use with a patient. There are no known contraindications to the use of this equipment. This symbol, when used in this manual and on product labels, represents a caution...
Open the catalog to page 4
IMPORTANT SAFETY INSTRUCTIONS The chair should not be used adjacent to or stacked with other equipment and that if adjacent or stacked use is necessary, the chair should be observed to verify normal operation in the configuration in which it will be used. The chair is designed to be a stand alone chair. This chair must not be modified or incorporated into any other equipment. As with any moving mechanism there are potential pinch points around and underneath the chair. It is the responsibility of the operator of this equipment to insure that bystanders are not in the area below or around this...
Open the catalog to page 5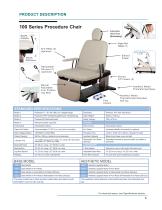
PRODUCT DESCRIPTION Arm rest | shown in up position Adjustable Head Rest (Accessory) Paper Roll Holder (1) Electric Fowler Retractable Stirrups (2) (optional) Manual Adjustable Four Position Leg Rest Foot Control Electric Lift Towers (2) Aesthetic Model Thermaformed Base 'Aesthetic Model Thermaformed Extended Sub-top STANDARD SPECIFICATIONS Motion 1 For electrical specs, see Specifications section.
Open the catalog to page 6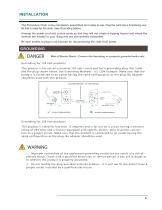
INSTALLATION The Procedure Chair come completely assembled and ready to use. Plug the cord into a functioning outlet that is rated for the chair. (see Grounding below) Arrange the power cord and control cords so that they will not create a tripping hazard and where the controls are located to your liking and are conveniently accessible. Be sure access to plug is not blocked for disconnecting the chair from power. Risk of Electric Shock - Connect this furnishing to a properly grounded outlet only. Grounding for 120 Volt products: This product is for use on a nominal 120-volt circuit and has a...
Open the catalog to page 7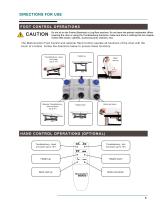
DIRECTIONS FOR USE FOOT CONTROL OPERATIONS Do not sit on the Fowler (Backrest) or Leg Rest sections. Do not leave the patient unattended. When lowering the chair or using the Trendelenburg functions, make sure there is nothing that can impede motion (like stools, cabinets, accessory parts, cleaners, etc.) The Multi-function Foot Control and optional Hand Control operate all functions of the chair with the touch of a button. Follow the directions below to access these functions. Trendelenburg - head end down (up to 15º) Reverse Trendelenburg foot end down (up to 5º) Height down Back rest down...
Open the catalog to page 8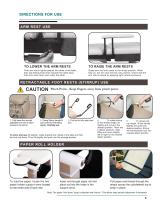
Push arm rest in lightly towards the center of the table, then pull locking knob down towards the table base. Fold arm rests down and under the table. Grasp arm rest and rotate to the raised position. When fully up, the arm rest will lock into position. Check that the arm rest is locked by applying light outward pressure. 1. ully lower the manual F adjustable foot rest to allow access to the stirrup. Pinch Point - Keep fingers away from pinch point. 2. rasp Stirrup handle & G pull out firmly while lifting slightly. Pull fully out. 3. old out to fully open posiF tion. To store stirrups, lift slightly,...
Open the catalog to page 9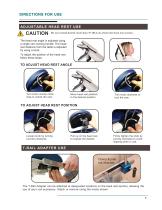
DIRECTIONS FOR USE ADJUSTABLE HEAD REST USE Do not extend dowels more than 4” (10.2 cm.) from the back rest section. The head rest angle is adjusted using a single cam locking handle. The head rest distance from the table is adjusted by using a knob. To adjust the position of the head rest follow these steps: TO ADJUST HEAD REST ANGLE Turn knob counter-clockwise to unlock the cam. Move head rest platform to the desired position. Turn knob clockwise to lock the cam. TO ADJUST HEAD REST POSITION Loosen knob by turning counter-clockwise. Pull up on the head rest to expose the dowels. Firmly tighten...
Open the catalog to page 10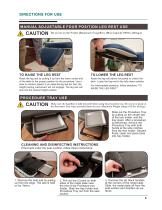
DIRECTIONS FOR USE MANUAL ADJUSTABLE FOUR POSITION LEG REST USE Do not sit on the Fowler (Backrest) or Leg Rest. (Max Capacity 150 lbs. (68 kg.)) Raise the leg rest by pulling it up from the lower center end of the table to the proper position for the procedure. Use a slow or medium speed. If you raise the leg rest too fast, the height locking mechanism will not engage. The leg rest will lock into the closest height position. Raise the leg rest above horizontal to unlock the latch. Lower the leg rest to the fully down position. For intermediate positions, follow directions “TO RAISE THE LEG REST.”...
Open the catalog to page 11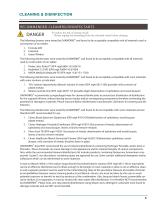
CLEANING & DISINFECTION RECOMMENDED CLEANERS/DISINFECTANTS To reduce the risk of electric shock: - Always unplug this furnishing from the electrical outlet before cleaning. The following cleaners were tested by OAKWORKS® and found to be acceptably compatible with all materials used in construction of our tables: 1. Formula 409® 2. Fantastik® 3. Green Windex® The following disinfectants were tested by OAKWORKS® and found to be acceptably compatible with all materials used in construction of our tables: 1. arker Labs: ProtexTM (EPA reg# 6836-152-82613) P 2. Healthlink® E-Z Kill® (EPA reg# 59894-10-67454)...
Open the catalog to page 12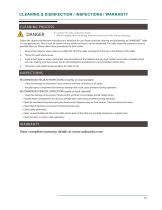
CLEANING & DISINFECTION / INSPECTIONS / WARRANTY CLEANING PROCESS To reduce the risk of electric shock: - Always unplug this furnishing form the electrical outlet before cleaning. Follow the cleaners/disinfectant manufacturers’ directions for use. Please note that cleaning and disinfecting an OAKWORKS® table is a two part process. First it must be cleaned of any visible soil, then it can be disinfected. The table should be cleaned as soon as possible after use. Please follow these procedures for best results: 1. Using a fresh wipe or wipes, clean any visible soil off of the table, working from...
Open the catalog to page 13All Oakworks catalogs and technical brochures
 PG Series & Ultrasound Series
40 Pages
 Clinician Adjustable
8 Pages
 Celesta® and Clodagh Gemini
28 Pages
 Antigua
28 Pages
 OAKWORKS
32 Pages
 PORTAL LIGHT
4 Pages
 New Performalift
7 Pages
 Clodagh Trolley
1 Page
 libra
libra2 Pages
 Masters
15 Pages
 Spa Catalog
44 Pages
 AURORA™
32 Pages
 PROLUXE™
32 Pages
 Symphony
1 Page
 EQUINOX
1 Page
 Trolley
8 Pages
 Physical Therapy
32 Pages
 Treatment Table
4 Pages
 Exam Tables
20 Pages
 Powerline
2 Pages
 Catalog:oak massage
24 Pages

Archived catalogs
 Celesta/Clodagh Gemini
24 Pages
 Clodagh Leo
20 Pages
 ProLuxe Convertible
20 Pages
 Alliance Wood Massage
2 Pages
 Mattes Chair Flyer
1 Page
 Powerline Treatment Table
4 Pages
 Portal Light Owner
4 Pages
 Clodagh Libra
24 Pages
 One by OAKWORKS
2 Pages
 Portal Pro 3 Owners
4 Pages
 Nova Portable Massage
2 Pages
 Advanta
2 Pages


- Industrial massage table
- Commercial massage table
- Height-adjustable massage table
- Electric massage table
- Wooden massage table
- Massage table with storage compartment
- Warming massage table
- Foldable massage table
- Hydraulic massage table
- Massage chair
- Folding massage chair
- Metal massage chair
- Synthetic leather massage chair