TRANSCEIVER

TRANSCEIVER
The document outlines a bidirectional 868 MHz FM wireless transceiver system designed for transmitting security signals to a control panel. It supports up to 16 transmitters (TRANSCEIVER-TX) and operates on a 12/24 Vac/dc power supply. The system has a standby autonomy of up to 2 years with DIP1 ON and functions within a temperature range of -20°C to +60°C. It complies with European standards ETSI EN 301 489-3 and EN 300 220-1.
1. Set all DIP switches to OFF on both the transmitter (TX) and receiver (RX).
2. Power the RX with 12/24 Vac/dc, connecting Jumper 12V if using 12V.
3. Reset the memory of both RX and TX during the first installation.
4. Connect the safety contact (NC or 8.2K resistive) to the TX terminals.
5. Select input type using DIP switches: OFF for NC contact, ON for 8.2K resistive contact.
6. Power the TX with two 1.5V LR06 AA batteries.
To associate a safety edge with RX outputs (OUT1 or OUT2), use the P1-PROG button on the RX and P1 on the TX. Successful memorization is confirmed by a buzzer sound.
Active Control: DIP-1 OFF on both TX and RX. The system performs a test at the start of each operation, consuming more battery power (approx. 12 months with 2 LR06 AA batteries).
Passive Control: DIP-1 ON on both TX and RX. The system checks the signal every 12 seconds, with a lower battery consumption (approx. 24 months).
Signal quality is indicated by the number of beeps (1-5) from the buzzer or LED flashes. A low battery in the TX triggers three short beeps every 12 or 120 seconds, depending on the control configuration.
During a test, the RX alarms the output if all associated TXs are detected. Outputs OUT1 and OUT2 are normally closed (NC) or 8.2K when not in alarm. The state is indicated by LEDs. The system supports up to 16 radio channels and has a maximum range of 20 meters.
EB TECHNOLOGY S.r.l. and NOLOGO S.r.l. are the manufacturers, with contact details provided for further inquiries.
Catalog excerpts
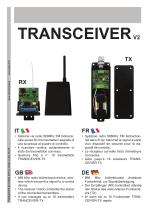
TRANSCEIVER www.ebtechnology.it • Sistema via radio 868Mhz FM bidirezionale senza fili che trasmette il segnale di una sicurezza al quadro di controllo. • Il ricevitore verifica costantemente lo stato dei trasmettitori connessi. • Gestione fino a n° 16 trasmettitori TRANSCEIVER-TX • Système radio 868Mhz FM bidirectionnel sans fil qui transmet le signal à partir d’un dispositif de sécurité pour le dispositif de contrôle. • Le récepteur surveille l’état d’émetteurs connectés. • Gère jusqu’à 16 émetteurs TRANSCEIVER-TX • 868 Mhz radio bidirectional device, wireless which transmitt a signal to a control device. • The receiver check constantly the status of the connected transmitters. • It can manages up to 16 transmitters TRANCEIVER-TX • 868 Mhz bidirektionale drahtlose Funkeinheit, zur Signalübertragung. • Der Empfänger (RX) kontrolliert ständig den Status des verbundenen Funksenders (TX) • Er kann bis zu 16 Funksender TRANCEIVER-TX regeln.
Open the catalog to page 1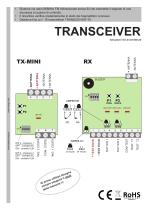
• Sistema via radio 868Mhz FM bidirezionale senza fili che trasmette il segnale di una sicurezza al quadro di controllo. • Il ricevitore verifica costantemente lo stato dei trasmettitori connessi. • Gestione fino a n° 16 trasmettitori TRANSCEIVER-TX gna iso o b reset z tiliz ire il ou u prim eseg !!! Al pre oria sem mem la del DIP 3 - Ingresso 2 OFF - contatto NC ON - contatto 8,2K DIP 2 - Ingresso 1 OFF - contatto NC ON - contatto 8,2K
Open the catalog to page 3
Prima installazione Ricevitore 1 Alimentare RX 12/24 ac/dc se 12V ponticellare Jumper12V Il LED-RX1 emette un lampeggio veloce contemporaneamente ad un beep del buzzer. Reset della memoria del ricevitore Questa operazione deve essere effettuata sempre al primo utilizzo. Tenere premuto il pulsante P1 PROG del ricevitore per 12 secondi. Al suono del Buzzer rilasciare Collegare nei morsetti del TX il contatto di sicurezza NC oppure il contatto sicurezza resistiva 8,2k Selezionare con il DIP-2 per ING 1 e DIP-3 per ING 2, il tipo di ingresso: OFF seleziona l’ingresso per un contatto NC ON seleziona...
Open the catalog to page 4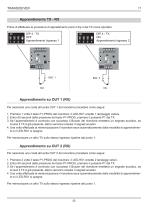
Apprendimento TX - RX Prima di effettuare la procedura di appredimento porre il dip 4 del TX come riportato: ON 1 Apprendimento su OUT 1 (RX) Per associare una costa all’uscita OUT 1 del ricevitore procedere come segue: 1. Premere 1 volta il tasto P1-PROG del ricevitore: il LED-RX1 emette 1 lampeggio veloce. 2. Entro 60 secondi dalla pressione del tasto P1-PROG, premere il pulsante P1 del TX. 3. Se l’apprendimento è avvenuto con successo il Buzzer del ricevitore emettera un segnale acustico, se invece il TX è già presente, allora verranno emessi 3 segnali acustici. 4. Una volta effettuata la...
Open the catalog to page 5
Configurazione a controllo attivo DIP-1 OFF sia su TX che RX Configurazione a controllo passivo DIP-1 ON sia su TX che RX Il sistema utilizzato come sicurezza per le automazioni risponde alle nomative vigenti solo se viene eseguito il test dalla centrale all’inizio di ogni manovra utilizzando gli ingressi test. In questa configurazione si verifica un controllo passivo detto pure: “CONTROLLO STATO IN VITA” della sicurezza, la ricezione del segnale da parte del TX si attiva ogni 12 secondi. Se dopo 30 secondi il RICEVITORE non ha ricevuto la comunicazione di stato in vita di un TX, il RICEVITORE...
Open the catalog to page 6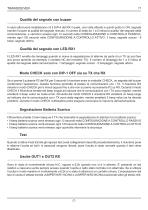
Qualità del segnale con buzzer In aiuto alla buona installazione c’è il DIP-4 del RX il quale, una volta attivato e quindi posto in ON, segnala tramite il buzzer la qualità del segnale ricevuto. Il numero di beep da 1 a 5 indica la qualita’ del segnale della comunicazione, e verranno emessi ogni 12 secondi nella CONFIGURAZIONE A CONTROLLO PASSIVO, mentre ogni 120 secondi nella CONFIGURAZIONE A CONTROLLO ATTIVO. 1 beep: segnale scarso - 5 beep: segnale ottimo. Il LED-RX1 emette dei lampeggi quando si riceve la segnalazione di allarme da parte di un TX (si può fare una prova aprendo ad esempio...
Open the catalog to page 7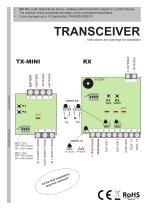
• 868 Mhz radio bidirectional device, wireless which transmitt a signal to a control device. • The receiver check constantly the status of the connected transmitters. • It can manages up to 16 transmitters TRANCEIVER-TX Instructions and warnings for installation
Open the catalog to page 8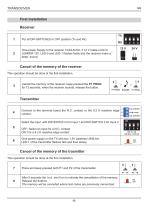
First Installation Receiver 1 Give power Supply to the receiver 12/24 Ac/Dc, if 12 V make a link to JUMPER 12V. LED-0 and LED-1 flashes fastly and the receiver make a “ beep” sound. Cancel of the memory of the receiver This operation should be done at the first installation. Cancel the memory of the receiver: keep pressed the P1 PROG for 12 seconds, when the receiver sounds, release the button. Connect to the terminal board the N.C. contact or the 8.2 K resistive edge contact. Select the input with DIP SWITCH 2 for Input 1 and DIP-SWITCH 3 for Input 2: OFF: Select an input for a N.C. contact...
Open the catalog to page 9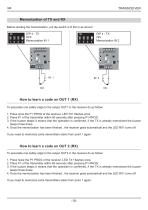
Memorization of TX and RX Before starting the memorization, put dip-switch 4 of the tx as shown: ON 1 How to learn a code on OUT 1 (RX) To associate one safety edge to the output OUT1 in the receiver do as follow: 1. Press once the P1 PROG of the receiver, LED TX1 flashes once. 2. Press P1 of the transmitter within 60 seconds after pressing P1-PROG. 3. If the buzzer beeps it means that the operation is confirmed, if the TX is already memorized the buzzer beeps three times. 4. Once the memorization has been finished , the receiver goes automaticall and the LED RX1 turns off. If you need to memorize...
Open the catalog to page 10
Memorization when the control has been activated. DIP-1 OFF in Tx and Rx Check of the passive control DIP -1 in ON in Tx and Rx The system is used for safety to the automation according to the laws only if the test will be done at the beginning of each movements of the inputs. There is a passive check available called “CHECK OF THE STATUS “ of the safeties, the Tx receive the signal each 12 sec. If after 30 seconds the receiver doesn’t receive any signal from the transmitter, the RECEIVER put in alarm the output to the corresponding Tx. TEST INPUTS Connect to the test connections COMMON (negative)...
Open the catalog to page 11All NOLOGO catalogs and technical brochures
 OTTO-C
2 Pages
 ROX-QCD4
4 Pages
 ZOOM-Z180DD
2 Pages
 ZOOM-Z1iDD
2 Pages
 ZOOM-Z180 / IR5001PS180
2 Pages
 ZOOM-Z180B
4 Pages
 ZOOM-LINE90
2 Pages
 ZOOM-Z1i
2 Pages
 FOTO-TOUCH
2 Pages
 RX2-XL
2 Pages
 RX2
RX26 Pages
 EKO-C
EKO-C2 Pages
 ROX-QC2
2 Pages
 SMART-QC2
2 Pages
 BANDY-CDE4
4 Pages
 BABY-ONE
2 Pages
 ACTIVE-A
12 Pages
 SMART-CD4
2 Pages
 RX4
RX44 Pages
 RX1
RX14 Pages
 START-UP
4 Pages
 SWING-C
2 Pages
 SMILE-C
2 Pages
 START-S4XL
14 Pages
 LAMP
LAMP2 Pages
 SMART-ONE
2 Pages
 BABY-C
2 Pages
Archived catalogs
 CFSECUR
8 Pages
 START-S3 XL
18 Pages
 START-S0
8 Pages
 ACTIVE-S
5 Pages
 TRANSCEIVER
2 Pages
 BANDY-C4
2 Pages
 nologo 2011
42 Pages