

SMART-ONE

SMART-ONE
To open the remote control case, use a screwdriver to remove the fixing screw. Ensure correct battery polarity when replacing batteries. Keep batteries away from children and dispose of them properly according to local regulations.
The SMART-ONE remote control offers two code learning modes: Automatic and Manual.
- Press and hold buttons 1 and 4 until the LEDs light up sequentially.
- Release the buttons; the LEDs will stay on for 5 seconds, which is the programming window.
- During this time, press the button you wish to program (1-6).
- Press and hold the button on the compatible remote control you wish to copy, maintaining a distance of 2 to 40 cm between the remotes.
- The SMART-ONE will scan frequencies, indicated by the green, red, and blue LEDs lighting up.
- The blue LED will flash to confirm successful code learning.
- Use this mode if automatic learning fails.
- Manually set the transmission frequency as described in the frequency setup section.
- Press and hold buttons 3 and 2 until the LEDs light up sequentially.
- Release the buttons; the LEDs will stay on for 5 seconds.
- During this time, press the button you wish to program (1-6).
- Press and hold the button on the compatible remote control you wish to copy, maintaining a distance of 2 to 40 cm between the remotes.
- The blue LED will flash to confirm successful code learning.
- Press and hold buttons 3 and 4 until the red and green LEDs flash.
- Wait for the red LED to stay on, then release the buttons.
- Press button 3 the number of times corresponding to the desired frequency.
- To set the frequency, press button 4 and then the button you wish to program. To set the frequency for all buttons, hold button 4 until the blue LED flashes.
The SMART-ONE remote control complies with essential norms such as ETSI EN 301 489-3, EN 50371:2002, EN 300 220-2, and EN 60950:2006. It has been tested in a typical installation and meets the essential protection requirements of directive 99/5/CE.
- 433.92 MHz - Red LED
- 868.3 MHz - Blue LED
Catalog excerpts
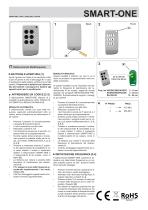
IT Radiocomando Multifrequenza BATTERIA E APERTURA [1] Aprire il guscio con l’aiuto di un cacciavite a stella per rimuovere la vite di bloccaggio A. In caso di sostituzione delle batterie verificare la corretta polarità. Conservare le batterie fuori dalla portata dei bambini. Consegnare le batterie agli appositi centri per lo smaltimento. APPRENDERE UN CODICE [2-3] Il radiocomando SMART-ONE dispone di 2 modalità di apprendimento codici: modalità automatica e modalità manuale. MODALITA’ AUTOMATICA Il radiocomando, tramite uno scan delle frequenze, apprende automaticamente oltre al codice, anche la frequenza del radicomando X da copiare. • • • • • Premere il pulsante 1 e successivamente il pulsante 4 tenendoli premuti. I Led si accendono uno alla volta Rilasciare i pulsanti 1 e 4. I led rimarranno accesi per 5 secondi, è il tempo limite per la programmazione. Durante questo tempo premere e mantenere premuto il pulsante scelto per la copia, può essere indifferentemente 1, 2, 3, 4, 5, 6. Premere e mantenere premuto il pulsante del radiocomando X compatibile di cui si vuole copiare il codice e mantenere distanti il radiocomando SMART-ONE e il radiocomando X da copiare, come in figura [3]. La distanza può variare a seconda della frequenza di trasmissione del radiocomando X. Il Tx esegue lo scan delle frequenze accendendo rispettivamente i led verde, rosso e blu. Il led blu lampeggierà regolarmente ad indicare l’avvenuto apprendimento. MODALITA’ MANUALE Questa modalità è indicata, nei casi in cui ci siano dei problemi di apprendimento nella modalità automatica. In questa modalità occorre impostare manualmente la frequenza di trasmissione del radiocomando X da copiare, seguendo quanto riportato nel paragrafo IMPOSTAZIONE FREQUENZA. Successivamente seguire i passaggi, qui riportati: • • • • • Premere il pulsante 3 e successivamente il pulsante 2 tenendoli premuti. I Led si accendono uno alla volta Rilasciare i pulsanti 3 e 2. I led rimarranno accesi per 5 secondi, è il tempo limite per la programmazione. Durante questo tempo premere e mantenere premuto il pulsante scelto per la copia, può essere indifferentemente 1, 2, 3, 4, 5, 6. Premere e mantenere premuto il pulsante del radiocomando X compatibile di cui si vuole copiare il codice e mantenere distanti il radiocomando SMART-ONE e il radiocomando X da copiare, come in figura. La distanza può variare a seconda della frequenza di trasmissione del radiocomando X. Il led blu lampeggierà regolarmente ad indicare l’avvenuto apprendimento. IMPOSTAZIONE FREQUENZA [2-4] Il radiocomando SMART-ONE consente di impostare una determinata frequenza su un singolo pulsante oppure su tutti i pulsanti tramite alcuni semplici passaggi: • • • • • Premere e tenere premuti i pulsanti 3 e 4. Ora i led rosso e verde lampeggiano. Attendere che Il led rosso rimanga fisso, in seguito rilasciare i pulsanti 3 e 4. Premere il tasto 3 un numero di volte pari al valore della frequenza che si vuole impostare. Riquadro [4]. Per settare la frequenza premere 4 e poi il pulsante interessato alla frequenza. Se invece si vuole settare la frequenza scelta su tutti i pulsanti, tenere premuto il pulsante 4 fino al lampeggio del led blu. Freq. led VERDE/GREEN/VERT 2 - 10 cm ROSSO/RED/ROUGE 5 - 20 cm BLU/BLUE 10 - 40 cm
Open the catalog to page 1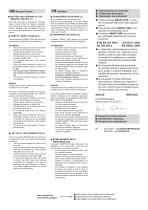
GB Remote Control BATTERY AND OPENING OF THE REMOTE CONTROL [1] Open the case with a screwdriver removing fixing screw A. When the battery is replaced, check the polarity. Keep the battery away from children. Dispose of the old battery in the correct manner and according to your local regulations. CHANGEMENT DE BATERIE [1] Ouvrir le boîtier avec un tournevis pour enlever la vis de blocage A. En cas de changement de batterie il faut contrôler la polarité. Merci de tenir les batteries hors de portée des enfants. Les batteries ne doivent pas être jetées aux ordures ménagères mais rapportées auprès...
Open the catalog to page 2All NOLOGO catalogs and technical brochures
 OTTO-C
2 Pages
 ROX-QCD4
4 Pages
 ZOOM-Z180DD
2 Pages
 ZOOM-Z1iDD
2 Pages
 ZOOM-Z180 / IR5001PS180
2 Pages
 ZOOM-Z180B
4 Pages
 ZOOM-LINE90
2 Pages
 ZOOM-Z1i
2 Pages
 FOTO-TOUCH
2 Pages
 RX2-XL
2 Pages
 RX2
RX26 Pages
 EKO-C
EKO-C2 Pages
 ROX-QC2
2 Pages
 SMART-QC2
2 Pages
 BANDY-CDE4
4 Pages
 BABY-ONE
2 Pages
 ACTIVE-A
12 Pages
 SMART-CD4
2 Pages
 RX4
RX44 Pages
 RX1
RX14 Pages
 START-UP
4 Pages
 TRANSCEIVER
24 Pages
 SWING-C
2 Pages
 SMILE-C
2 Pages
 START-S4XL
14 Pages
 LAMP
LAMP2 Pages
 BABY-C
2 Pages
Archived catalogs
 CFSECUR
8 Pages
 START-S3 XL
18 Pages
 START-S0
8 Pages
 ACTIVE-S
5 Pages
 TRANSCEIVER
2 Pages
 BANDY-C4
2 Pages
 nologo 2011
42 Pages