SMO 40
1 /48Pages

SMO 40
1 /48Pages
Catalog excerpts
User manual Control module NIBE SMO 40
Open the catalog to page 1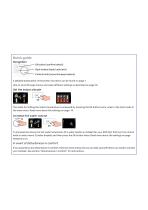
Quick guide Navigation Ok button (confirm/select) Back button (back/undo/exit) Control knob (move/increase/reduce) A detailed explanation of the button functions can be found on page 7. How to scroll through menus and make different settings is described on page 10. Set the indoor climate INDOOR CLIMATE The mode for setting the indoor temperature is accessed by pressing the OK button twice, when in the start mode in the main menu. Read more about the settings on page 14. Increase hot water volume 1X INDOOR CLIMATE To increase the amount of hot water temporarily (if a water heater is installed...
Open the catalog to page 2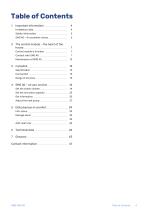
2 The control module - the heart of the Control module's function _ 7 Adjust the heat pump _ _ 27 NIBE SMO 40 Table of Contents 3
Open the catalog to page 3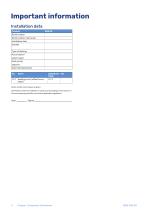
Important information Installation data Product Serial number Serial number, heat pump Installation date Installer Type of docking Accumulator/ water heater Heat pump/ capacity Add. heat type/power No. heating curve (offset/curve slope) Serial number must always be given. Certification that the installation is carried out according to instructions in the accompanying installer manual and applicable regulations. Chapter 1 | Important information
Open the catalog to page 4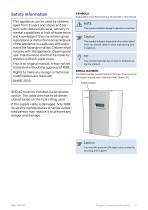
Safety information This appliance can be used by children aged from 8 years and above and persons with reduced physical, sensory or mental capabilities or lack of experience and knowledge if they have been given supervision or instruction concerning use of the appliance in a safe way and understand the hazards involved. Children shall not play with the appliance. Cleaning and user maintenance shall not be made by children without supervision. This is an original manual. It may not be translated without the approval of NIBE. Rights to make any design or technical modifications are reserved. ©NIBE...
Open the catalog to page 5
SMO 40 – An excellent choice SMO 40 is a control module, which has been introduced to supply your home with environmentally friendly heating in the most efficient way. Heat production is reliable and economical with a NIBE air/water heat pump and accumulator/water heater. Additional heat (for example electric/gas boiler) can engage automatically if something unexpected should occur or as emergency operation. EXCELLENT PROPERTIES FOR SMO 40: • Easy to read display The control module has an easy to read display with easyto-understand menus that facilitate setting a comfortable indoor climate. •...
Open the catalog to page 6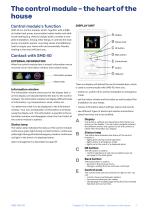
The control module – the heart of the house Control module's function DISPLAY UNIT SMO 40 is a control module, which, together with a NIBE air/water heat pump, accumulator/water heater and additional heating (e.g. electric/oil/gas boiler), creates a complete installation. Among other things, it controls the heat pump, circulation pumps, reversing valves and additional heat to supply your home with environmentally friendly heating in the most efficient way. INDOOR CLIMATE A Display B Status lamp EXTERNAL INFORMATION When the control module door is closed, information can be received via an information...
Open the catalog to page 7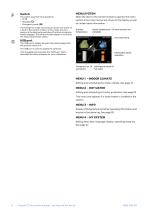
The switch assumes three positions: • On ( ) • Standby ( ) • Emergency mode ( ) The emergency mode must only be used in the event of a fault in the control module. In this mode, the compressor in the heat pump switches off and any immersion heater engages. The control module display is not lit and the status lamp shines yellow. MENU SYSTEM When the door to the control module is opened, the menu system’s four main menus are shown in the display as well as certain basic information. Outdoor temperature Indoor temperature - (if room sensors are installed) INDOOR CLIMATE The USB port is hidden beneath...
Open the catalog to page 8
Chapter 2 | The control module - the heart of the house
Open the catalog to page 9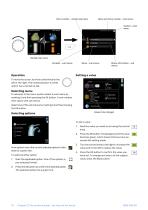
Menu number – marked sub menu Name and menu number – main menu Symbol – main menu INDOOR CLIMATE scheduling advanced Marked main menu Symbols – sub menus Status information – sub menus To move the cursor, turn the control knob to the left or the right. The marked position is white and/or has a turned up tab. Selecting menu To advance in the menu system select a main menu by marking it and then pressing the OK button. A new window then opens with sub menus. month year Select one of the sub menus by marking it and then pressing the OK button. Values to be changed Selecting options comfort mode...
Open the catalog to page 10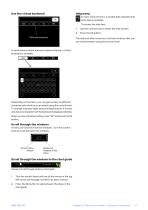
Help menu In many menus there is a symbol that indicates that extra help is available. To access the help text: Different keyboards Use the control knob to select the help symbol. The help text often consists of several windows that you can scroll between using the control knob. In some menus where text may require entering, a virtual keyboard is available. Depending on the menu, you can gain access to different character sets which you can select using the control knob. To change character table, press the Back button. If a menu only has one character set the keyboard is displayed directly....
Open the catalog to page 11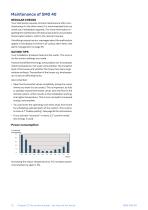
Maintenance of SMO 40 REGULAR CHECKS Your heat pump requires minimal maintenance after commissioning. On the other hand, it is recommended that you check your installation regularly. For more information regarding the maintenance of heat pumps and/or accumulator tanks/water heaters, refer to the relevant manual. If anything unusual occurs, messages about the malfunction appear in the display in the form of various alarm texts. See alarm management on page 39. SAVING TIPS Your installation produces heat and hot water. This occurs via the control settings you made. Factors that affect the energy...
Open the catalog to page 12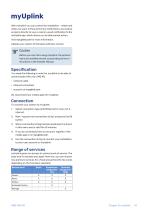
With myUplink you can control the installation - where and when you want. In the event of any malfunction, you receive an alarm directly to your e-mail ora push notification to the myUplink app, which allows you to take prompt action. Visit myuplink.com for more information. Update your system to the latest software version. Before you can start using myUplink, the product has to be installed and set up according to the instructions in the Installer Manual. You need the following in order for myUplink to be able to communicate with your SMO 40: • network cable • Internet connection We recommend...
Open the catalog to page 13All NIBE Energy Systems catalogs and technical brochures
 S1156/S1256
16 Pages
 Sustainability is in our nature
44 Pages
 F470
F47076 Pages
 F1345
F134572 Pages
Archived catalogs
 EMINENT
2 Pages
 NIBE Ground source
36 Pages
 F2026
F20264 Pages
 nibe
nibe32 Pages
 Domestic Boilers
4 Pages
 NIBE™ F2016
32 Pages
 Solar FP215 series
2 Pages
 NIBE™ F2300
32 Pages
 NIBE Energy systems
8 Pages
 NIBE Water heaters
24 Pages
 1145/VPAS FP215 P / PL
2 Pages
 F1255
F125522 Pages
 F1155
F115522 Pages
 F1345
F134528 Pages
 NIBE™ F2120
2 Pages
 NIBE GROUND SOURCE
36 Pages
 NIBE™ F2030
16 Pages
 NIBE™ F370
16 Pages
 NIBE™ F470
16 Pages
 NIBE product range
64 Pages
 NIBE Accessories
20 Pages
 F1255
F125520 Pages
 NIBE S Series heat pumps
48 Pages
 NIBE PRODUCT RANGE 2016
32 Pages


- Indoor boiler
- Domestic boiler
- Residential heat pump
- Air source heat pump
- Industrial thermostat
- Industrial solar panel
- Outdoor heat pump
- White thermostat
- Mechanical ventilation unit
- Programmable thermostat
- Heating thermostat
- Digital thermostat
- Vertical water heater
- Inverter heat pump
- Energy rating heat pump
- Electric water heater