- Catalogs
- NIBE Energy Systems
- S1156/S1256
S1156/S1256
1 /16Pages
S1156/S1256
1 /16Pages
Catalog excerpts
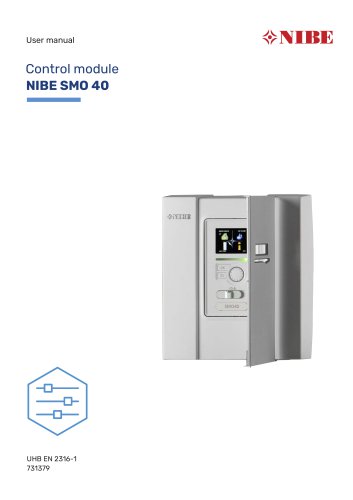
User Manual Ground source heat pump NIBE S1156/S1256
Open the catalog to page 1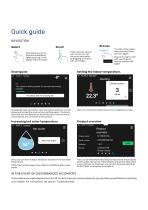
Quick guide NAVIGATION Select Scroll Most options and functions are activated by lightly pressing on the display with your finger. The dots at the bottom edge show that there are more pages. If the menu has several sub-menus, you can see more information by dragging up or down with your finger. Drag to the right or left with your finger to browse between the pages. Setting the indoor temperature. 13.45 3 October Heating Climate system 1 Hi! Your system is working properly. Do you want help making changes? Yes please, take me to Smartguide. Smartguide helps you both to view information about the...
Open the catalog to page 2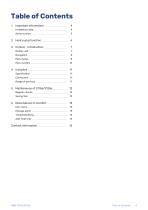
2 Heat pump function _ _ 6 NIBE S1156/S1256 Table of Contents 3
Open the catalog to page 3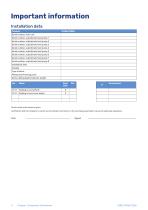
Serial number must always be given. Certification that the installation is carried out according to instructions in the accompanying installer manual and applicable regulations. 4 Chapter 11 Important information
Open the catalog to page 4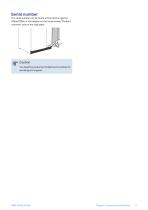
Serial number The serial number can be found at the bottom right on S1156/S1256, in the display on the home screen "Product overview" and on the type plate. Caution You need the product's (14 digit) serial number for servicing and support. Chapter 1 | Important information
Open the catalog to page 5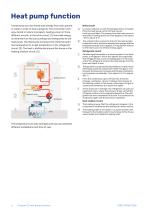
Heat pump function A heat pump can use stored solar energy from rock, ground or water in order to heat a property. The conversion of energy stored in nature to property heating occurs in three different circuits. In the brine circuit, (1), free heat energy is retrieved from the surroundings and transported to the heat pump. The heat pump increases the retrieved heat's low temperature to a high temperature in the refrigerant circuit, (2). The heat is distributed around the house in the heating medium circuit, (3). Heating medium Brine circuit In a hose, collector, an anti-freeze liquid, brine,...
Open the catalog to page 6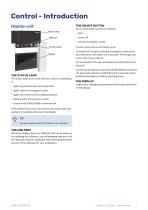
Control - Introduction Display unit THE ON/OFF BUTTON The on/off button has three functions: Status lamp USB port • start • switch off • activate emergency mode On/off button To start: press the on/off button once. To switch off, restart or activate emergency mode: press and hold the on/off button for 2 seconds. This brings up a menu with various options. For hard switch off: press and hold the on/off button for 5 seconds. THE STATUS LAMP The status lamp shows how well your system is operating. It: • lights up white during normal operation. To activate emergency mode when S1156/S1256 is switched...
Open the catalog to page 7
FACTORY SETTING S1156/S1256 has a touchscreen where you simply navigate by pressing and dragging with your finger. Factory set values are marked with *. Your installer may have chosen other values that suit your system better. Most options and functions are activated by lightly pressing on the display with your finger. BROWSE The dots at the bottom edge show that there are more pages. Drag to the right or left with your finger to browse between the pages. HELP MENU In many menus there is a symbol that indicates that extra help is available. Press the symbol to open the help text. If the menu...
Open the catalog to page 8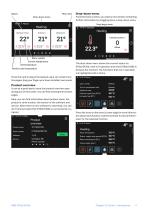
Menu tree Drop-down menu From the home screens, you reach a new window containing further information by dragging down a drop-down menu. Drop-down menu 13.45 3 March Drop-down menu Heating Bottom floor Menu symbol Current temperature The drop-down menu shows the current status for S1156/S1256, what is in operation and what S1156/S1256 is doing at the moment. The functions that are in operation are highlighted with a frame. Set temperature Works to set temperature Press the card to adjust the desired value. On certain function pages, drag your finger up or down to obtain more cards. Product overview...
Open the catalog to page 9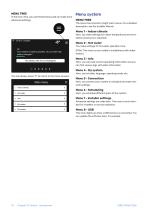
MENU TREE In the menu tree, you can find all menus and can make more advanced settings. Menu system MENU TREE The menu tree consists of eight main menus. For a detailed description, see the Installer Manual. Menu 1 – Indoor climate Here, you make settings for indoor temperatures and ventilation (accessory is required). 13.45 3 October Menu 2 – Hot water You make settings for hot water operation here. Hi! Your system is working properly. Do you want help making changes? Yes please, take me to Smartguide. S1156: This menu is only visible in installations with water heaters. Menu 3 - Info Here,...
Open the catalog to page 10
With myUplink you can control the installation - where and when you want. In the event of any malfunction, you receive an alarm directly to your e-mail ora push notification to the myUplink app, which allows you to take prompt action. Visit myuplink.com for more information. Before you can start using myUplink, the product has to be installed and set up according to the instructions in the Installer Manual. You need the following in order for myUplink to be able to communicate with your S1156/S1256: • wireless network or network cable • Internet connection We recommend our mobile apps for myUplink....
Open the catalog to page 11
Maintenance of S1156/S1256 Regular checks Saving tips You should check your installation at regular intervals. Your heat pump installation produces heat and hot water. This occurs via the control settings you made. If anything unusual occurs, messages about the malfunction appear in the display in the form of different alarm texts. BRINE The brine that obtains the heat in the ground is not normally consumed, but just pumped around. In most installations, there is a level vessel where you can check if there is sufficient fluid 2/3 vary slightly due in the system. The level can to the temperature...
Open the catalog to page 12
Disturbances in comfort In most cases, S1156/S1256 notes a malfunction (a malfunction can lead to disruption in comfort) and indicates this with alarms, and instructions for action, in the display. BASIC ACTIONS All the heat pump’s measurement values are gathered under menu 3.1 - "Operating info" in the heat pump’s menu system. Examining the values in this menu can often make it easier to identify the source of the fault. Start by checking the following items: • Group and main fuses of the accommodation. Manage alarm LOW HOT WATER TEMPERATURE OR A LACK OF HOT WATER In the event of an alarm, a...
Open the catalog to page 13All NIBE Energy Systems catalogs and technical brochures
 SMO 40
48 Pages
 Sustainability is in our nature
44 Pages
 F470
F47076 Pages
 F1345
F134572 Pages
Archived catalogs
 EMINENT
2 Pages
 NIBE Ground source
36 Pages
 F2026
F20264 Pages
 nibe
nibe32 Pages
 Domestic Boilers
4 Pages
 NIBE™ F2016
32 Pages
 Solar FP215 series
2 Pages
 NIBE™ F2300
32 Pages
 NIBE Energy systems
8 Pages
 NIBE Water heaters
24 Pages
 1145/VPAS FP215 P / PL
2 Pages
 F1255
F125522 Pages
 F1155
F115522 Pages
 F1345
F134528 Pages
 NIBE™ F2120
2 Pages
 NIBE GROUND SOURCE
36 Pages
 NIBE™ F2030
16 Pages
 NIBE™ F370
16 Pages
 NIBE™ F470
16 Pages
 NIBE product range
64 Pages
 NIBE Accessories
20 Pages
 F1255
F125520 Pages
 NIBE S Series heat pumps
48 Pages
 NIBE PRODUCT RANGE 2016
32 Pages


- Boiler
- Indoor boiler
- Residential heat pump
- Domestic boiler
- Air source heat pump
- Industrial thermostat
- Outdoor heat pump
- Industrial solar panel
- White thermostat
- Mechanical ventilation unit
- Programmable thermostat
- Heating thermostat
- Digital thermostat
- Air/water heat pump
- Inverter heat pump
- Vertical water heater
- Energy rating heat pump
- Electric water heater