


F1345
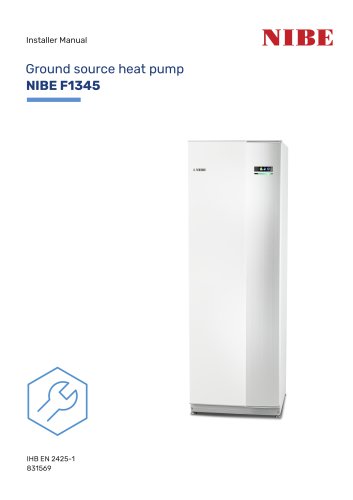
F1345
This section emphasizes safety and operational guidelines for the NIBE F1345 ground source heat pump. It includes warnings about installation by qualified personnel only, potential hazards such as water and refrigerant leaks, and the importance of using original components. Regular inspection and maintenance are crucial for safety and efficiency.
The manual outlines safety precautions, including the necessity for professional installation to avoid risks like electric shocks and fire. Proper grounding and the use of appropriate cables and fuses are stressed. Special attention is given to handling refrigerants safely, particularly R407C and R410A, due to their high pressure and environmental impact.
The heat pump must be transported and stored vertically and handled with care due to its top-heavy design. Specific instructions are provided for moving the unit safely, including the use of pallet trucks and the need for two people to lift the unit.
This section describes the heat pump's design, including the motor and cooling modules. It provides details on the dimensions and necessary clearances for installation, emphasizing the importance of a stable and noise-insulated location.
Guidelines for pipe connections cover the brine side, climate system, and water connections. Electrical connections must be made by a qualified electrician, with specific instructions on cable types and circuit requirements to prevent overloading and ensure safety.
Before commissioning, the system must be inspected by a qualified person. The manual provides a checklist for system flushing, venting, and setting up safety valves and circulation pumps. It also includes instructions for setting the heating curve and connecting to myUplink for remote monitoring.
This section provides detailed technical specifications, including dimensions, energy labeling, and electrical circuit diagrams. It also lists the components supplied with the unit, such as insulation tape and temperature sensors.
The manual highlights the environmental impact of the refrigerants used and the importance of proper disposal to comply with EU regulations. It advises against releasing refrigerants into the atmosphere due to their high Global Warming Potential (GWP).
- The kit includes various components such as heat conduction paste, aluminium tape, tubes for sensors, O-rings, particle filters, cable ties, pipe insulation, and a brine pump for specific models.
- Electrical components include a base card, input circuit board, terminal blocks, display unit, motor module, and various connectors.
- Cooling components include evaporators, condensers, compressors, drying filters, and expansion valves.
- Instructions for removing and reassembling the front and side panels of the heat pump are provided.
- Pipe installation must adhere to current standards, with specific instructions for ensuring clean incoming water and proper venting to avoid air pockets.
- Detailed steps for connecting the brine side, including the installation of expansion vessels, safety valves, and particle filters, are outlined.
- The heat pump includes connections for heating medium flow and return, as well as brine in and out.
- Diagrams illustrate the system layout, including the placement of circulation pumps, sensors, and electrical components.
- Precautions include ensuring the pipe systems are flushed clean before connection and that overflow pipes are properly routed to prevent damage.
- Instructions for insulating pipes and marking the brine system with the antifreeze used are provided.
- The document includes diagrams for dimensioning pressure expansion vessels based on the type of antifreeze used.
- Installation alternatives and additional accessories are mentioned, with further details available on the manufacturer's website.
- Heat Pump (EB100): Prioritizes hot water charging using a cooling module and switches to the heating circuit when the water heater is fully charged.
- Circulation Pumps (GP10, GP11, GP16): Used for domestic hot water circulation and heating medium circulation.
- Temperature Sensors (BT2, BT3, BT6, BT7, BT25, BT71): Monitor various temperatures within the system, including heating medium flow and return, hot water charging, and external supply and return lines.
- Safety and Control Valves: Include shunt valves, safety valves, and non-return valves to manage system flow and pressure.
- Floating Condensing: The system can operate with electric additional heat and hot water heater configurations, adjusting to heating demands.
- Groundwater System: Utilizes an intermediate heat exchanger to protect the heat pump from dirt, with specific settings to prevent freezing.
- Fixed Condensing: Requires an external supply temperature sensor and specific menu settings for operation.
- General Guidelines: All electrical equipment is pre-connected except for outdoor and room sensors. Installation must comply with local electrical standards.
- Power Connection: Requires correct phase sequence to avoid compressor issues. Includes instructions for connecting external control voltage and tariff control.
- Brine Pump Connection: Specific instructions for connecting the enclosed brine pump for 40 kW and 60 kW models.
- Temperature Sensors: Detailed connection instructions for various temperature sensors used in the system.
- Master/Slave Configuration: Allows multiple heat pumps to be interconnected, with one acting as the master and others as slaves.
- Load Monitor: Controls power steps for external electric additional heat to prevent overload.
- Room Sensor (BT50): Optional component for displaying and adjusting room temperature.
The document outlines the electrical connections and configurations for the NIBE F1345 heat pump system. It details the setup for external step-controlled additional heat, which can be managed using up to three potential-free relays in F1345, with options for linear or binary steps. Additional relays can be added with the AXC 50 accessory. The document specifies connection points for various components and provides menu references for configuration settings.
This section describes the integration of an external heater, such as an oil or gas boiler, to assist with heating. It requires a boiler sensor (BT52) and involves controlling a shunt valve to maintain the correct supply temperature. The settings are adjusted in specific menus, and the document provides detailed connection instructions.
The document explains how to connect an external heater in the tank to aid hot water production. It includes connection instructions and menu settings for activation.
In emergency mode, internal circulation pumps and a variable emergency mode relay are activated, disconnecting external accessories. The document provides connection details and notes that no hot water is produced in this mode.
The F1345 can be supplemented with an external reversing valve for hot water control. Connection instructions are provided, and the valve is controlled by the master heat pump in a master/slave setup.
The document details the software-controlled AUX inputs and outputs for connecting external switch functions or sensors. It lists selectable inputs and outputs, along with possible functions that can be activated or blocked externally.
Instructions are provided for filling and venting both the climate and brine systems. The document emphasizes checking for leaks and ensuring correct pressure levels.
The start-up and inspection process is outlined, including a start guide that ensures correct initial setup. The guide must be followed during the first start and can be manually initiated if necessary. The document highlights the importance of preheating compressors during start-up.
- All additional heat can be blocked via a potential-free switch function.
- The document includes numerous cautionary notes about marking junction boxes with warnings for external voltage.
- Specific menu references are provided for various settings and configurations.
The document outlines the necessary components for connecting the F1345 to the myUplink service, including a network cable, internet connection, and a myUplink account. It also details the available service levels, including basic and premium options.
- Setting Pump Speeds: Instructions are provided for both automatic and manual operation of brine and heating medium pumps. The document emphasizes the importance of achieving the correct flow and temperature differences for optimal operation.
- Commissioning: The start guide assists in initial setup, including language selection and venting the brine circuit. It also covers menu settings for control via analogue input.
- Climate System Configuration: Guidance is given on setting the heating curve to ensure uniform indoor temperature and energy-efficient operation. Adjustments to the curve slope and offset are explained.
The document recommends using the same compressor size for multiple heat pump installations and provides tips for setting the heating curve based on the type of heating system and insulation level of the house.
The document includes graphs showing the relationship between available pressure, flow, and power output for different pump configurations and capacities (24 kW, 30 kW, 40 kW, and 60 kW). These graphs help in setting the correct pump speeds for various operational scenarios.
A list of accessories is provided, including options for active/passive cooling, solar docking kits, immersion heaters, and energy measurement kits. Each accessory is described with its intended use and part number.
Catalog excerpts
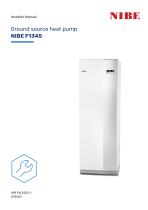
Installer Manual Ground source heat pump NIBE F1345
Open the catalog to page 1
Electrical circuit diagram_ 57 Safety information _ _ Safety precautions__ Serial number _ _ Environmental information _ Supplied components _ 3 The heat pump design _ Cooling module _ _ Dimensions and pipe connections Brine side___ Climate system__ Installation alternative Optional connections _ _ Connecting accessories Setting the heating curve _
Open the catalog to page 3
This manual describes installation and service procedures for implementation by specialists. The manual must be left with the customer. For the latest version of the product's documentation, see nibe.eu. This appliance is designed for use in a home environment and not intended to be used by persons (including children) with reduced physical, sensory or mental capabilities, or lack of experience and knowledge, unless they have been given supervision or instruction concerning use of the appliance by a person responsible for their safety. This in accordance to applicable parts of the low-voltage...
Open the catalog to page 4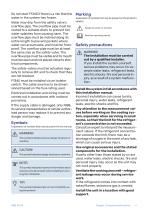
Do not start F1345 if there is a risk that the water in the system has frozen. Water may drip from the safety valve’s overflow pipe. The overflow pipe must be routed to a suitable drain, to prevent hot water splashes from causing harm. The overflow pipe must be inclined along its entire length to prevent pockets where water can accumulate, and must be frostproof. The overflow pipe must be at least the same size as the safety valve. The overflow pipe must be visible and its mouth must be open and not placed close to electrical components. The safety valves must be actuated regularly to remove...
Open the catalog to page 5
Unsuitable installation locations can cause the unit to fall and cause material damage and personal injury. Installation without sufficient support can also cause vibrations and noise. Ensure that the unit is stable when installed, so that it can withstand earthquakes and strong winds. Unsuitable installation locations can cause the unit to fall and cause material damage and personal injury. The electrical installation must be carried out by a qualified electrician and the system must be connected as a separate circuit. Power supply with insufficient capacity and incorrect function can cause...
Open the catalog to page 6
Do not install the unit where corrosive gas (for example gas with sulphuric acid content) or combustible gas or steam (for example thinner and petroleum fumes) can be produced or collect, or where volatile combustible substances are handled. Corrosive gas can cause corrosion to the heat exchanger, fractures in plastic parts, etc., and combustible gas or steam can cause fire. Do not use the unit for specialist purposes such as for storing food, cooling precision instruments, freeze-conservation of animals, plants or art. This can damage the items. Do not install and use the system close to equipmentthat...
Open the catalog to page 7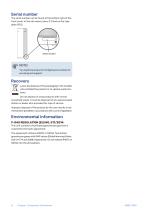
Serial number The serial number can be found at the bottom right of the front cover, in the info menu (menu 3.1) and on the type plate (PZ1). Serial number NOTE! You need the product's (14 digit) serial number for servicing and support. Recovery Leave the disposal of the packaging to the installer who installed the product or to special waste stations. Do not dispose of used products with normal household waste. It must be disposed of at a special waste station or dealer who provides this type of service. Improper disposal of the product by the user results in administrative penalties in accordance...
Open the catalog to page 8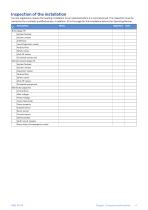
Chapter 11 Important information 9
Open the catalog to page 9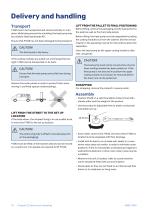
Delivery and handling Transport LIFT FROM THE PALLET TO FINAL POSITIONING F1345 has to be transported and stored vertically in a dry place. While being moved into a building, the heat pump may be carefully tilted backwards 45°. Ensure that F1345 has not been damaged during transport. Before lifting, remove the packaging and the load anchor to the pallet as well as front and side panels. Before lifting, the heat pump must be separated by pulling the cooling modules out from the cabinet. See the service chapter in the operating manual for instructions about the separation. Carry the heat pump by...
Open the catalog to page 10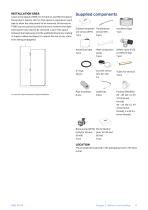
Leave a free space of 800 mm in front of, and 150 mm above, the product. Approx. 50 mm free space is required on each side to allow the side panels to be removed. All service on F1345 can be carried out from the front, however the righthand panel may need to be removed. Leave free space between the heat pump and the wall behind (and any routing of supply cables and pipes), to reduce the risk of any vibrations being propagated. INSTALLATION AREA Outdoor temperat- Temperature ure sensor (BT1) sensor (BT) 1 pcs 5 pcs Heat conduction paste 3 pcs x Leave the required space for pipe installation. Particle...
Open the catalog to page 11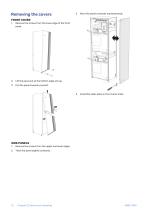
1. Remove the screws from the lower edge of the front panel. 3. Move the panel outwards and backwards. 2. Lift the panel out at the bottom edge and up. 3. Pull the panel towards yourself. 4. Assembly takes place in the reverse order. SIDE PANELS 1. Remove the screws from the upper and lower edges. 2. Twist the panel slightly outwards. 12 Chapter 2 | Delivery and handling
Open the catalog to page 12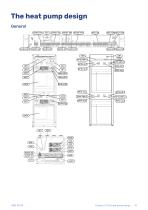
The heat pump design General AA101-X4 Chapter 3 | The heat pump design
Open the catalog to page 13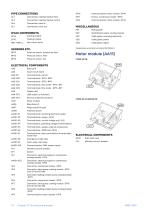
XL1 Connection, heating medium flow XL2 Connection, heating medium return XF10 Communication motor module -EP14 XF11 Pumps, compressor heater -EP14 XF13 Communication motor module -EP14 PZ2 Identification plate, cooling module UB1 Cable gland, incoming electricity UB2 Cable gland, power UB3 Cable gland, signal Designations according to standard EN 81346-2. SENSORS ETC. BP12 Pressure sensor, exhaust air duct BP13 Pressure sensor, filter Base card Input circuit board Terminal block, sensor Terminal block, flow meter -EP14 -BF1 Terminal block, flow meter -EP15 -BF1 Display unit Service outlet (No...
Open the catalog to page 14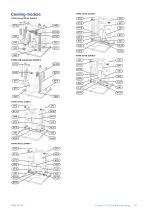
Cooling module Chapter 3 | The heat pump design
Open the catalog to page 15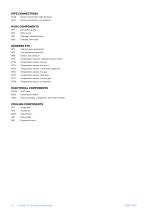
XL20 Service connection, high pressure XL21 Service connection, low pressure QM1 Drainage, climate system QM2 Draining, brine side BP1 High pressure pressostat BT3 Temperature sensors, heating medium return BT10 Temperature sensor, brine in BT11 Temperature sensor, brine out BT12 Temperature sensor, condenser supply line BT15 Temperature sensor, fluid pipe BT17 Temperature sensor, suction gas BT29 Temperature sensor, compressor X401 Joint connector, compressor and motor module 16 Chapter 3 | The heat pump design
Open the catalog to page 16All NIBE Energy Systems catalogs and technical brochures
 SMO 40
48 Pages
 S1156/S1256
16 Pages
 Sustainability is in our nature
44 Pages
 F470
F47076 Pages
Archived catalogs
 EMINENT
2 Pages
 NIBE Ground source
36 Pages
 F2026
F20264 Pages
 nibe
nibe32 Pages
 Domestic Boilers
4 Pages
 NIBE™ F2016
32 Pages
 Solar FP215 series
2 Pages
 NIBE™ F2300
32 Pages
 NIBE Energy systems
8 Pages
 NIBE Water heaters
24 Pages
 1145/VPAS FP215 P / PL
2 Pages
 F1255
F125522 Pages
 F1155
F115522 Pages
 F1345
F134528 Pages
 NIBE™ F2120
2 Pages
 NIBE GROUND SOURCE
36 Pages
 NIBE™ F2030
16 Pages
 NIBE™ F370
16 Pages
 NIBE™ F470
16 Pages
 NIBE product range
64 Pages
 NIBE Accessories
20 Pages
 F1255
F125520 Pages
 NIBE S Series heat pumps
48 Pages
 NIBE PRODUCT RANGE 2016
32 Pages


- Indoor boiler
- Domestic boiler
- Residential heat pump
- Air source heat pump
- Industrial thermostat
- Industrial solar panel
- Outdoor heat pump
- White thermostat
- Mechanical ventilation unit
- Programmable thermostat
- Heating thermostat
- Digital thermostat
- Vertical water heater
- Air/water heat pump
- Inverter heat pump
- Energy rating heat pump
- Electric water heater