
- Catalogs
- Multitek Electronics
- ALARM FEATURES of IP MONITORS

ALARM FEATURES of IP MONITORS

ALARM FEATURES of IP MONITORS
Catalog excerpts
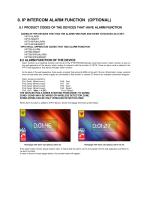
8.1 PRODUCT CODES OF THE DEVICES THAT HAVE ALARM FUNCTION CODES OF THE DEVICES THAT HAS THE ALARM FUNCTION AND GIVEN TO BLOCKS AS A SET: VIP70-ALARM VIP70-SMART VIP70-WIFI&ALARM VIP70-WIFI&SMART VIP70 WALL APPARATUS CODES THAT HAS ALARM FUNCTION: VIP70B-ALARM VIP70B-SMART VIP70B-WIFI&ALARM VIP70B-WIFI&SMART 8.2 ALARM FUNCTION OF THE DEVICE Alarm function is an optional function and not all of the IP INTERCOM devices have that function. Alarm function is only on the wall apparatus of the device, which makes it irrelevant with the monitor of VIP70. Once an alarm card is placed in the VIP70 wall apparatus, that device will gain alarm function. At the back of the wall apparatus, there exists a socket that writes ALARM on top with 10 pins. Wired alarm zones, external siren, private relay and, power supply are connected to that socket. In section 8.5 there is an example connection diagram. Alarm socket connections: Pin1 Zone1 (Wired zone1) Pin6 Gnd THE DEVICES HAS 8 ZONES STARTING FROM ZONE1 TO ZONE8. ZONE1-ZONE4 MAY BE WIRED OR WIRELESS DETECTOR ZONE. ZONE5-ZONE8 CAN BE ONLY WIRELESS DETECTOR ZONE. When alarm function is added to VIP70 device, device homepage will show up like below. Homepage with alarm card placed, alarm set Homepage with alarm card placed, alarm not set If the alarm button shown above doesn't exist, it means that the alarm card is not placed into the wall apparatus and there is no alarm function. In case of touch to those pages above, this screen below will appear:
Open the catalog to page 1
Screen 8.1: Device Homepage Screen If “NOT SUPPORTED” warning is seen when the user touches to the ALARM icon at the low left hand side corner, it means that the device doesn’t have the alarm card. If alarm function is supported password screen will show up for the user to write the security password. When 4-digit password is authenticated alarm properties screen will show up. DEFAULT ALARM PASSWORD: 0000 Screen 8.2: Authentication of Alarm Password Alarm password is used to turn off the sirens in case of an alarm, enter the alarm properties menu, change the alarm password and, set the parameters...
Open the catalog to page 2
Screen 8.3: Edit Alarm Parameters 8.3.1ADDING OR REMOVING ALARM ZONES FROM THE CIRCUIT Zone screen (Screen 8.4) will show up when the user touches to Zone icon. Then zone/zones are chosen by touching on them. Zones can be activated or deactivated by putting or removing tick on them. If there is a tick on a zone, it means that it is active; if not, it is not active. Zone 1, Zone 2, Zone 3 and Zone 4 can be used in connection of wired and wireless detectors. Only wireless detectors can be connected to Zone5-Zone8. After choosing the zones that will be used, user’s choice will be saved by touching...
Open the catalog to page 3
Alarm activation delay: 10 seconds. Relay delay: 10 seconds. Alarm delay: 10 seconds. Siren Time: 3 minutes Zones: Not Active Note: Default settings do not change security password. Homepage (Screen 8.1) will show up when homepage Alarm logs will show up when Alarm Records which zone was the cause of the alarm in these icon is touched in screen 8.3. User can see the time of the alarm and logs. There is a sample below: ALARM ZONE DATE&TIME 8.3.5 ALARM SETTINGS: Alarm Settings Screen (Screen 8.5) shows up when alarm setup icon is touched in Screen 8.3. In that screen parameters like alarm activation...
Open the catalog to page 4
Screen 8.6: Call Type Screen Addresses of the devices that will receive SIP SMS is below: Door Keeper XX 841 (XX Block Number) Security 99 901 My Phone Number: XX YYY When alarm is triggered, the device will send an SIP SMS to the given number including the zone that is triggered in the format below: “WARNING! WARNING! ALARM! ZONE X IS TRIGGERED!” 8.3.5.2 ALARM PASSWORD: Screen 8.2 shows up for a new alarm password to be entered when Alarm Password 8.5. icon is touched in Screen DEFAULT SECURITY PASSWORD: 0000 “PLEASE ENTER OLD PASSWORD” message appears. User enters 4-digit old password. (If...
Open the catalog to page 5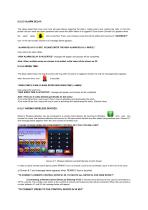
8.3.5.5 ALARM DELAY: This delay determines how much time will pass before triggering the alarm, ringing sirens and, making the calls. In this time period user can enter the alarm password and cancel the alarm before it is triggered. Zone screen (Screen 8.4) appears when the icon is touched. There, user chooses zones that will be edited and touches to “SAVE&EXIT” icon. In the next screen (Screen 8.2) message below appears: “ALARM DELAY IS 10 SEC. PLEASE ENTER THE NEW ALARM DELAY (1-99SEC).” User enters the alarm delay. “NEW ALARM DELAY IS ACCEPTED” message will appear and process will be completed....
Open the catalog to page 6
If the user presses to the control device more than 3 seconds in the given time interval, the message below will appear: “REMOTE RECORDED” And then screen 8.7 and message below appears: “PLEASE CHOOSE WIRELESS ZONE/REMOTE CONTROL KEY THAT YOU WILL EDIT” By doing the process again the remote control devices are connected. If the user doesn’t press to the remote control in 20 seconds the message below will appear: “NO DEVICE FOUND” And then: “PLEASE CHOOSE WIRELESS ZONE/REMOTE CONTROL KEY THAT YOU WILL EDIT” message will appear. Note1: When a remote control devices is connected, Zone 1 and Zone...
Open the catalog to page 7
“DEVICE DELETED” iii) Deleting All the Devices by Entering 03: All the wireless devices are deleted without any message appearing when the user enters 03. Screen 8.7 and message below appears after the process: “PLEASE CHOOSE WIRELESS ZONE/REMOTE CONTROL KEY THAT YOU WILL EDIT” 8.4 Activating Alarm of the Device and Deactivating Methods: a-) By Programming the Device Note: Activating and deactivating the alarm by this method is not recommended due to its complexity. For easy activation usage of remote control device and red/green alarm icon at the homepage usage is highly recommended. User enters...
Open the catalog to page 8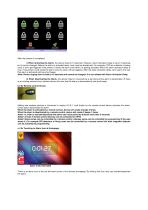
After the process is completed; i) When Activating the Alarm, the device rings for 10 seconds. However, Alarm Activation Delay is set to 10 seconds but it can be changed. Before the alarm is activated alarm zone must be abandoned. For example if PIR as a detector is being used, it won’t get triggered if the person is inside the alarm zone while it is getting activated. When the alarm activation delay is over, if the person is still inside the alarm zone the alarm will be triggered. After the alarm activation delay, siren warns the user that alarm is activated with two short beeps. Note: Device...
Open the catalog to page 9All Multitek Electronics catalogs and technical brochures
 RL-B17M
5 Pages
 IP Intercom Brochure
4 Pages
 Multibus One-Pager
2 Pages
 Multitek presentation
19 Pages

- Door intercom
- Metal door intercom
- Video intercom
- White door intercom
- Door intercom with screen
- Interior digital door viewer
- IP door intercom
- Door station
- Exterior door station
- Access control digital door viewer
- Video door intercom with screen
- Metal door station
- Video intercom with color screen
- Black door intercom
- White video door intercom
- Access control door station
- Door station with camera
- Built-in video door intercom
- Black digital door viewer
- Residential video door intercom