Important Information About Your New Moen Products

Important Information About Your New Moen Products
This document provides essential guidelines for the care, maintenance, and emergency handling of Moen® plumbing products. It covers the identification of shut-off valves, faucet maintenance, and finish care.
To handle plumbing emergencies effectively, locate the main water shut-off valves and have a 24-hour plumbing contractor's contact information ready. Moen suggests finding a certified service plumber through their website or local directories.
Conduct a home tour to identify all emergency shut-off valves, including those for the main water supply, kitchen sink, bathroom fixtures, and appliances. Ensure all family members know their locations and operation.
Moen faucets feature durable cartridges. Use genuine Moen parts for maintenance to avoid voiding warranties. Cartridge replacement instructions for single and two-handle faucets are available on Moen's website.
Detailed steps for replacing cartridges in single-handle faucets using the 1225 and 1255 Duralast cartridges, and two-handle faucets using the 1224 cartridge, are provided. Proper alignment and installation are crucial.
Moen's LifeShine® finishes are guaranteed against tarnishing and corrosion. Use soft cloths and non-abrasive cleaners. Avoid harsh chemicals and abrasive pads.
Regular cleaning with soap, ammonia, or vinegar is recommended for Moen stainless steel sinks. Avoid harsh abrasives to prevent damage.
- Avoid steel wool pads to prevent rust or pitting.
- Do not leave rubber mats or wet items in the sink to prevent discoloration.
- Avoid letting liquid soap dry on the sink surface.
- Do not use bleach; rinse thoroughly if contact occurs.
- Dry the sink with a soft towel after each use to mitigate water quality effects.
- Moen products have a Lifetime Limited Warranty for the original consumer purchaser, covering leak- and drip-free performance and defect-free parts and finishes.
- Moen will provide necessary parts and replace any defective part or finish free of charge during the warranty period.
- Builders may offer additional warranties; contact your builder for details.
- A separate warranty is available for Moen sinks; consult your homeowner’s packet for details.
- Moen Incorporated is a leading manufacturer of residential and commercial plumbing products.
- Visit Moen’s website for product information and to find a Moen Certified Service Plumber.
- Contact Moen’s Consumer Service at 1-800-BUY-MOEN for assistance.
Catalog excerpts

Important Information About Your New Moen® Products Basic Plumbing Handling Emergencies Customer Service
Open the catalog to page 1
Be Prepared When a Plumbing Emergency Strikes 1 lthough plumbing emergencies are rare, the best way to prepare is to plan ahead. To act swiftly when and if a plumbing situation occurs, familiarize yourself with the location of main water shut-off valves, and ask your builder or a neighbor to refer a reliable local plumber before the need arises. Moen Incorporated recommends the following steps to prepare yourself for a plumbing situation. Remember, a few minutes of your time now can provide the assurance that any immediate needs down the road will be handled. 1. Find a 24-Hour Plumbing Contractor...
Open the catalog to page 2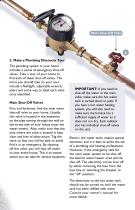
Main Shut-Off Valve 2 2. Make a Plumbing Discovery Tour The plumbing system in your home includes a series of emergency shut-off valves. Take a tour of your home to find each of these shut-off valves. The items you should take on your tour include a flashlight, adjustable wrench, pliers and some way to label each valve once identified. Main Shut-Off Valves First and foremost, find the main water shut-off valve to your home. Usually, this valve is located in the basement on the pipe coming through the wall on the street side of your house (near the water meter). Also, make sure that the area where...
Open the catalog to page 3
Kitchen Sink Shut-Off Valve Kitchen Sink Shut-Off Valves Below your kitchen sink, you will probably find the shut-off valves for both hot and cold water. In some cases, the valves will be in the basement, just below the kitchen. Sometimes valves may be both below the sink and in the basement. Once you find the valves, open and close them to make sure they are functioning properly. It is important to check these valves often, as they may become “frozen” from lack of use. Usually a wrench applied to the control handle will free up the valve. However, this must be done very carefully to avoid breaking...
Open the catalog to page 4
Basic Maintenance Tips Before replacing the cartridge The Anatomy of Your Faucet Your faucet is equipped with one of Moen’s durable cartridges, which are unequalled in quality and reliability. Since faucet cartridges come in several styles, it is best to take your old cartridge along when shopping for a replacement. Moen recommends using a genuine Moen replacement cartridge so that you will not void the faucet warranty. Though a well-made faucet should last for many years, you may occasionally need to make some simple faucet adjustments. Leaky faucets or hard-to-move knobs are easy to fix by...
Open the catalog to page 5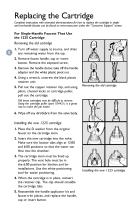
Replacing the Cartridge Complete instructions with animated demonstrations for how to replace the cartridge in singleand two-handle faucets can be found on www.moen.com under the “Consumer Support” screen. For Single-Handle Faucets That Use the 1225 Cartridge 1. Turn off water supply at source, and drain any remaining water from the tap. 2. Remove faucet handle, cap or insert b utton. Remove the exposed screw. 3. Remove the handle dome; take off the handle adaptor and the white plastic pivot nut. 4. Using a wrench, unscrew the black lastic p retainer unit. 5. Pull out the copper retainer...
Open the catalog to page 6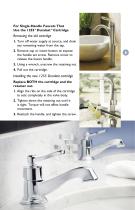
For Single-Handle Faucets That Use the 1255™ Duralast™ Cartridge Removing the old cartridge 1. urn off water supply at source, and drain T any remaining water from the tap. 2. emove cap or insert button to expose R the handle set screw. Remove screw to release the faucet handle. 3. Using a wrench, unscrew the retaining nut. 4. Pull out the cartridge. Installing the new 1255 Duralast cartridge Replace BOTH the cartridge and the retainer nut. 1. lign the ribs on the side of the cartridge A to seat completely in the valve body. 2. ighten down the retaining nut until it T is tight. Torque will not...
Open the catalog to page 7
Replacing the Cartridge Complete instructions with animated demonstrations for how to replace the cartridge in singleand two-handle faucets can be found on www.moen.com under the “Consumer Support” screen. 1. The flat part of the D-shaped top must line up with the cartridge tab. The outlet port aligns to face the 2. Remove the handle and any other spout, and the cartridge tab is on c overings on the valve body. the opposite side, away from the 3. To remove the cartridge from a widespread spout. assembly, hold the handle steady while 2. The tab is in the 9:00 position for you unscrew the handle...
Open the catalog to page 8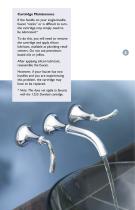
Cartridge Maintenance If the handle on your single-handle faucet “sticks” or is difficult to turn, the cartridge may simply need to be lubricated.* To do this, you will need to remove the cartridge and apply silicon l ubricant, available at plumbing retail centers. Do not use petroleumbased oils or jellies. After applying silicon lubricant, reassemble the faucet. However, if your faucet has two handles and you are experiencing this problem, the artridge may c have to be replaced. * ote: This does not apply to faucets N with the 1255 Duralast cartridge.
Open the catalog to page 9
Basic Care and Cleaning Keeping your Moen® products looking like new Moen LifeShine® Faucet Finishes In order to maintain any Moen faucet, Moen suggests the following: If you have the LifeShine® finish on your new faucet, you have Moen’s guarantee that your finish will not t arnish, corrode or discolor. The LifeShine® finishes include Polished Brass, Stainless, Brushed Bronze, Classic Stainless and Brushed Nickel. • Use a soft, damp cloth to clean the faucet, and use only warm water or glass cleaner to remove dry water spots. • Never use cleaners that contain abrasives or harsh chemicals...
Open the catalog to page 10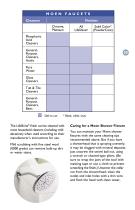
MOEN FAUCETS Cleaners Finishes Chrome, Platinum Solid Color* (PowderCoat) Phosphoric Acid Cleaners GeneralPurpose Cleaners, Acidic Pure Water Glass Cleaners Tub & Tile Cleaners GeneralPurpose Cleaners, Basic Safe to use * Black, white, ivory The LifeShine® finish can be cleaned with most household cleaners (including mild abrasives) when used according to their manufacturer’s instructions for use. Mild scrubbing with fine steel wool (0000 grade) can remove built-up dirt or water stains. Caring for a Moen Shower Fixture You can maintain your Moen shower f ixtures with the same cleaning tips recommended...
Open the catalog to page 11All Moen catalogs and technical brochures
 Shower Brochure
11 Pages
 Kitchen Inspirations
8 Pages
 Order Moen Highlights
24 Pages

Archived catalogs
 HOME CARE
17 Pages
 Kitchen & Bath Collections 2009
116 Pages
 Kitchen & Bath Products 2009
48 Pages
 Moen® Vertical Spa DESIGN GUIDE
28 Pages
 Every drop matters
16 Pages
 The Easy Indulgence
14 Pages
 Rothbury_Bath_Suite
6 Pages
 2006 Sink Collection
16 Pages
 New Products 2007
20 Pages
 2007 Full Line Catalogue
340 Pages
 2007 Kitchen and Bath Collections
104 Pages


- Mixer faucet
- Indoor mixer tap
- Bathroom single-handle faucet
- Metal mixer tap
- 1-hole single-handle faucet
- Washbasin tap
- Countertop single-handle mixer tap
- Lavatory mixer tap
- 2-hole tap
- 2-hole mixer tap
- Stainless steel mixer tap
- Kitchen mixer tap
- 3-hole tap
- Contemporary kitchen sink
- Mixer tap with pull-out spray
- Industrial soap dispenser
- Commercial soap dispenser
- Industrial towel rail