
- Catalogs
- MATTERHORN METAL ROOFING
- MATTERHORN ® Standing Seam


- Products
- Catalogs
- News & Trends
- Exhibitions
MATTERHORN ® Standing Seam

MATTERHORN ® Standing Seam
- 6” End Wall H: Used on roof transitions and end walls, 10ft long, 5 pieces per carton.
- W-Valley I: Used in roof valleys, 10.88” legs, 10ft long, 50 pieces per crate.
- 4” Valley Cleat - Black J: Used in valleys, 1” locking mechanism, 5 pieces per carton.
- 1.5” Z-Closure Solid - Black K: Holds ridge cap, hip cap, sidewall, and rake edge parts, 10ft long, 10 pieces per carton.
- 10-16X1 1/4” Roofing Screw (Mill): Zinc-coated, 1,000 screws per carton.
- 10-16X1 1/4” Roofing Screw (Painted): Painted zinc-coated, 1,000 screws per carton.
- Paint Pen: Sold individually.
- 10 - 12x2” Roofing Screws: 2” mill screws, 1,000 screws per box.
Catalog excerpts
Installation Guide MATTERHORN® Standing Seam MATTERHORN METAL ROOFING TO LAST A LIFETIME
Open the catalog to page 1
System Components Placement A. Standing Seam Panel B. Valley Cleat/Sidewall Counter Flashing H. T-Style Drip Edge (most available through roofing distributors): • Screw types: • 1¼” no. 10 zinc-coated panhead (for installing panels) 1¼” no. 10 zinc-coated painted hex-head (for all exposed areas) • Caulk -- Butyl or urethane caulk/sealant • Tape – Butyl tape on a roll • Boots – Flexible base or “witch’s hat” style • torage - Metal building products should be stored in S a dry well ventilated space. Never cover materials with non-breathing or plastic tarps. This may cause condensation which will...
Open the catalog to page 2
General Installation Guidelines General Installation Guidelines • Installing Matterhorn® Standing Seam roofing on top of existing shingles is not recommended. Matterhorn® Metal Roofing must be installed on a minimum ½” CDX plywood roof deck. Synthetic, temperature-resistant underlayment must be installed prior to the installation of metal roofing products—or refer to local building code. To achieve a Class A fire safety rating, install a ½” Dens Deck. Prior to installing the underlayment, clear the roof deck of any debris or protrusions that could puncture the protective membrane. Installing...
Open the catalog to page 3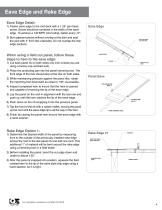
Eave Edge and Rake Edge Eave Edge Detail: 1) asten eave edge to the roof deck with a 1.25” pan head F screw. Screw should be centered in the width of the eave edge. To achieve a 130 MPH wind rating, fasten every 12”. EAVE EDGE DETAIL Eave Edge 2) utt adjacent pieces without overlap at the joint and seal B the joint with 4” from the underside. Do not overlap the drip edge sections. When using a field cut panel, follow these steps to hem to the eave edge: SNAP LOCK PANEL WITH OPEN HEM FIELD HEMMED PANEL END FASTENER 1) Cut back panel rib on both sides one inch (unless you are using a factory pre-notched...
Open the catalog to page 4
Rake Edge and Z-Closure RAKE EDGE DETAIL - OPTION 2 Rake Edge Option 2: An alternative to bending the panel in the field is to cut the panel to width-from the last panel rib to the outside of the roof edge. Install a “Z” Closure on the top of the panel and screw down into the deck. The hem of the outer gable will hook onto the lip of the “Z” Closure and fastened into the fascia as needed given weather conditions. Butyl tape or tube sealant is needed between the panel and the “Z” Closure. To achieve a 130 MPH wind rating, fasten the rake trim every 12” with the panhead screws. STANDING SEAM OUTER...
Open the catalog to page 5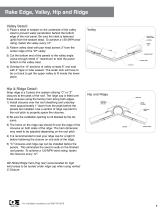
Rake Edge, Valley, Hip and Ridge Valley Detail: 1) Place a bead of sealant on the underside of the valley cleat to prevent water penetration behind the bottom edge of the roof panel. Be sure the cleat is fastened uphill from the sealant bead. To achieve a 130 MPH wind rating, fasten the valley every 12”. Valley SNAP LOCK PANEL W/HEM FASTENER VALLEY CLEAT 2) asten valley cleat with pan head screws 3” from the F center ridge of the “W” valley. 3) ut the bottom end of the panels to the valley angle. C Leave enough metal (1” maximum) to hem the panel bottom to the valley cleat. SEALANT BEAD 4) verlap...
Open the catalog to page 6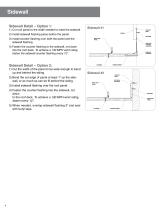
Sidewall RAKE WALL TRANSITION - OPTION 3 Sidewall Detail – Option 1: 1) Cut roof panel to the width needed to meet the sidewall. SEALANT BEAD 2) nstall sidewall flashing piece before the panel. I 3) nstall counter flashing over both the panel and the I sidewall flashing. SIDING FASTENER SNAP LOCK PANEL SIDE WALL COUNTER FLASHING 4) asten the counter flashing to the sidewall, not down F into the roof deck. To achieve a 130 MPH wind rating, fasten the sidewall counter flashing every 12”. SIDEWALL FLASHING RAKE WALL TRANSITION - OPTION 2 Sidewall Detail – Option 2: 1) ut the width of the panel to...
Open the catalog to page 7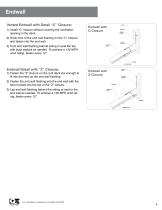
Endwall END WALL TRANSITION - OPTION 1 Vented Endwall with Detail “C” Closure: 1) nstall “C” closure without covering the ventilation I opening in the deck. Endwall with C-Closure FASTENER ENDWAL FLASHING 2) ook hem of the end wall flashing on the “C” closure H and fasten into the end wall. VENTED C-CLOSURE 3) uck end wall flashing behind siding or seal the top T with butyl sealant as needed. To achieve a 130 MPH wind rating, fasten every 12”. SNAP LOCK PANEL FASTENER UNDERLAYMENT END WALL TRANSITION - OPTION 3 Endwall Detail with “Z” Closure: 1) asten the “Z” closure on the roof deck low enough...
Open the catalog to page 8
Transition Detail TRANSITION FLASHING Transition Detail: 1) nstall the “C” Closure against the transition, with the I opening of the closure facing down the roof. Transition Detail SNAP LOCK PANEL WITH OPEN HEM To achieve a 130 MPH wind rating: 2) Install transition trim with the bottom hem over the edge of the “C” CLosure, fastening to the upper section of the roof deck. 3) Install upper course first over top of the transition trim. 4) hen install the lower course under the transition trim, T pushing all the way to the back of the “C” Closure before fastening. TRANSITION TRIM VALLEY CLEAT
Open the catalog to page 9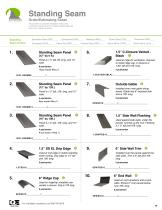
Standing Seam Order/Estimating Sheet All quantities to complete installation need to be verified by contractor and or Installer Quality Edge will only honor ordered amounts. Standing Seam Colors Burnished Slate (BST)____ Evergreen (EVG)____ Standing Seam Panel Stone Gate (STG)____ Stone White (STW)____ Used at ridge for ventilation; required to install ridge cap. C-Closure is 1.63” tall and 10ft. long. Standing Seam Panel Outside Gable 1.5” Side Wall Flashing Used at roof edge to match standing seam roofing. Drip edge is 1.5” tall and 10ft. long. 6” Side Wall Trim Installed over the panels...
Open the catalog to page 10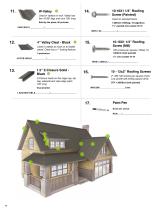
Used in valleys on roof. Valley has two 10.88” legs and runs 10ft. long. 10-16X1 1/4” Roofing Screw (Painted) Used on exposed faces. Sold by the piece, 50 pc/crate 24WVSS10 4” Valley Cleat - Black Used in valleys to hook on to folded panel. Cleat has a 1” locking feature. 10-16X1 1/4” Roofing Screw (Mill) 100 screws per square (100sq. ft.) 1,000/ctn (bulk packed) 1.5” Z-Closure Solid Black K Z-Closure holds on the ridge cap, hip cap, sidewall and rake edge parts. 10ft. long 2”. Mill 100 screws per square of job. Low profile self drilling square drive. QTY 1,000/Box (bulk packed) MRS2M/___________________Ctns...
Open the catalog to page 11All MATTERHORN METAL ROOFING catalogs and technical brochures
 Brochure
21 Pages