


- Products
- Catalogs
- News & Trends
- Exhibitions
CLAY PLAIN TILES FIXING GUIDE

CLAY PLAIN TILES FIXING GUIDE
This document provides comprehensive guidelines for the installation and fixing of roof tiles, focusing on components such as eaves, verges, hips, valleys, and ridges. It highlights the importance of proper alignment and fixing techniques to ensure both durability and aesthetic appeal.
Proper setting out of the roof is crucial to avoid unequal overhangs and reduce labor costs. The position of top and bottom battens must be calculated on-site, with the eaves batten extending over the fascia board by at least 50mm. Additional eaves tile battens should be positioned below the first full plain tile batten, and the batten gauge must be accurately calculated.
Horizontal and perpendicular alignment is essential for achieving a true line. Techniques include striking chalk lines and using gauge rods. Key checkpoints include not exceeding the maximum gauge for tiles and ensuring proper overhangs.
Eaves require a double course throughout their length, with tiles nailed twice. The eaves course should overhang the fascia board to discharge water into the gutter. Specific fascia heights are recommended based on roof pitch.
Verges can use a plain tile undercloak or a fibre cement strip. Tiles should be laid broken-bond with full tiles and tile-and-a-half in alternate courses. Mortared verges should have an overhang of 38 to 50mm.
Hip tiles are not suitable for intersecting roof slopes with different pitches. Specific bedding and fixing techniques are required for third round and bonnet hip tiles. Close-fitting arris hip and purpose-made hip tiles should be fixed with nails and mortar.
Valley tiles are used for intersecting roof slopes, with specific guidelines for metal and open construction valleys. Minimum widths for valley gutters are provided based on roof pitch and plan areas.
Ridges should be covered with tiles that complement or contrast with the main roof tiles. Mechanical fixing is recommended to meet BS 5534 standards. Specific instructions are provided for duo-pitch ridges, clay plain tile ridges, and mono-ridges.
- Ensure all tiles are properly nailed and aligned.
- Avoid cutting tiles unnecessarily and ensure proper overhangs.
- Use mechanical fixing for ridges and hips to enhance stability.
- Follow specific guidelines for different roof components to ensure compliance with standards.
General Fixing: Vertical tiling is a traditional method used in the southeast of England, often applied to timber-framed constructions or single leaf masonry walls. It involves decorative pattern tiles for aesthetic and weatherproof cladding.
Universal Eaves Vent System: Designed to provide continuous ventilation to roof voids, suitable for roof pitches from 12.5° to 55°. Components include continuous rafter roll packs and gutter spacers.
1. Clay plain tile right and left hand cloak verge.
2. Universal 6m HipFast system.
3. Universal Dry Valley System.
4. Universal RidgeFast System.
1. Set out tiling to fit flush with brickwork or bargeboard, allowing a maximum 50mm overhang if necessary.
2. Begin with an under eaves course using standard or cut cloak verge tiles.
3. Nail eaves cloak verge tiles with specified nails.
4. Use normal plain tiles in alternate courses to break bond.
5. Complete verge with cloak verge and plain tiles, trimming as needed.
6. Finish with a Stop End Ridge Tile at the apex.
1. Lay roof underlay and battens, leaving a gap for ventilation.
2. Fix Hip Batten Brackets to the hip rafter.
3. Tile roof with an 80mm gap between raking cut tiles.
4. Secure tiling battens to Batten Brackets.
5. Roll out HipFast roll over hip rafter battens.
6. Use HipFast support trays for alignment.
7. Fit hip tiles, unions, and clamps, ensuring alignment.
1. Fit valley boards, either inset or continuous.
2. Lay roofing underlay over valley boards.
3. Fix dry valley trough by nailing outer welts.
4. Lay raking cut tiles to valley trough.
5. Use lead saddle for valley intersections.
1. Lay roof underlay and battens, leaving a gap at the apex.
2. Fix ridge batten brackets to rafters.
3. Secure ridge batten and lay top course tiles.
Catalog excerpts

y CLAY PLAIN TILES FIXING GUIDE Tell me more Call 01283 722588 Email [email protected] Or visit marley.co.uk Marley, Lichfield Road, Branston, Burton upon Trent, DE14 3HD A6 clay fixing guide cover v2.indd 1
Open the catalog to page 1
CONTENTS GENERAL ADVICE STORAGE & HANDLING CUTTING TILES FLASHINGS & WEATHERINGS UNIVERSAL UNDERLAYS VERTICAL TILING UNIVERSAL EAVES VENT SYSTEMS UNIVERSAL RIDGEFAST SYSTEM PLAIN TILE DRY VERGE PLAIN TILE CLOAK VERGE UNIVERSAL HIPFAST SYSTEM CLAY IN-LINE VENT TERMINAL SAMPLES Samples of clay and concrete interlocking and plain tiles are available on request. Call 01283 722588 or visit marley.co.uk/samples FIXING INSTRUCTIONS AND LITERATURE Comprehensive sitework, fixing and installation literature and videos: marley.co.uk/resources All current product and technical literature can be downloaded:...
Open the catalog to page 2
CLAY PLAIN TILES FIXING GUIDE Clay plain tiles are part of Marley’s ‘Roof System’. We offer more roofing elements from one supplier, more integration between components, more accountability and better, more durable roofs. This fixing guide gives comprehensive details on how to install Marley Clay plain tile roofing systems.
Open the catalog to page 3
5 STORAGE & HANDLING 6 LOADING OUT 8 UNDERLAYS 10 UNIVERSAL UNDERLAYS 12 BATTENS 14 JB-RED BATTENS 16 CUTTING TILES 18 FLASHINGS & WEATHERINGS
Open the catalog to page 4
STORAGE AND HANDLING Provision should be made for proper storage and handling of materials to avoid deterioration in quality and appearance, to avoid breakage or distortion, and to minimise wastage. GENERAL 1 Store roof underlays on end on a firm, clean base protected from direct sunlight and in accordance with manufacturers' instructions. 2 Store battens and counterbattens on sufficient bearers to prevent sagging or twisting. 3 Protect battens and counterbattens from water saturation when stored in bales or bundles horizontally. 4 Store roof accessories in a safe, weatherproof store/location....
Open the catalog to page 5
LOADING OUT GENERAL 1 Before tiling commences, check delivered products against initial order and report any discrepancies or defective materials to the site agent or manufacturer. 2 Pallet loads should be checked for batch codes to ensure consistency on large roof areas. 3 Special fittings should be checked against matching tiles to ensure suitability before tiling commences. LOADING THE ROOF WITH TILES OR SLATES y Load slates, tiles and fittings out on roof safely, support by battens to avoid slippage and distribute evenly to prevent overloading of roof structure (Figs. 1-2). y All slates and...
Open the catalog to page 6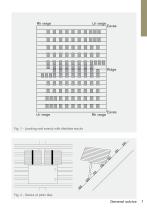
Fig. 1 – Loading roof evenly with tile/slate stacks Fig. 2 – Stacks of plain tiles General advice
Open the catalog to page 7
UNDERLAYS GENERAL Underlays for use beneath tiles and slates are either fully supported over boarding, sheathing or sarking, or unsupported draped over rafters/counterbattens and should meet the following: FULLY SUPPORTED UNDERLAYS 1 HR* underlay to BS EN 13859-1 Class W1 water penetration classification with third party certification for the use intended. 2 LR† underlay to BS EN 13859-1 Class W1 water penetration classification with third party certification for the use intended. UNSUPPORTED UNDERLAYS 1 BS 8747 Class 1F Reinforced Bitumen or Class 5U polyester reinforced bitumen. 2 HR* underlay...
Open the catalog to page 8
2 Minimise gap at laps resulting from different tautness between underlay courses. Drape in underlay between supports to be no less than 10mm and no greater than 15mm. 3 Fix underlay with fixings specified, keeping number of perforations to a minimum. 4 Handle and fix underlay with care to ensure no tears or punctures. Repair any tears or punctures prior to tiling. 5 Ensure that underlay does not obstruct flow of air through ventilators located at eaves, ridge or in main roof. 6 Weather appropriately all holes formed in underlays for soil vent pipes etc. 7 A nominal 10mm drape should be provided...
Open the catalog to page 9
UNIVERSAL UNDERLAYS Marley underlay can form part of our complete 'Roof System' and should be laid horizontally across the rafters, starting at the eaves. It should not be stretched taut over the rafters, but draped as shown, in order to allow for small temperature movements and to ensure a gap between the tile batten and underlay for drainage down to the gutter. Marley vapour permeable underlay must always be fixed with the PRINTED side facing outwards. Seal laps with integral tape. MINIMUM LAP Roof pitch 15-34° Over 35° ZONAL COMPLIANCE Summary of test results for wind uplift resistance of...
Open the catalog to page 10
General advice
Open the catalog to page 11
BATTENS CHOOSING BATTENS 1 Roofing battens must meet the recommendations stated in BS 5534 in terms of their species, permissible characteristics and defects (knots, fissures and splits, wane, slope of grain, rate of growth, distortion, decay and insect attack, sap stain, resin pockets and moisture content), including minimum dimensions and grading requirements. 2 To help meet these minimum standards, roofing battens delivered to site should be graded with the following information in accordance with the standard: a) Name of supplier (the company that graded the roofing battens NOT the company...
Open the catalog to page 12
CHOOSING COUNTER BATTENS 1 It is important to note that counter battens need not be marked or graded where they are fully supported by the rafters. In cases where they are used to restrain insulation boards and are subject to upward bending loads they should be graded. 2 However, if counter battens are used to provide a ventilation gap beneath the roof covering, there is a potential risk of high levels of moisture, and it may be advisable for them (and the roofing battens fixed above) to be preservative treated in order to provide the required durability. RECOMMENDED BATTEN SIZES (BS 5534) 1...
Open the catalog to page 13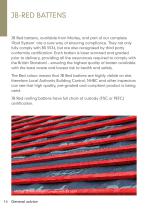
JB-RED BATTENS JB Red battens, available from Marley, and part of our complete ‘Roof System’ are a sure way of ensuring compliance. They not only fully comply with BS 5534, but are also recognised by third party conformity certification. Each batten is laser scanned and graded prior to delivery, providing all the assurances required to comply with the British Standard – ensuring the highest quality of batten available with the least waste and lowest risk to health and safety. The Red colour means that JB Red battens are highly visible on site, therefore Local Authority Building Control, NHBC...
Open the catalog to page 14All Marley catalogs and technical brochures
 TIMBER DECKING
11 Pages
 ASHDOWNE
2 Pages
 Marley SolarTile® Data sheet
2 Pages
 Marley SolarTile brochure
7 Pages
 Decking brochure
11 Pages
 Eden product brochure
13 Pages
 Eden fixing
4 Pages
 Roofing Accessories
33 Pages
 CLAY PLAIN TILES
76 Pages
 SHINGLES & SHAKES
28 Pages
 CLAY INTERLOCKING TILES
44 Pages
 THE MARLEY ROOF SYSTEM
11 Pages
 Fibre cement slates
26 Pages
 Natural Orange Acme double
2 Pages
 Lincoln Clay Pantiles
9 Pages
 Roofing Battens
12 Pages
 Agricultural Brochure
9 Pages
 Roofing product catalogue
41 Pages
 Total Roof Systems
16 Pages
 BS 5534 Grade Battens
4 Pages
 Yard Farm
4 Pages
 Lincoln
9 Pages
 YOU, and BS 5534
4 Pages
 Solo-Fix
1 Page
 Clay creasing tiles
2 Pages
 EQUITONE Brochure
40 Pages
 Canterbury brochure
12 Pages
 Roof System
16 Pages
 Fibre Cement Slates
36 Pages
 Clay Plain Tiles
72 Pages
 Ecologic
12 Pages
 Cedral Fixing guide
56 Pages
 Vertigo
40 Pages
 Edgemere interlocking slates
20 Pages
 Thrutone
2 Pages
 Universal
8 Pages
 Dry Fix and Ventilation Systems
44 Pages
 Solesia PV
8 Pages
 Edgemere Brochure
16 Pages
 Clay Plain Tiles
28 Pages
 Bluclad 20Brochure
4 Pages
 Cedral Weatherboard and Operal
20 Pages
 Facades Brochure
133 Pages
 A5 Guide
31 Pages
 Fibre Cement Slates Fixing Guide
20 Pages


Archived catalogs
 Roofing Accessories 2018
29 Pages
 equitone brochure
20 Pages
 Fibre Cement Slates
32 Pages
 Clay plain tiles
72 Pages


- Clay roof tile
- Industrial solar panel
- Building fastening system
- Metal fastening system
- Decking
- Flat roof tile
- Cement mortar
- Beam
- Large roof tile
- Red roof tile
- Beam with symmetrical section
- Masonry mortar
- Brown roof tile
- Commercial decking
- Smooth roof tile
- Interlocking roof tile
- Wood look decking
- Small roof tile
- Concrete roof tile