- Catalogs
- LOPEZ PIGUEIRAS
- DECKING INSTALLATION PROTOCOL
DECKING INSTALLATION PROTOCOL
1 /16Pages
DECKING INSTALLATION PROTOCOL
1 /16Pages
Catalog excerpts
RESPECT FOR THE ENVIRONMENT CHAIN OF CUSTODY We are a company that takes our future and that of the planet very seriously. That is why we work towards guaranteeing reforestation and environmental care, safeguarding the future of the forests and their wood. WE ADHERE TO THE CHAIN OF CUSTODY STANDARD in line with EUTR regulations. EUROPEAN REGULATIONS Our wood is purchased under the permits required by the official competent agencies in each country of origin and adhering to Due Diligence System of AEIM (Spanish Timber Trade Federation's), thus complying with the European Union Timber Regulation...
Open the catalog to page 2
LOPEZ PIGUEIRAS SOLID WOOD FLOORING Any type of installation must be performed with the corresponding personal protective equipment, using machinery bearing the EC mark, and following the manufacturers' instructions for use. The machinery must only be used by qualified, trained and authorised staff, following the relevant Occupational Risk Prevention protocols.
Open the catalog to page 3
I PREVIOUS CONSIDERATIONS OF DECKING 1.1 External conditions that affect the wood 1.3 Colour and dimensional alterations 2 PRE-INSTALLATION CONDITIONS 3.1 Formats and profiles for installation 3.3 Installation system with VISIBLE FASTENERS (HH) 3.4 Installation system with HIDDEN FASTENING (FO) 3.5 Installation system by SCREWING (S4S E4E) 3.6 Decking accesories for decoration 4 EXAMPLES OF INSTALLATION 4.1 Examples of poor installation 4.2 Examples of good installation 5 POST-INSTALLATION CONDITIONS
Open the catalog to page 4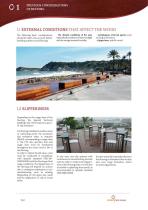
PREVIOUS CONSIDERATIONS OF DECKING 1.1 EXTERNAL CONDITIONS THAT AFFECT THE WOOD Depending on the usage class of the flooring, the Spanish Technical Building Code (CTE) requires a specific slip resistance. For flooring installed in outdoor areas or swimming pools, the maximum slip resistance value is required (Rd>45), corresponding to usage class 3. The CTE also specifies that said usage class must be maintained throughout the entire service life of the flooring. In order to obtain the Rd value, a test must be conducted in compliance with Spanish standard UNE-EN-V12633:2003 with the flooring in...
Open the catalog to page 5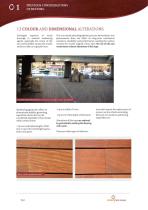
PREVIOUS CONSIDERATIONS OF DECKING Prolonged exposure of wood floorings to external weathering agents, especially the action of the sun and humidity, causes the wood's surface to take on a greyish tone. This is a natural photodegradation process. Nevertheless, this phenomenon does not affect its long-term mechanical resistance, durability and performance: sanding the surface restores the wood's original colour. Also, the use of oils and wood stains reduces alterations of this type. Weathering agents also affect its dimensional stability, generating superficial checks that can be considered repairable...
Open the catalog to page 6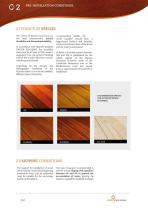
The choice of species must focus on two main characteristics: natural durability and dimensional stability. In accordance with Spanish standard UNE-EN 335-2:2007, the durability class must be at least 3 if the wood is separated from the ground (floating) and 4 if the wood is directly in contact with the ground (fixed). Depending on the climatic and hydrographic conditions of the location where it is to be be installed, different types of wood are recommended. Ideally, the wood installed should have a hygroscopic balance and humidity content in between those of the driest and the most humid season. In...
Open the catalog to page 7
INSTALLATION SYSTEMS 3.1 FORMATS AND PROFILES FOR INSTALLATION PROFILE TYPES PROFILE WITH VISIBLE FASTENERS (HH) • Female-female tongue-and-groove joint for installation with fasteners. • Head tongue-and-groove joint. PROFILE WITH HIDDEN FASTENING (FO) • Female-female tongue-and-groove joint with tab, for installation with fasteners. • This profile does not allow the re-tightening of the flooring one year after installation. * Seepost-installation recommendations (5.1). ■ Head tongue-and-groove joint. SCREWING PROFILE (S4S E4E) • Four-face planing. Four R6 bevelled edges. Two smooth sides. •...
Open the catalog to page 8
INSTALLATION SYSTEMS 3.2 BATTENING CONDITIONS • We recommend hard tropical wood. In accordance with Spanish standard UNE-EN 350-2, the durability of woods for battening must be greater than or equal to 4. • Their density must be greater than or equal to 650 kg/m3, which favours the fastening of any mechanical attachment. • Battens must have a cross section that is appropriate to the format (in terms of width and thickness) of the board that they will need to support. The minimum cross section of battens is 50 x 30 mm. - The maximum distance between batten axes for each type of flooring is 40...
Open the catalog to page 9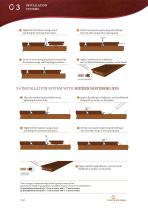
© Slightly lift the fastener using a hook and bring the next board into place. o Fit this new board in place by gently hitting it from the side using a 5mm spacing stop. G Screw in, overcoming the pressure exerted by the fastener wings, until reaching the batten. 0 Place the wooden board with the screw, tightening the latter fully. O Slightly lift the fastener using a hook and bring the next board into place. o Fit this new board in place by gently hitting it from the side using a 3 mm spacing stop. Q Apply a bead of rigid adhesive, such as Wurth Multikraft or similar, on the heads. * Due to...
Open the catalog to page 10
INSTALLATION SYSTEMS 3.5 INSTALLATION SYSTEM BY SCREWING (S4S E4E) o Fit this new board in place using a 5 mm spacing stop. 0 Pre-drill the board and the batten using a 4.5 mm drill bit 30 mm from the edges. 0 Apply a bead of rigid adhesive, such as Wurth Multikraft or similar, on the heads. 0 If screws need to be placed close to the end of the board, leave a minimum spacing of 2 cm. * Due to changes in ambient humidity and the hygroscopic nature of wood, movements that modify the spacing between installation boards are normal. You will typically see: (1) spacing between boards of+/- 3 mm in...
Open the catalog to page 11
3.6 DECKING ACCESORIES DESIGNED FOR DECORATION. Caps • Our standard for hidden fastening (FO) profile is tongue • Please query for delivery time in the case of groove profile. • All the nosings with a drop of 70 mm and over are made up of two pieces glued with Wurth Multicraft adhesive. Format 4 Outer Corner Format 1 Inner Corner Curves ■ Curves with a radius longer than 400 mm are manufactured. Please query price and delivery time. • All the curves are made up of two pieces glued with Wurth Multikraft Adhesive. Inner Corner Inner Corner
Open the catalog to page 12All LOPEZ PIGUEIRAS catalogs and technical brochures
 JATOBA
3 Pages
 IROKO
IROKO3 Pages
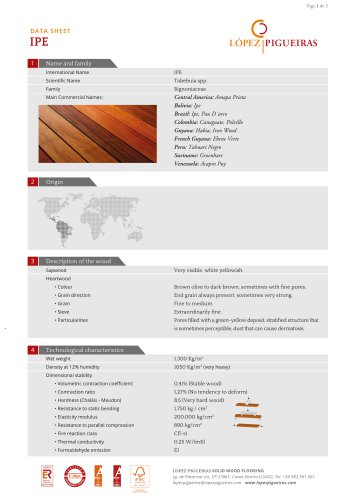 IPE
IPE3 Pages
 ELONDO
3 Pages
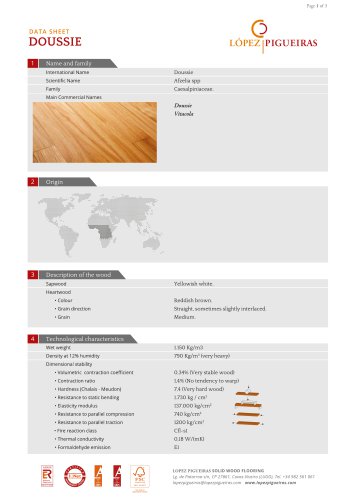 DOUSSIE
3 Pages
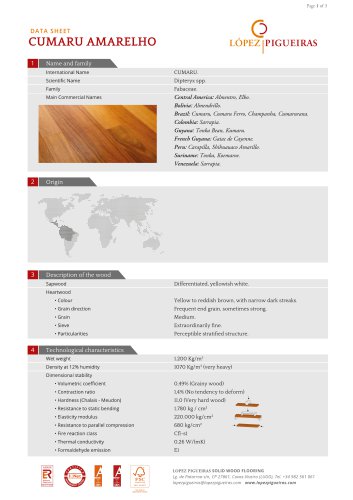 CUMARU
3 Pages
 Corporate Brochure
56 Pages
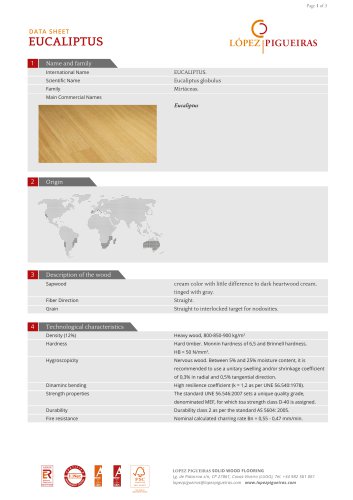 EUCALIPTUS
3 Pages
 MAPLE
MAPLE3 Pages
 CHERRY
3 Pages
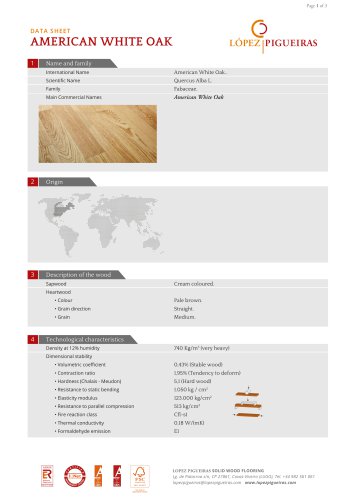 AMERICAN WHITE OAK
3 Pages
 AMERICAN BLACK WALNUT
3 Pages


- Industrial wood floor
- Glued parquet flooring
- Strip parquet floor
- Oiled parquet flooring
- FSC certified parquet flooring
- Solid parquet flooring
- Matte wood floor
- Nailed parquet floor
- Beam
- Beam with symmetrical section
- Stained parquet floor
- Wooden beam
- Hardwood parquet floor
- Semi-gloss parquet floor
- Maple parquet flooring
- Wooden step
- Solid wood beam
- Eucalyptus parquet floor