- Catalogs
- Leucos srl
- LAGUNA P60 Delta
LAGUNA P60 Delta
1 /2Pages

LAGUNA P60 Delta
1 /2Pages
Catalog excerpts
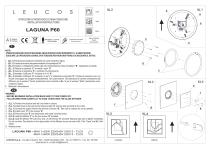
ISTRUZIONI DI MONTAGGIO E MANUTENZIONE INSTALLATION INSTRUCTIONS Montaggio 1 persona One installer Conservare le istruzioni Save instructions I NOTA: - PRIMA DI ESEGUIRE OGNI OPERAZIONE ASSICURARSI DI AVER DISINSERITO L' ALIMENTAZIONE. - ESEGUIRE LE OPERAZIONI CON MOLTA ATTENZIONE PER NON GRAFFIARE O SCHEGGIARE IL VETRO. (ILL. 1) Posizionare la struttura e orientarla così come mostrato in figura. (ILL. 1) Fissare la struttura alla parete mediante i fori predisposti “A”. (ILL.1) Eseguire i collegamenti elettrici alla rete di alimentazione nella morsettiera “B”, rispettando le polarità. (ILL. 2) Fissare la copertura “C” avvitando i perni “D”. (ILL. 2) Inserire le lampadine “E” e verificare il funzionamento. (ILL. 3) Installare il diffusore “F” avvitando le 4 viti “G”. (ILL. 4) Installare il diffusore “H” avvitando i 4 perni “J” utilizzando la chiavetta “K”. Prestare la massima cura: non forzare il serraggio ma stringere moderatamente. Non usare utensili. Fare attenzione al corretto orientamento del diffusore: per la versione “Canal” posizionarlo come mostrato in ILL. 5, per la versione “Delta” posizionarlo come mostrato in ILL.6. 8. Riattivare l’alimentazione. WARNING: - BEFORE BEGINNING INSTALLATION MAKE SURE TO TURN POWER OFF. - FOLLOW DIRECTIONS CAREFULLY TO AVOID SCRATCHING THE GLASS DIFFUSER. 1. 2. 3. 4. 5. 6. 7. (ILL. 1) Position the structure and set it as shown in picture. (ILL. 1) Install fixture to the wall by the holes provided “A” and the slots provided for the J-Box. (ILL. 1) Connect the supply wires to the terminal connector “B”. Take care to respect the correct polarity. (ILL. 2) Install cover “C” by the screws “D”. (ILL. 2) Place the bulbs “E” into lamphoders and make a working check. (ILL.3) Install the diffuser “F” by the four screws “G” provided. (ILL.4) Install the diffuser “H” by the four pins “J” with the key “K” provided. Warning: take care to tighten moderately. Do not use tools. Pay attention to the right position of the diffusers as you can see in ILL. 5 for “Canal” and ILL. 6 for “Delta”. 8. Restore power. LAGUNA P60 - MAX 1x22W 220/240V 2GX13 - TLC5 MAX 1x40W 220/240V 2GX13 - TLC5 LEUCOS S.p.A.- Via delle Industrie 16/b - 30030 SALZANO (VE) - Tel. 041 5859111 - Fax. 041 447598 www.leucos.it - e-mail [email protected]
Open the catalog to page 1
D VERMERK: - Vor Beginn jeder Handlung, sich versichern, dass die Stromversorgung unterbrochen ist. - Mit großer Sorgfalt vorgehen, um das Zerkratzen des Glases zu vermeiden. 1. (BILD. 1) Das Gestell legen und es so richten, wie im Bild gezeigt wird. 2. (BILD. 1) Das Gestell an die Wand durch die vorbereiteten Löcher “A” befestigen. 3. (BILD.1) Die elektrischen Verbindungen an die Stromzufuhr in das Klemmbrett “B” ausführen und die Polungen beachten. 4. (BILD. 2) Die Deckung “C” befestigen, indem man die Zapfen “D” benutzt. 5. (BILD. 2) Die Birnen “E” einstecken und den Betrieb prüfen. 6. (BILD....
Open the catalog to page 2All Leucos srl catalogs and technical brochures
 Leucos 2016
179 Pages
 idea timeless design
229 Pages
 LUXIT general catalog
157 Pages
 LOOP-LINE
2 Pages
 BOLERO L6
2 Pages
 MERCURE P-PL
3 Pages
 BLOCK P29
1 Page
 beamer 11s3
2 Pages
 shaker tr 1
2 Pages
 Leucos_Cat_MODO
95 Pages
 Leucos_Cat_STUDIO
229 Pages
 Leucos_Cat_IDEA
141 Pages
 BRICK P
2 Pages
 VITTORIA T1 / C
2 Pages
 ASPID P35
2 Pages
 MOAI
MOAI2 Pages
 KATERINA T40
2 Pages
 KOKO'
KOKO'1 Page
 LAGUNA P35 ´platino´
2 Pages
 LAGUNA P35
2 Pages
 ARO
ARO1 Page
 OREVENTI
1 Page
 general catalogue
388 Pages
Archived catalogs
 LEUCOS CATALOGUE 2010
14 Pages
 RECESSED 2007 (EN+IT+DE+ES+FR)
22 Pages
 Collection 2007 (EN + IT)
30 Pages