


2017.44.001.I.EN-Dia-Installatie-EN

2017.44.001.I.EN-Dia-Installatie-EN
Catalog excerpts
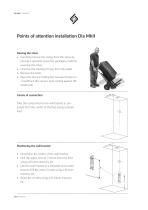
Points of attention installation Dia MkII Moving the stove • Carefully remove the casing from the stove by moving it upwards; leave the packaging material covering the stove. • Unscrew the transport brace from the pallet. • Remove the bolts. • Place the stove including the transport brace on a handtruck (the stove’s back resting against the handtruck). Centre of connection Take the centre line for the wall bracket as projected from the centre of the flue (using a plumb line). Positioning the wall bracket • Determine the centre of the wall bracket. • Drill the upper hole at 712mm from the floor...
Open the catalog to page 2
Mounting the wall bracket • Mount the wall bracket using the expansion-shell bolts. • Affix 2x flat tape on the vertical strips of the wall bracket. Hanging the stove • Place sliding pieces underneath the transport brace. • Push the stove against the wall bracket so that the oblong holes slide over the eyes. Be careful not to damage the floor. • Place the 2 cotters into the eyes with the opening towards the front. Removing the transport brace • Remove the 4 bolts from the transport brace using a socket-head wrench 6. • Remove both legs from the transportbrace. Levelling the stove 1 Use the 2...
Open the catalog to page 3
Use the 2 M8 socket-head bolts provided at the back of the wall support to level the stove “depthwise” (socket-head wrench 4). Tap the cotters into place. Fitting wall-support finishing cover • • Fit the finishing cover by sliding the projections into the slots. If the cover is not fixed properly, use the 2 M8 bolts from the transport brace to fix the cover. Take the casing out of the packaging material. Open the door of the stove. Carefully put the casing over the stove sliding it, without damaging the paint, until touching the stop. Installing duct material • Place the pipe on the turning ring...
Open the catalog to page 4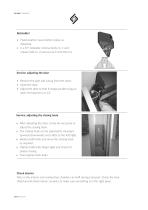
Rotatable? • Fixed position: leave bolts in place as delivered. • 2 x 45° rotatable: remove bolts no. 1 and release bolt no. 2 and secure it with the nut. Service: adjusting the door • • • Remove the pipe and casing from the stove. Open the door. Adjust the door so that it hangs parallel using an open-end spanner j.w. 10. Service: adjusting the closing hook • • • • • After adjusting the door, it may be necessary to adjust the closing hook. The closing hook can be adjusted by moving it upwards/downwards and a little to the left/right. Slacken both bolts and move the closing hook as required. Tighten...
Open the catalog to page 5
General instructions and regulations Installation To secure the warranty, the Dia MkII must be installed by a properly qualified person employed by a dealer recognized by Leenders. See leenders.nl for a current list of addresses of recognized dealers or contact the manufacturer. The stove is susceptible to scratching. Handle with care. After installation, check the draught by burning some kindling wood. Use • All local regulations including those referring to national and European standards must be observed when installing the appliance. • Ensure there is sufficient ventilation/air supply in...
Open the catalog to page 6All LEENDERS catalogs and technical brochures
 BOXER PLUS
6 Pages
 LOBBE COMPACT
6 Pages
 MATS
MATS6 Pages
 WALD
WALD8 Pages
 LOBBE
LOBBE6 Pages
 Catalog 2022-2023
31 Pages
 KILO
KILO6 Pages
 HYMME
HYMME6 Pages
 LYNNE
LYNNE5 Pages
 SORENNE
5 Pages
 PHAROS INTERIOR
5 Pages
Archived catalogs
 HARRIE LEENDERS
37 Pages
 Harrie Leenders catalogue 2015
76 Pages
 Leenders Catalogue
60 Pages


- Contemporary heating stove
- Metal heating stove
- Wood heating stove
- Black heating stove
- Free-standing heating stove
- Vented heating stove
- Steel heating stove
- Class A+ heating stove
- Gray heating stove
- Glass heating stove
- Garden hearth
- Heating stove with vertical outlet
- Class A heating stove
- Stone heating stove
- Metal fire pit
- Wood-burning fire pit
- 8 kW heating stove
- Round heating stove
- Wall-mounted heating stove
- Heating stove with thermal accumulation